WebP for Image Optimization
To get the most out of your fast WordPress hosting it is recommended to start offering WebP images. WebP is a type of encoding that compresses image files in order to help them load faster. Files will be up to 34% smaller once compressed and will download for the user more quickly, enhancing their experience. Images tend to be one of the largest additions to page weight so simply put, your WordPress site can perform better by offering WebP files.
NOTE: If you are using WP Engine’s Global Edge Security or advanced network, Cloudflare Polish is enabled by default. This means your site will use WebP images automatically, without any additional configuration steps.
There are two types of image compression that can occur with WebP:
- “Lossy” files will be smaller, but the quality will be reduced.
- “Lossless” files will maintain their quality but require a larger file size to do so.
WebP Support
Serving WebP is a two-part process; first the browser must be compatible and send the request for WebP images, then the site must be able to find and provide any WebP image files.
Supported Browsers
- Chrome
- Firefox
- Edge
- Opera
These are the most common browsers, but you can find a full list of currently supported browsers and versions here.
Unsupported Browsers
- Safari
- Internet Explorer
Supported file types:
- .jpg
- .jpeg
- .png
- .gif
Suggested WebP Configurations
Below are several options for using WebP on a WordPress website that we’ve tested with WP Engine services.
Advanced Network
WP Engine’s new advanced network automatically optimizes images on your website using Cloudflare Polish without the use of additional plugins or code. On top of automatic WebP conversion, the advanced network also includes many speed and security improvements. Best of all, WP Engine’s advanced network is completely free.
Learn more about the advanced network here.
Cloudflare Polish
Polish is a service offered by Cloudflare that will convert images to WebP on the fly. This is a paid service, and if you area already pointing DNS through Cloudflare, the feature simply needs to be toggled on in Cloudflare.
You can find information on enabling WebP Polish through Cloudflare here.
Polish can be enabled independently of WP Engine if you are using Cloudflare services.
If you are using WP Engine’s Global Edge Security or advanced network, Cloudflare Polish is enabled by default. This means your site will use WebP images automatically, without any additional configuration steps.
WebP Express Plugin
WebP Express is a great plugin option to support WebP on your WordPress website. In order to get the WebP Express plugin working correctly, use the following configuration settings within the plugin.
NOTE: If you are using WP Engine’s Global Edge Security or advanced network, Cloudflare Polish is enabled by default. This means your site will use WebP images automatically, without any additional configuration steps.
- Operation mode:
- Varied Image Responses
- General:
- Scope: All content
- Image types to convert: Both jpegs and pngs
- Destination folder: Mingled
- File extension: Append “.webp”
- Destination structure: Document root
- .htaccess rules for webp generation – Quality can be set here as desired.
- Enable redirection to converter? Must be enabled
- Convert on upload: Enabled
- Bulk Convert: Don’t click either option, as the NGINX rule that you will add below will create the webp equivalent when a person visits the site.
- Alter HTML?: Leave unchecked
Finally, reach out to WP Engine Support to add the following rule to your website’s Nginx configuration file. Support can also enable WebP support on your zone by request.
# WebP Express rules
# ——————–
location ~* ^/?wp-content/.*.(png|jpe?g)$ {
add_header Vary Accept;
expires 365d;
if ($http_accept !~* "webp"){
break;
}
try_files
/wp-content/webp-express/webp-images/doc-root/$uri.webp
$uri.webp
/wp-content/plugins/webp-express/wod/webp-on-demand.php?xsource=x$request_filename&wp-content=wp-content
;
}# Route requests for non-existing webps to the converter
location ~* ^/?wp-content/.*.(png|jpe?g).webp$ {
try_files
$uri
/wp-content/plugins/webp-express/wod/webp-realizer.php?xdestination=x$request_filename&wp-content=wp-content
;
}
# ——————- (WebP Express rules ends here)
Manual WebP Configuration
If you cannot use Cloudflare Polish or one of the suggested plugins, you can manually set up WebP using these steps.
NOTE: This method is not yet supported with WordPress Multisite.
1. Convert images to WebP.
As WebP is a type of encoding, you must also first encode (or convert) the image to WebP.
Conversion Methods
- Online Converter
- Precompiled Utilities via Google Developers
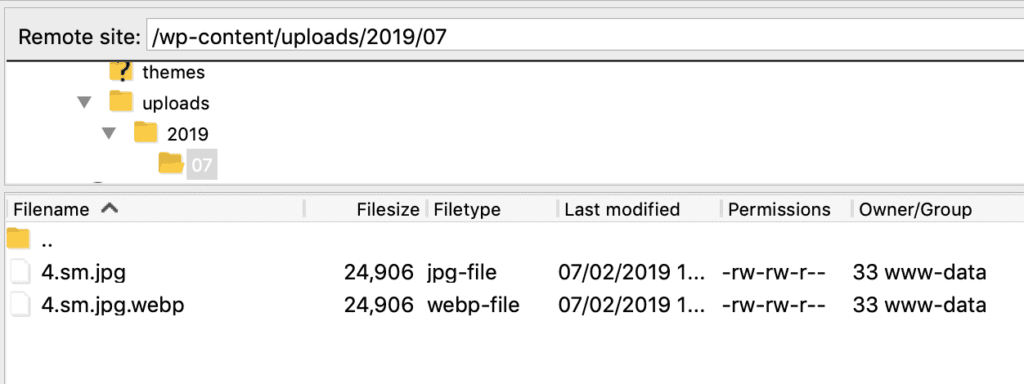
2. Upload two versions of each image to the same directory.
One file will end in the original file extension:
- .jpg
- .jpeg
- .png
- .gif
The second (converted) file will have the .wepb file extension added:
- .jpg.webp
- .jpeg.webp
- .png.webp
- .gif.webp

Example: If the original file is located at /wp-content/uploads/2019/06/image.jpg Then ensure your newly converted file is uploaded to the exact same location: /wp-content/uploads/2019/06/image.jpg.webp
NOTE: Directions for connecting with SFTP can be found here.
- Support will place a NGINX rule on your site.
- When WebP is requested, this rule checks for available files and serves them.
Test WebP
There are a couple of different ways to test if WebP is working.
- Test the site in a tool such as Google PageSpeed Insights which will reflect WebP image support.
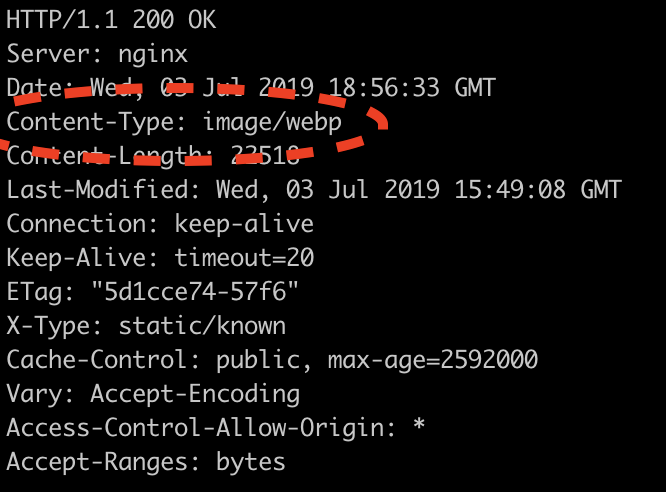
- You can also curl the file to test the headers, if you’re not seeing the extension added in the browser, like this:
curl -H "Accept: image/webp" -sIL "yourdomain.wpengine.com/wp-content/2019/07/myimage.jpg"
