Get Started

Key Takeaways
Transferable sites and environments allow developers to build websites without counting towards the total site limit on their WP Engine plan.
Transferable environments are automatically password-protected to block traffic and exempt from server cache.
Initiating environment transfer requires Owner or Full user permissions on the originating WP Engine plan.
Accepting a transferable site on a plan requires Full user access and entering a transfer code in the User Portal.
Learn how to use a transferable environment to transfer a website to a client’s plan within the WP Engine User Portal.
Transferable sites and environments allow developers to build a website without counting towards the total site limit on their WP Engine plan. Once completed, transferable sites and environments include an easy path to transfer them to another WP Engine plan. In this article, we will explain how to create a transferable site, how to transfer an environment to a client successfully, and how to unlock a transferable site without transferring.
Note
With our new transfer site process, the use of transferable sites is no longer necessary. You can now self-serve the transfer of any site. Transferrable sites still work but will be deprecated at some point in the future.
Read more about our new transfer site process.
What is “transferable”?
Every WP Engine plan has the ability to create essentially infinite transferable sites and environments at no additional charge.
Each transferable environment has traffic blocked through basic authentication (password protection), and cannot receive live production traffic. Therefore transferable sites do not count against the plan’s total site limit. Be aware however that other plan limits, like local disk storage, will continue to count towards the total plan usage.
To remove the transferable status, and convert a website into a regular, billable instance; a Site can be unlocked (remain on the current account) or an environment can be transferred (moved to another account).
- Only individual environments can be transferred (Production/Staging/Development).
- Only Sites can be unlocked, which will subsequently unlock all environments within it (Production/Staging/Development).
For a refresh on the difference between a “Site” and an “environment” review our guide here.
Transferable Sites can be identified by the arrow icon next to the name in the User Portal.
Note
If adding a new Site and it can only be created as transferable, the account has reached the Site limit. Delete extraneous Sites or upgrade the plan’s Site limit.
Transferable Specifications
Transferable sites differ from billable sites in a few ways:
- Transferable sites do not count against the plan’s site limit. Storage, visits, and all other metrics will still contribute to the plan’s limits.
- Transferable environments are transferable to any other WP Engine plan with sufficient space on their plan through an automated process.
- Transferable environments are automatically password-protected to block traffic. The password cannot be removed until the transfer or unlock is complete, however it can be changed.
- Transferable environments are automatically exempt from server cache due to password-protection.
- Transferable environments can have a custom domain added when the environment is set as Production (PRD) within the site.
- Transferable environments cannot have SSL added.
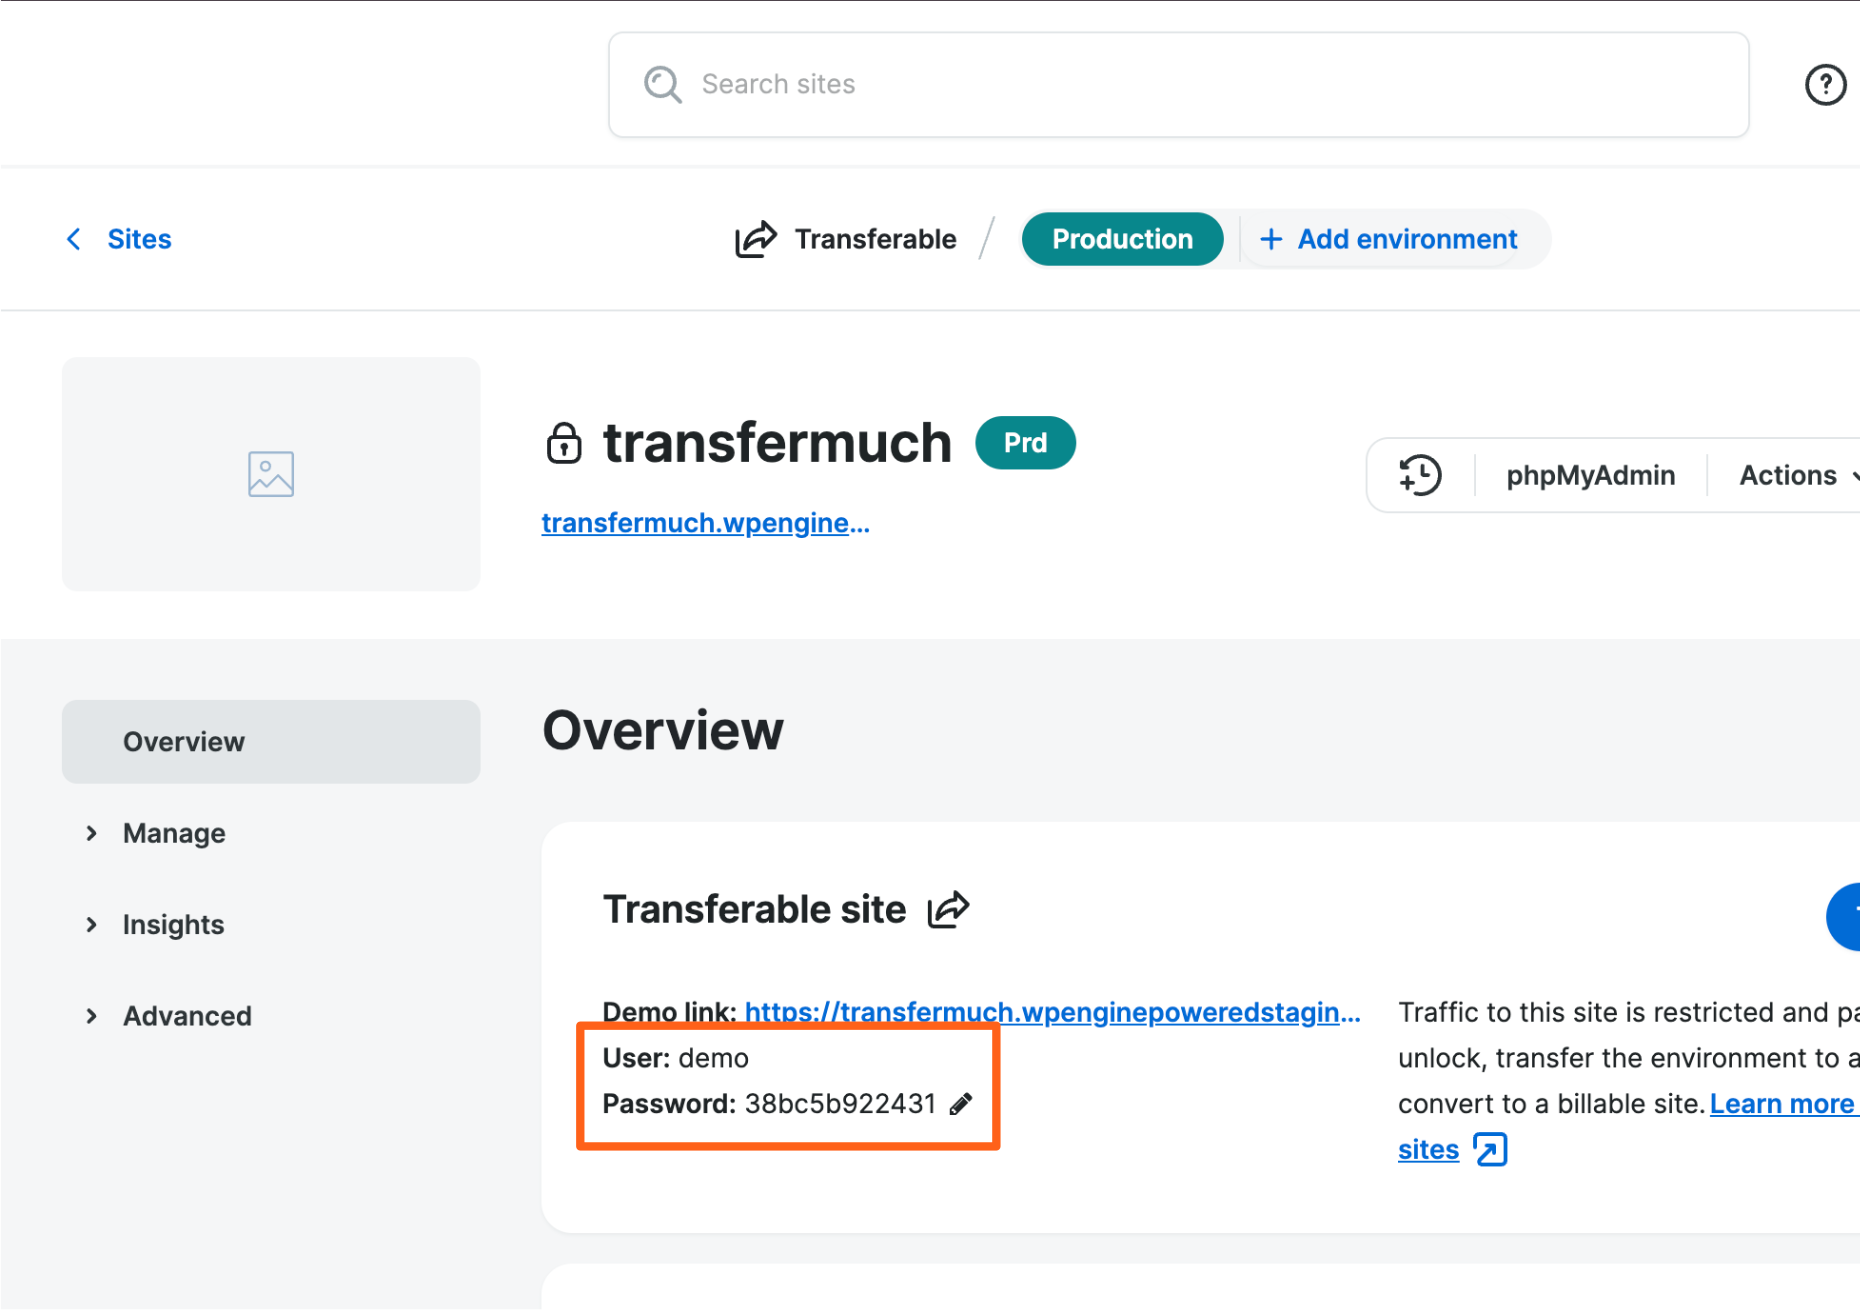
Transferable Password Protection
Transferable environments are password protected behind basic authentication. This additional login prevents the website from being taken live and receiving real traffic. Because the environment is not billable, the basic authentication login cannot be removed until the environment is transferred to another plan or unlocked on the current plan.
This password can be changed, however, in order to make logging in easier, or if the login has been shared for review and needs to be changed for security reasons. The user name will always be demo and cannot be changed.
Note
Do not change the password for a transferable environment until the environment has completed its initial set up.
To change the transferable password, click the pencil icon next to the password on the Overview page for the environment in the User Portal. The username cannot be changed.
Create Transferable Site
A “site” is the grouping of three environments (PRD, STG and DEV) and will need to be created before adding a transferable environment. Both the site “container” and the individual environments within it will be transferable.
To make a transferable site:
- From Sites page, click Add site
- Any of the following creation options will allow the site to be created as transferable:
- Build a new site
- Migrate a site
- Copy or move an environment
- On the next page, under “Site Owner” select Someone else will own it
- Click Next, and complete the other required creation details, such as entering a name.
- For more information in site creation options, see the full “Create Site” guide.
That’s it! An email will be sent once setup is complete and work can begin on the new transferable site.
The basic authentication credentials can be found any time on the Overview page for the environment in the User Portal.
Convert to Transferable
If you’ve already begun working on a non-transferable website and need to convert it to transferable later, use the following steps:
- From the Sites page, click Add site
- Choose Copy or move an environment
- On the next page, under “Site Owner” select Someone else will own it
- Select Copy an environment – This will duplicate the existing environment into the new transferable site.
- Select the source environment from the list
- Fill in the additional creation details, then click Add site.
This process will duplicate the environment onto a new one that is transferable. The original non-transferable site/environment can be deleted once this is complete, if necessary.
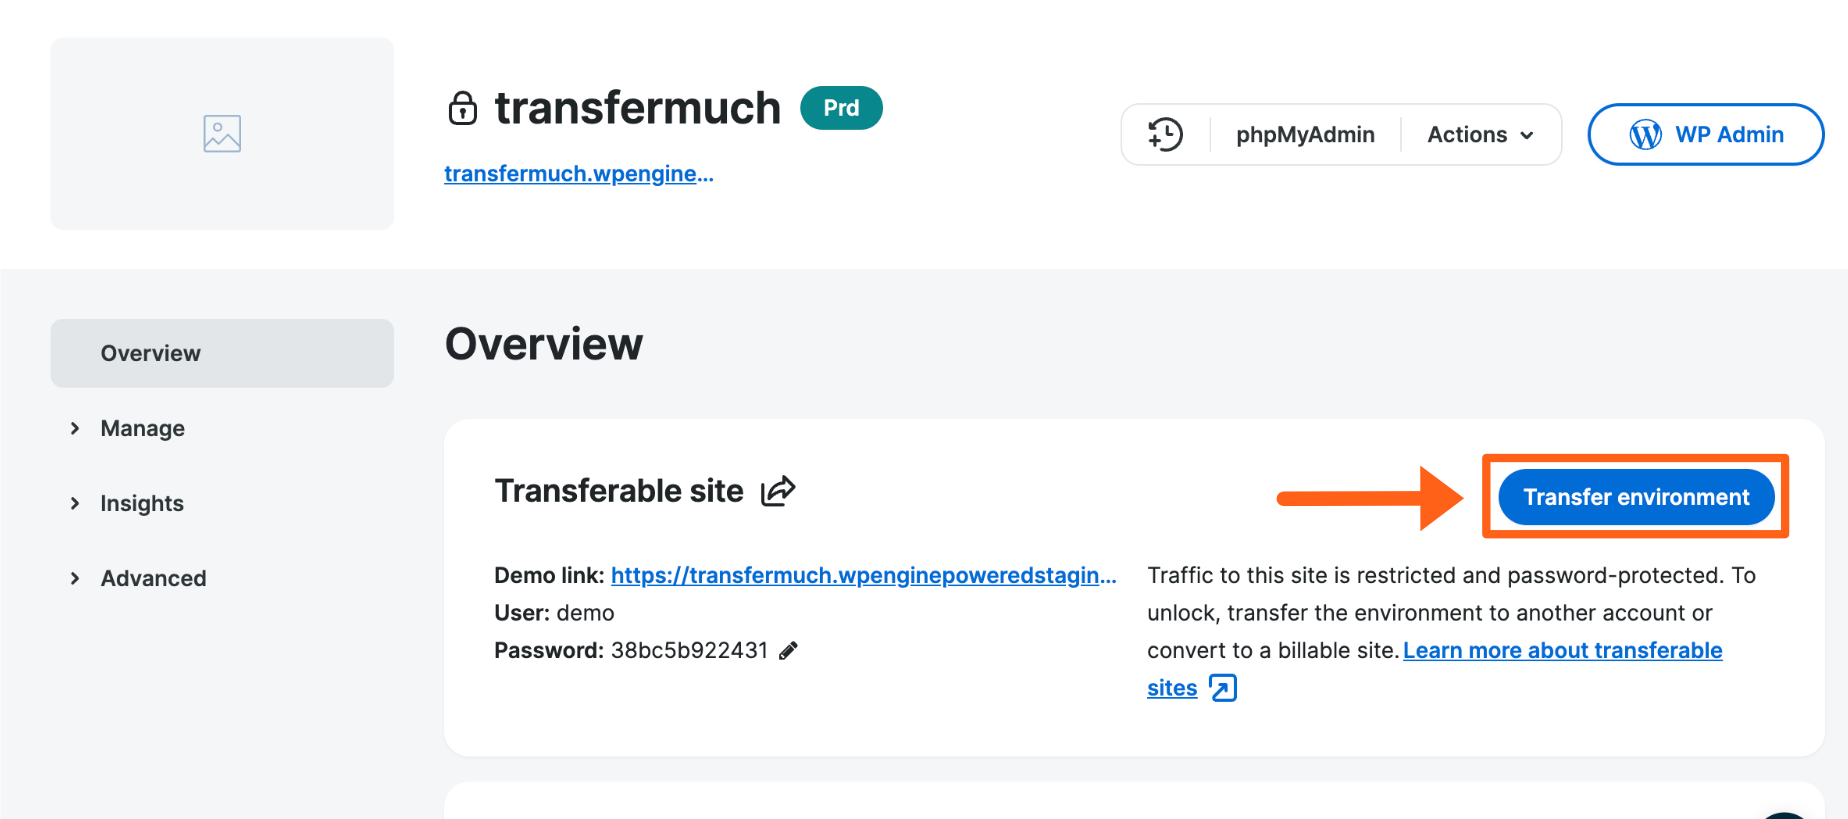
Transfer Environment
Use the following steps to transfer an environment to a client’s own WP Engine plan. Initiating a transfer requires Owner or Full (with billing) permissions on the originating WP Engine plan. Owner or Full user permissions are required to accept a transfer on the receiving plan.
Note
Only individual environments can be transferred to another plan. To make an entire site (including its environments) billable on the current plan, see the steps for unlocking a site instead.
Initiate Environment Transfer
Before beginning this process, ensure the recipient has their own WP Engine plan with available sites. If the recipient does not have available sites on their plan they will need to delete an existing site or upgrade to accept the transfer.
- From the Sites page, select the environment name
- Click Transfer environment
- Enter the client’s email in the field labelled Recipient Email
- (Optional) Enter a Note to the recipient
- For example, provide a link to this article or a contact phone number.
- Click Send Code
- This code will expire 30 days after being generated, for security purposes.
- The recipient will receive an email with instructions on how to accept the transfer, as well as the custom note. This email will look similar to the following example:
Note
The environment will not be removed from the plan until the recipient has entered the transfer code into their own WP Engine plan and completed the Accept Transfer process.
Accept Environment Transfer
The recipient of a transfer will need to enter a transfer code in the User Portal to complete the transfer process.
Accepting a transferable site on an plan requires Full (with or without Billing) level user access to that plan in the User Portal.
- Log in to the User Portal under the plan receiving the transfer
- From the Sites page, click Add Site

- On the following page, locate Accept a transfer of a site and select Get Started
- On the next page, Enter transfer code will display. Paste in the Transfer code from either the email or copied from the transfer initiation form.
- Click Next
- Follow the prompts to confirm the transfer, such as selecting the destination site and granting any users access.
Transfer Code
The transfer code is sent via email to the specified recipient when a transfer is initiated. It can be found at the top of the email, as shown in this example:
Alternatively, if a user has access to both the sending and receiving plan, the transfer code can be copied and pastes into the receiving plan via the User Portal. The transfer code in this case can be generated on the Transfer Environment form prior sending the transfer email.
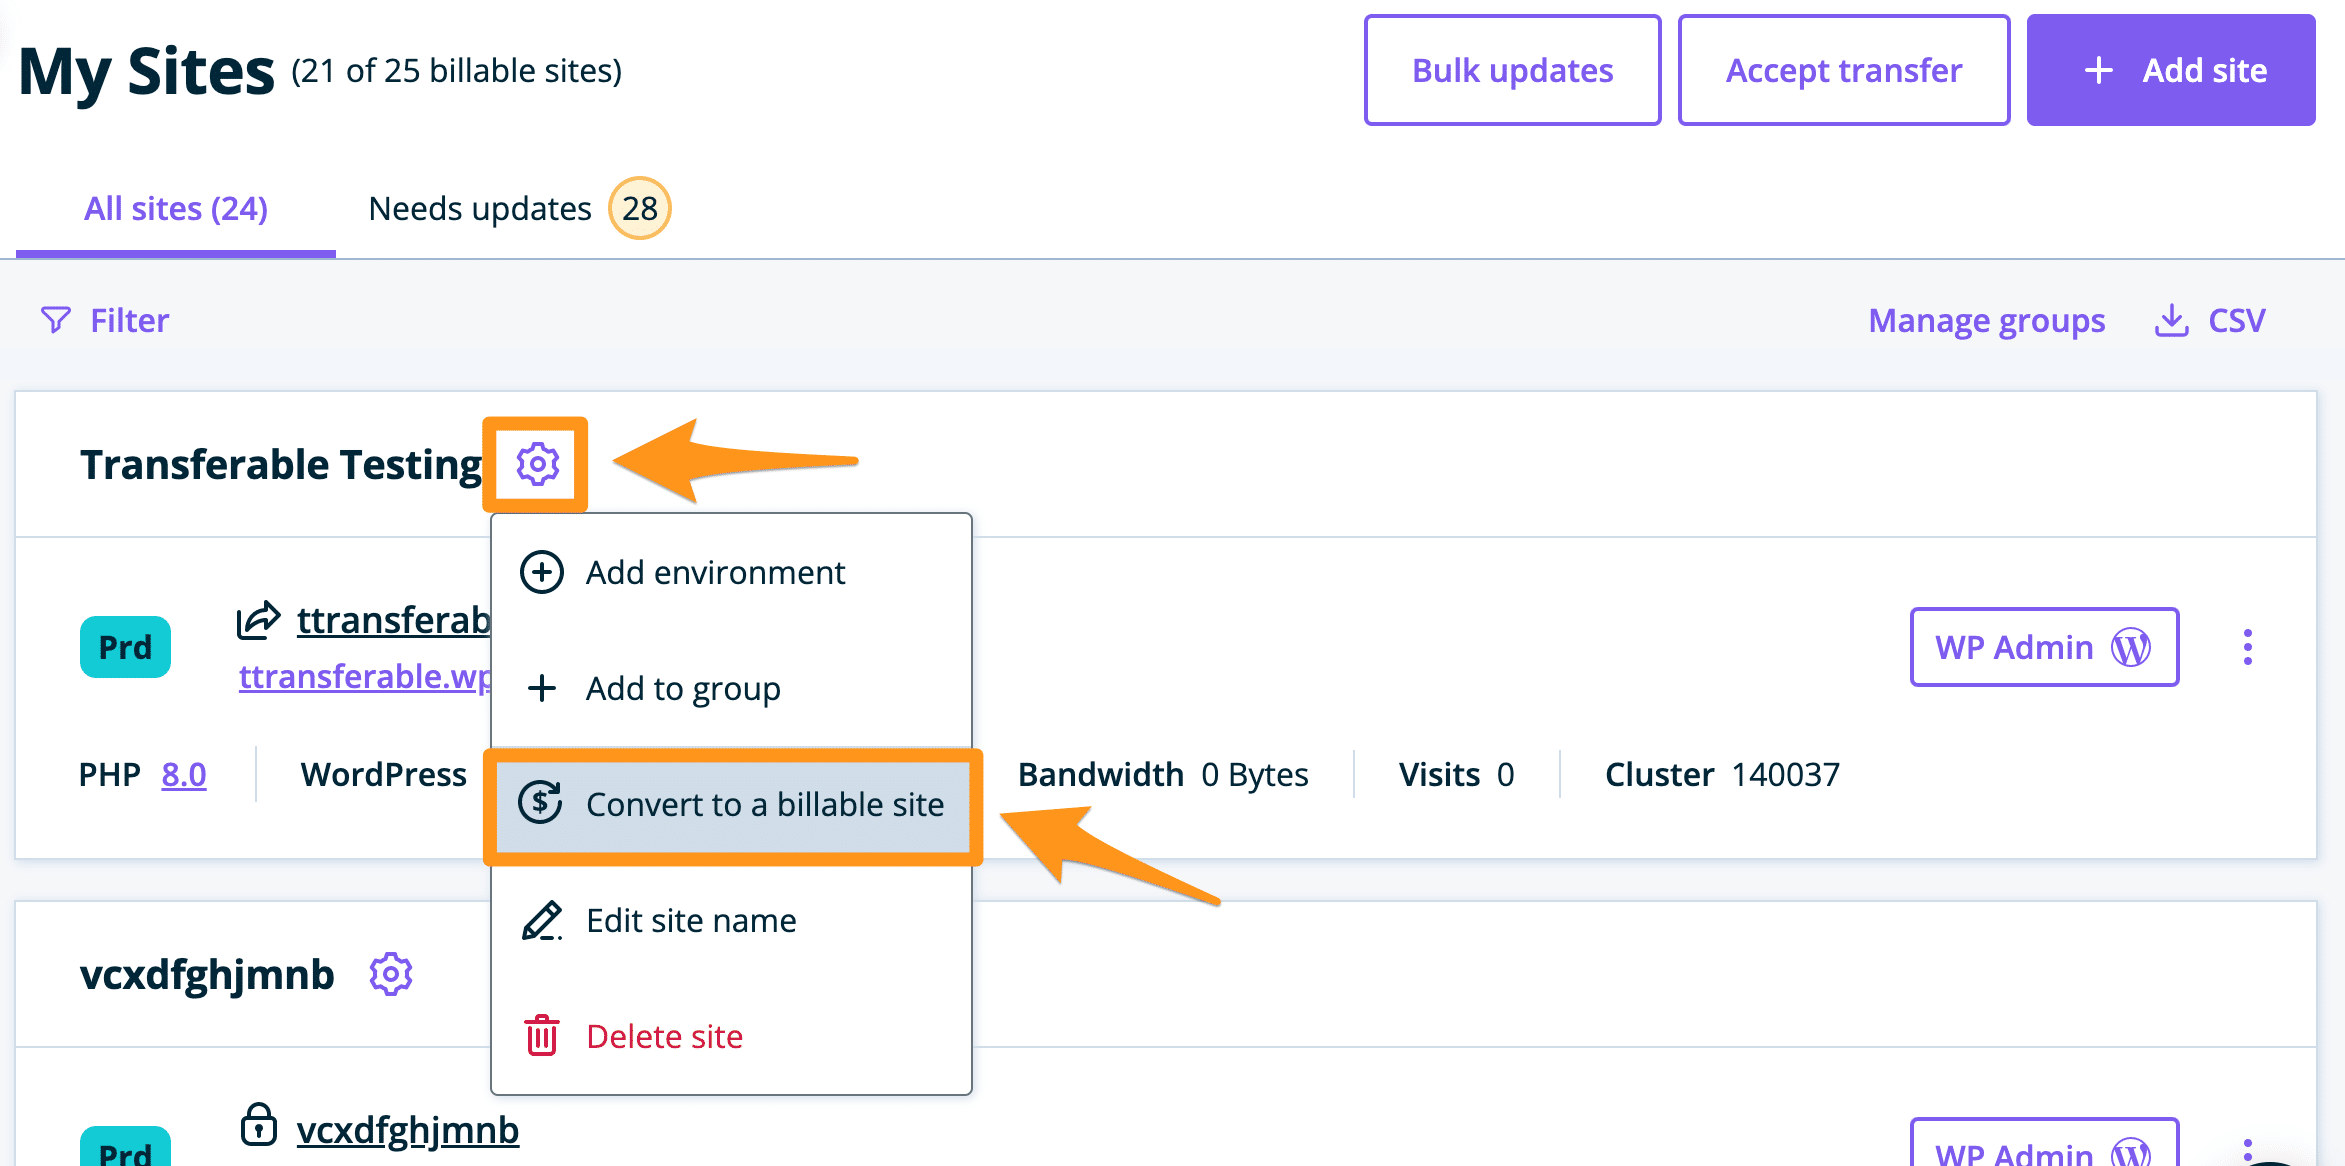
Unlock a Transferable Site
Unlocking a transferable Site will remove the transferable status, making it billable on the account. Unlocking a transferable Site is different than transferring a Site because unlocking will keep the site on the same, current hosting account. The entire Site will be unlocked, removing the transferable status of all environments within it.
A “billable” site is allowed to serve live traffic by removing basic authentication and grants the ability to add a domain, CDN, and SSL. Additionally, converting to a billable Site means it will count towards the plan’s total site limit.
- From the Sites page, locate the site name in the list
- Select the gear menu icon to the right
- Select Convert to billable site
- Click Convert in the pop up
Transfer to Another Account I Manage
If your WP Engine user account has access to multiple hosting accounts, transferable sites can now be transferred more easily between them. Your user must have Full with Billing or Owner level user access to both accounts in order to transfer a Site with this option.
This process will transfer the entire Site (including any Production, Staging, and Development environments) and unlock it on the destination account. Unlocking it means that it will no longer be a transferable site and will be a billable site on the new account which counts towards the plan limit. The auto password protection for the front end of the site which is always on for transferable sites will also not be required once it’s converted to a billable site.
Note
Any users who had access to the site on the source account but who do not have access to the destination account will lose access to the site. If they need access to the site, you will need to add them as a user on the destination account.
Any product extensions enabled on the site will need to be re-enabled once the transfer is complete.
The site will immediately be associated with the new account after the transfer is started but no actions can be taken on the site within the portal until the migration is complete.
In order to ensure that no changes are made to the site during the migration, we recommend that you place the site in Maintenance Mode.
To start a transfer:
- From the Sites page, click on the site name for a transferable site
- Click Transfer to another account I manage
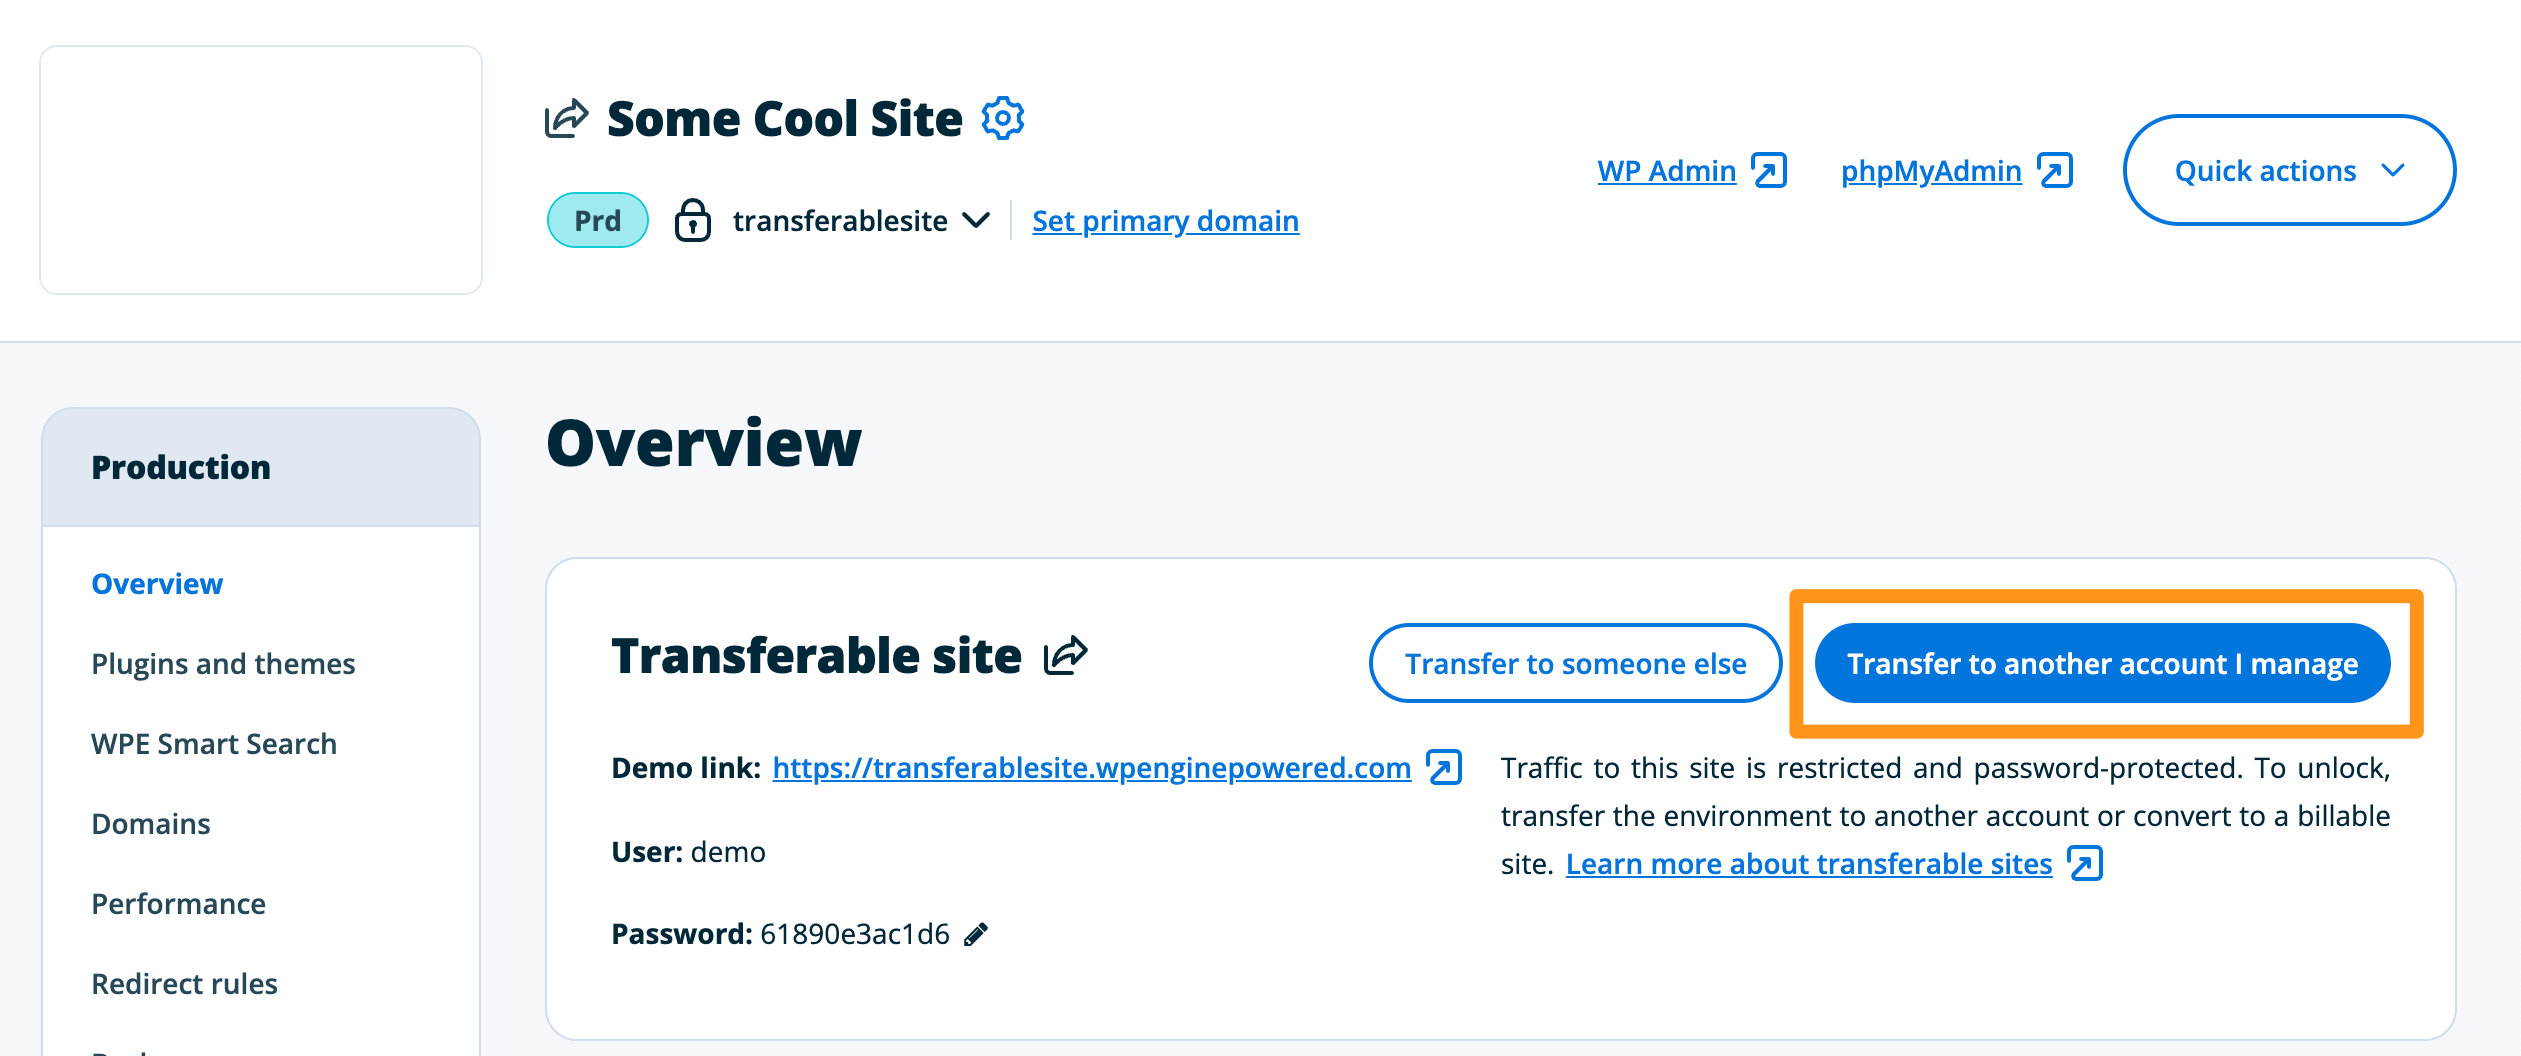
- Select the destination account name
- Click Transfer site
- Click Transfer site again in the “Are you sure…?” popup

No migration is needed when transferring Sites from one Shared account to another Shared account in the same data center region. Shared account plans include Startup, Professional, Growth, and Scale.
A migration may be necessary when the source and destination accounts are in different datacenter regions or if one of the accounts is a premium account with a dedicated server.
If a migration is necessary, you will see the “migration required” message shown in the image above, when selecting your destination account. By selecting “transfer site”, WP Engine will initiate the migration from the source account to the destination account.
You’ll see the below status screen when a migration is in progress.

Support Assisted Site Transfer
If you reach out to our support team to assist with transferring a site to another account, you can refer to it as a reparent request.
You can reach out to our support team for assistance in the following conditions:
- You cannot use the self-serve transfer site process, because you do not have Owner or Full (with billing) user-level permissions on both accounts.
- You cannot use the self-serve transferable site process because the site was not initially created as a transferable site.
- Your site is not a transferable site and you do not want to convert the site to transferable in order to use the transferable site process.
- You do not feel comfortable with any of the self-serve options and would like assistance.
Note
The site reparent process will change ownership of the site to another WP Engine account, and may require a migration to a new server as well as a DNS change.
Only Owner or Full (with billing) users may request a site reparent. When submitting a reparent request, Owner or Full (with billing) level user support PIN numbers are required for both accounts. If you know user PIN numbers for both accounts it will speed up the process. If you don’t know the PIN number for one of the accounts then our support team can reach out to the other owner through a ticket to get their PIN and confirm permission for the account reparent request.
NEXT STEP: Learn how to add Sites and Environments