Get Started
Single Sign-On (SSO) for WP Engine User Portal
- Updated date
- Updated Apr 2, 2026
Key Takeaways
SSO for WP Engine User Portal enables seamless login with corporate identity systems. Users can access the User Portal using their own identity provider like Active Directory or Google, enhancing security and user experience.
Limitations of SSO for WP Engine include no support for SFTP, SSH, or API credentials. Understanding these limitations is crucial for managing access and security effectively.
SSO setup requires DNS record validation and integration with identity apps. Owners must follow specific steps to configure SSO, ensuring a smooth and secure implementation.
Before configuring SSO, ensure access to DNS records and follow the setup guides for common identity providers. Proper preparation is key to successful SSO implementation and user authentication.
Reach out to WP Engine Support for SSO enablement and domain configuration assistance. Support can help with setting up SSO for multiple email domains and resolving any issues during the process.
The Single Sign-On (SSO) feature will allow customers to use their own identity provider (like Active Directory, Google, Okta, etc.) to authenticate and log in to WP Engine’s User Portal (my.wpengine.com). SSO will give you the ability to set up custom security rules for the User Portal based on your own internal processes and security practices.
About WP Engine SSO
WP Engine uses SAML 2.0 to provide SSO to corporate identity systems. When you log in to the WP Engine User Portal, you are first prompted for your email. Our systems then use this email to route authentication to your business’s identity system.
When you integrate through SAML, you can use the SAML app from your identity UI to push authentication from your company to WP Engine, so you are automatically logged in to WP Engine’s User Portal. Often this means you click a tile in your identity application to launch the WP Engine User Portal.
Once logged in to the User Portal, your users can additionally utilize WP Engine’s Seamless Login feature to access any WordPress® admin dashboards on your account that they have access to.1
Add a New User with SSO
To add a new user using SSO for WP Engine, ensure you’ve added the user to the WP Engine User Portal as well as to your SAML application.
The email address on WP Engine must match the email in your identity system, and should use the domain for which SSO was enabled.
As long as these two requirements are met, the user will automatically be prompted to log in with SSO at my.wpengine.com and can log in remotely from your identity app.
Limitations
- SSO for WP Engine only supports the login process for accessing the WP Engine User Portal. This feature does not support SFTP, SSH, or API credentials.
- At this time, we do not support SCIM, Just in Time (JIT) user provisioning, or group integrations.
- Only one identity provider may be configured per account. Multiple domain configurations may be tied to a single account, only in the case where there is one identity provider.
- We require email, first name, and last name attributes, and can optionally configure a mobile phone attribute to map through SAML. We do not map group attributes.
- If you have configured multi-factor authentication (MFA) for your WP Engine account you will no longer see that verification requested after SSO is enabled. If your identity provider requires MFA users will see verification prompts as dictated by your corporate identity provider when logging in.
- Only one email domain per account can have SSO configured. Multi-domain configurations are not supported. If you require this configuration, please reach out to Support.
Before Starting
SSO for the User Portal can only be configured by the owner of the account. To see if you have the self-serve option available:
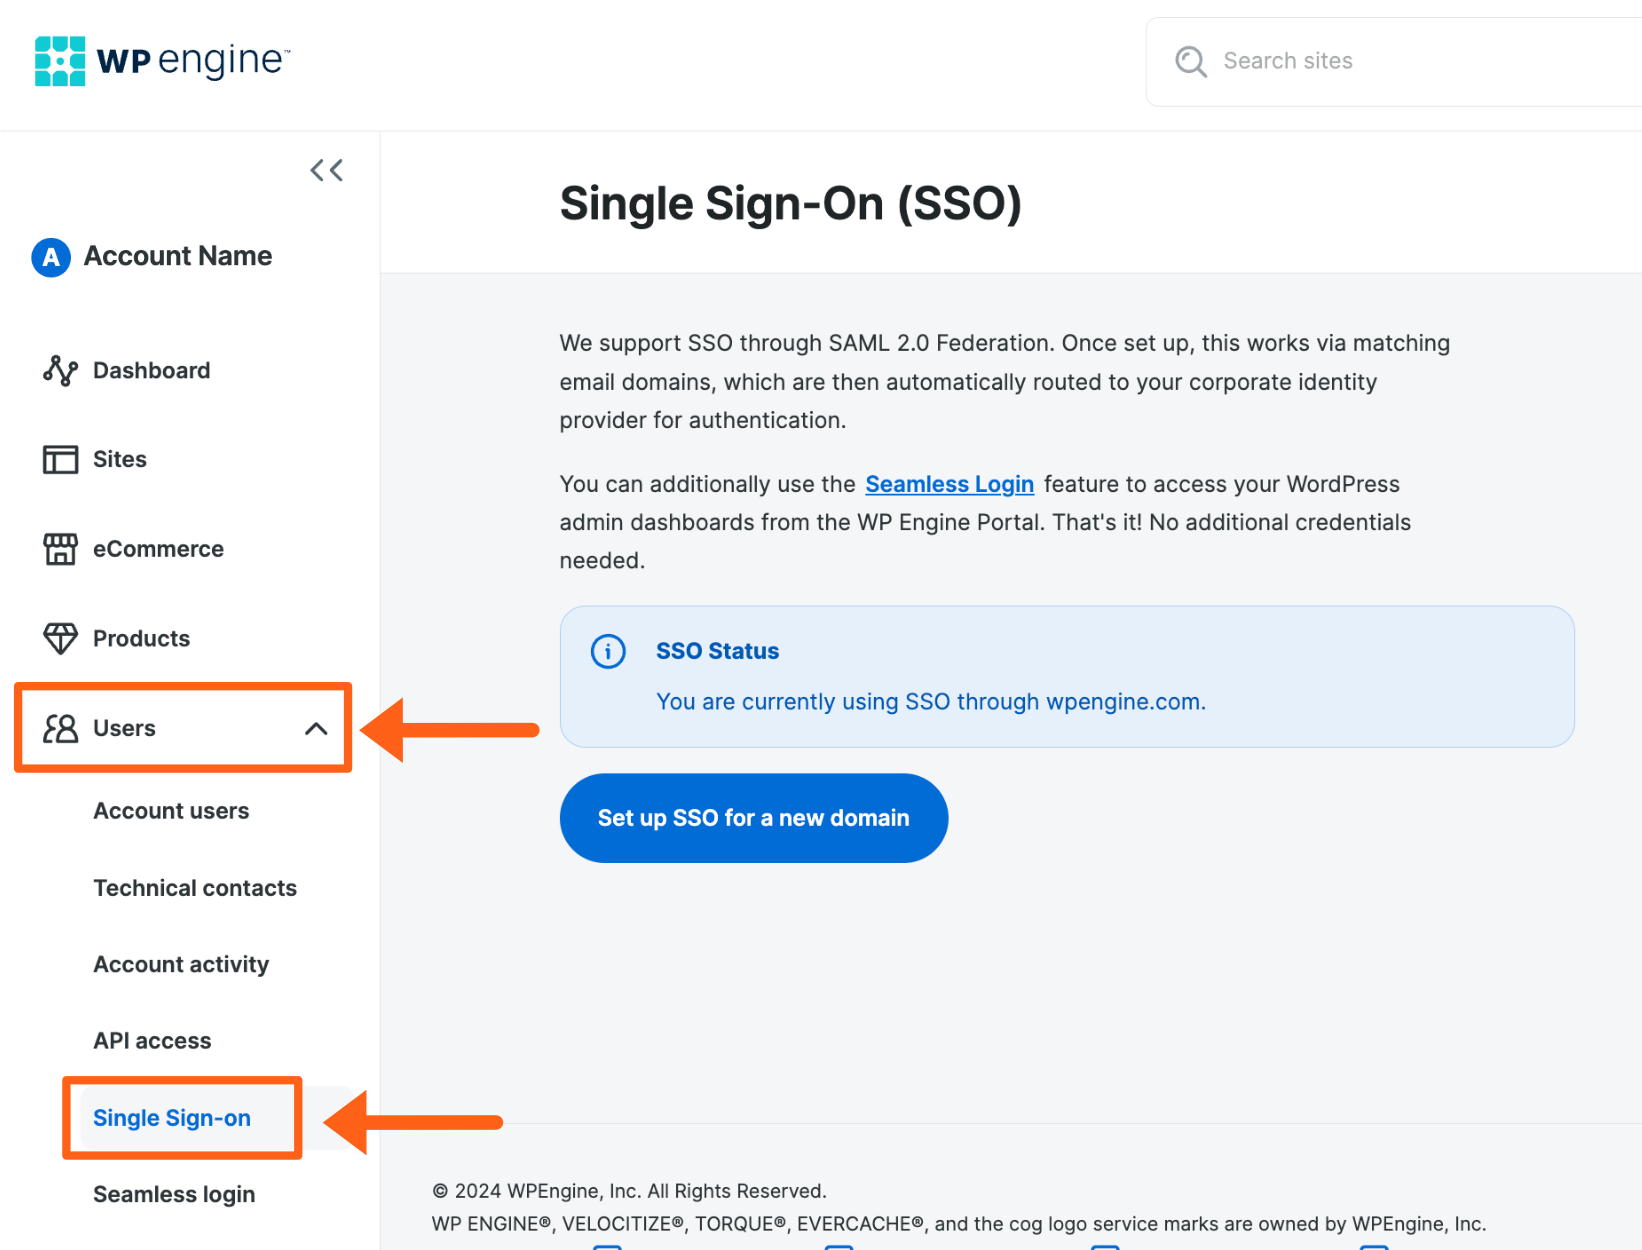
- Log in to the User Portal
- Expand Users in the lefthand menu
- Click Single Sign-On
If the Single Sign-On page is available, please skip to the SSO configuration steps.
If you do not see the Single Sign-on option, please contact Support to have this feature enabled or reach out to an Owner on the account.
SSO Enablement Request
If you do not have the SSO Page enabled in your User Portal, or if you need to configure SSO for multiple email domains on a single account, please reach out to the WP Engine Support team to have this feature enabled. Support will get your request to the appropriate team internally to have SSO enabled for your domain. Please provide the following information with your request:
- Domain name(s) attached to your email addresses.
- EX: If your email is
[email protected]we would need to knowsomedomain.com
- EX: If your email is
- The name and email of an initial test user.
- We will use this address to allow you to test logging in prior to enabling SSO for the entire domain.
- Contact emails of the people doing the SSO setup for your domain.
- At least one of these should have admin access to your identity management system.
- Support PIN for an Owner of the WP Engine plan.
- The Owner user’s email must use the same domain for which we’re enabling SSO.
Configure SSO
Setting up single sign-on for a domain is restricted to Owner level users. If you have multiple WP Engine accounts for your business then we suggest configuring SSO on the primary account.
Before You Begin
You will need access to the DNS records for the domain that SSO will be configured for.
Additionally, this automated process will walk you through connecting the WP Engine SSO feature to your identity app. Below are the configuration guides for the most common identity providers:
- AD FS – Configure a SAML 2.0 provider with Active Directory Federation Services
- Azure – Set up your Azure AD subscription, which is included with Microsoft 365
- OneLogin – Learn how to add a custom SAML app to OneLogin
- Okta – Configure an SSO integration with Okta
- Google SSO – Set up SSO via a third party SSO provider
If you do not see your identity provider here, please reach out to WP Engine Support.
Configuration Steps
- Log in to the User Portal
- Expand Users in the lefthand menu
- Select Single Sign-On
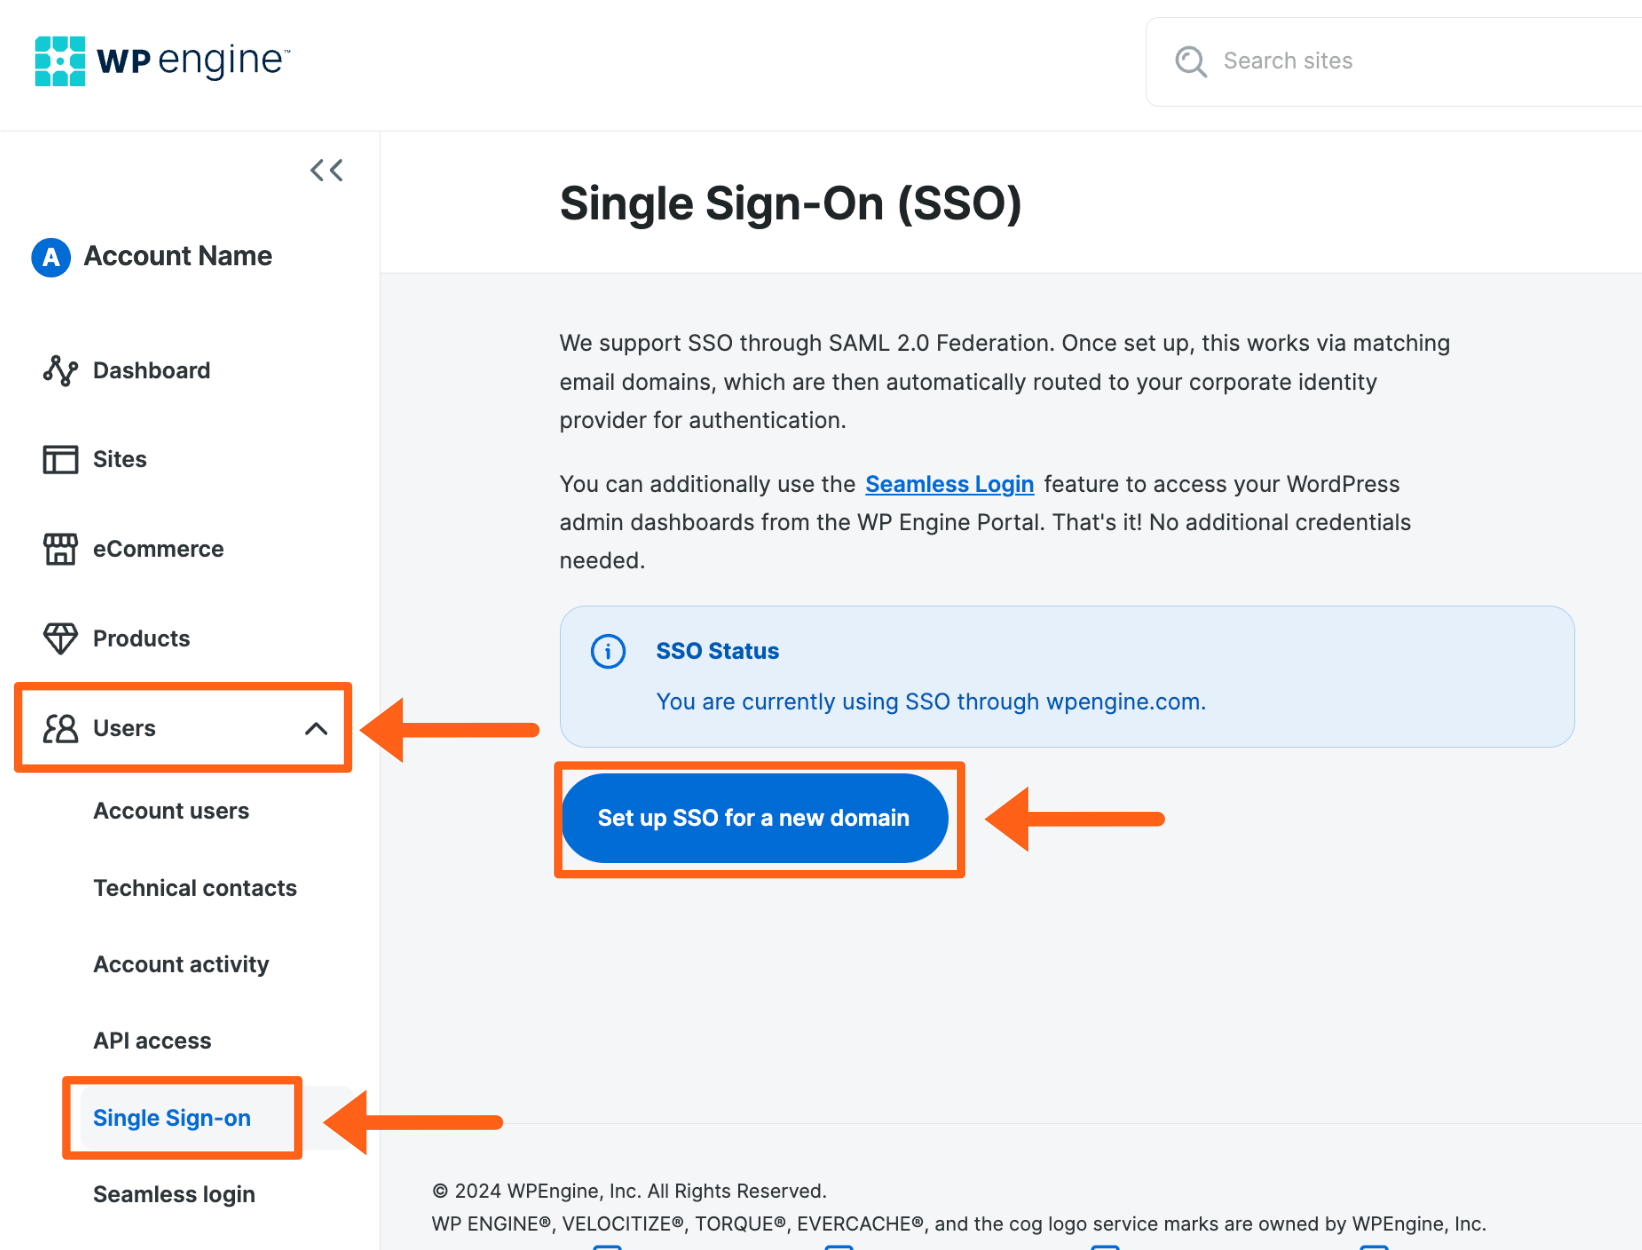
- Click Setup SSO for a new domain
- Enter email domain name
- This is not necessarily the domain of the website, it’s the domain of the email addresses.
- For example, if your business email addresses look like
[email protected]we would needsomedomain.comentered here.
- Select a WP Engine account
- This ties the SSO configuration to a given account. Any Owner on this account can view and edit these settings.
- Click Next
- The TXT and Value for a DNS record are provided on this page. Log in to your DNS host for the domain and add the TXT record for validation.
Your TXT verification record should look similar to the following:
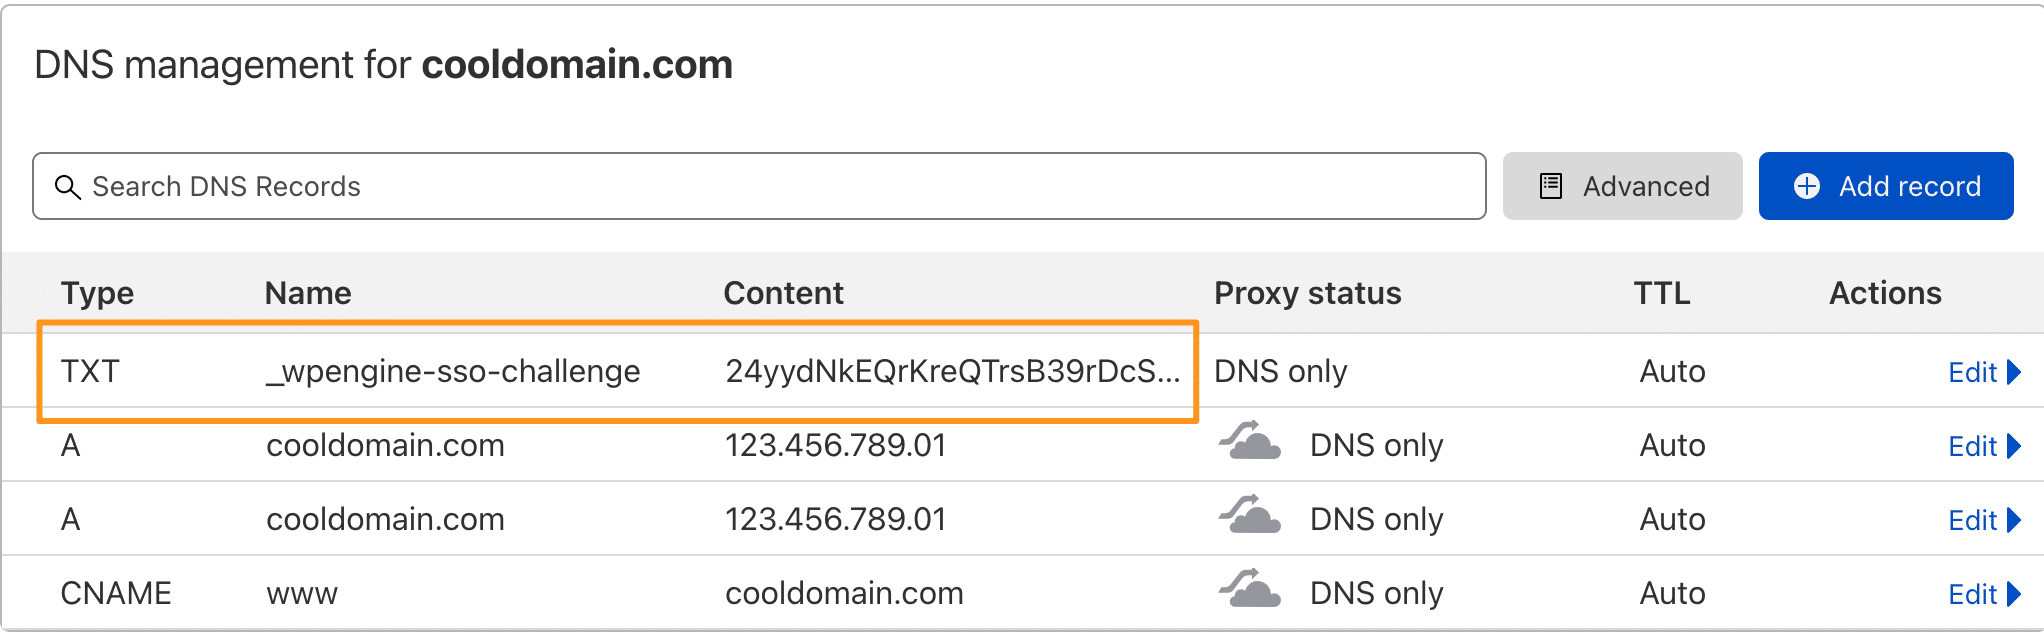
- Click Next
- There will be an error message at the top of this page until the DNS record has been validated. Record propagation may take some time, depending on your DNS host.
- When the DNS record has been validated, the SAML app details will appear. Enter these into your SAML app where requested.
- App name
- Description
- WP Engine app logo downloads
- WP Engine metadata
- ACS URL and recipient
- Audience URL
- Click Next
- Integrate SAML:
- Upload the XML metadata file supplied by your identity provider, or input the metadata manually using copy and paste
- Click Next
- Test SSO:
- Enter an email address to test with
- We suggest using a user account other than the one you are logged in with while configuring SSO, and that uses the same domain as the email addresses you wish to enable. This is to prevent the possibility of being locked out if there’s an issue with the configuration. You can use this guide to add a new user to WP Engine. For example, I’m logged into the User Portal configuring SSO with
[email protected], but I will test with[email protected]. - Additionally, take note of your support PIN, located in the lower left-hand side of the screen, next to the key icon. This will be required if you need to contact Support with any issues.
- Test signing in to the WP Engine User Portal using the designated test email
- We suggest trying to log in with the test user through a separate incognito browser window. That way you can stay logged in with your normal user account in the original session in case there’s an issue.
- Test launching the WP Engine User Portal from your identity system
- Once satisfied, return to the SSO Configuration page of the User Portal and click Next
- Go live:
- Be sure to notify your users about the new authentication flow and assign the application to required users in your identity system before going live.
- After going live with SSO, MFA for SSO users will be handled by your Identity Provider (IdP). WP Engine will not prompt SSO users for MFA.
- This will impact all users who have an email at this domain and force them through your corporate identity provider for authentication.
- Finally, as a contingency for any unforeseen SSO issues or IdP outages, we recommend adding a user to the account as an Owner that doesn’t use the SSO email domain.
- Click Go live
- (Optional) Add SSO Exceptions: Learn more here
Now, any user that attempts to log in to the WP Engine User Portal with an email address belonging to the SSO-configured domain will be redirected to your identity provider, then redirected back to the User Portal once authenticated.
Note
Make it even easier for your users to log in to your WordPress sites by also enabling Seamless login.
Delete SSO Configuration
SSO can be disabled either by deactivation (temporary) or deletion (permanent). To delete your SSO configuration, it must first be deactivated. Only account owners where the configuration was created can deactivate and delete SSO.
Deactivate SSO
Deactivating SSO will temporarily stop redirecting all email domain users to your identity provider’s log in. The SSO configuration must be reactivated to begin functioning again. To delete your SSO configuration, you must first deactivate the configuration.
To deactivate SSO:
- Log in to the User Portal
- Expand Users in the lefthand menu
- Select Single Sign-On
- Locate the SSO email domain and click the 3 dot menu icon to the right
- Click Deactivate
Follow the prompts to complete SSO deactivation.

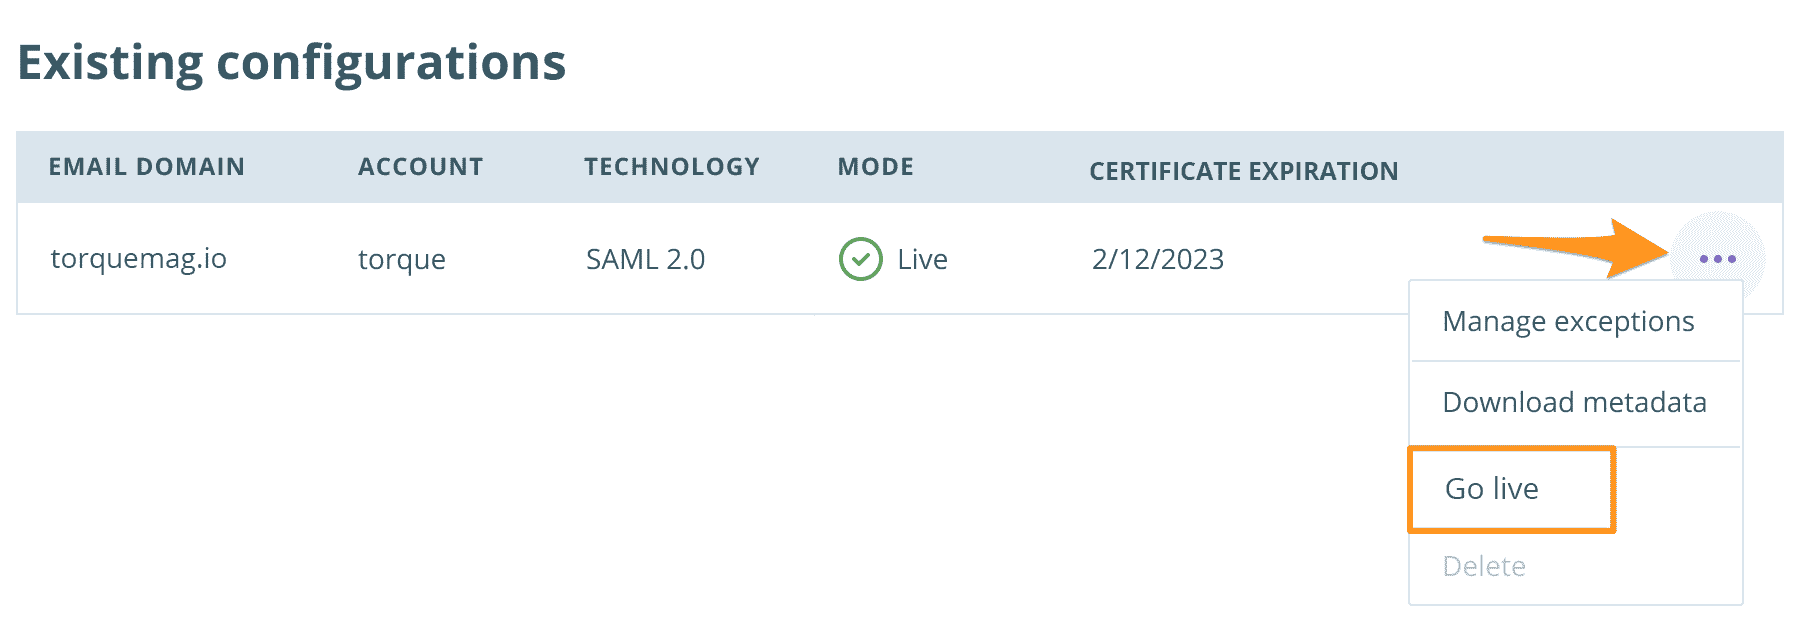
Reactivate SSO
Reactivating the SSO configuration will begin forwarding email domain users to your identity provider for login to access the WP Engine User Portal.
To enable SSO again after deactivating the configuration:
- Log in to the User Portal
- Expand Users in the lefthand menu
- Select Single Sign-On
- Locate the SSO email domain and click the 3 dot menu icon to the right
- Click Go Live
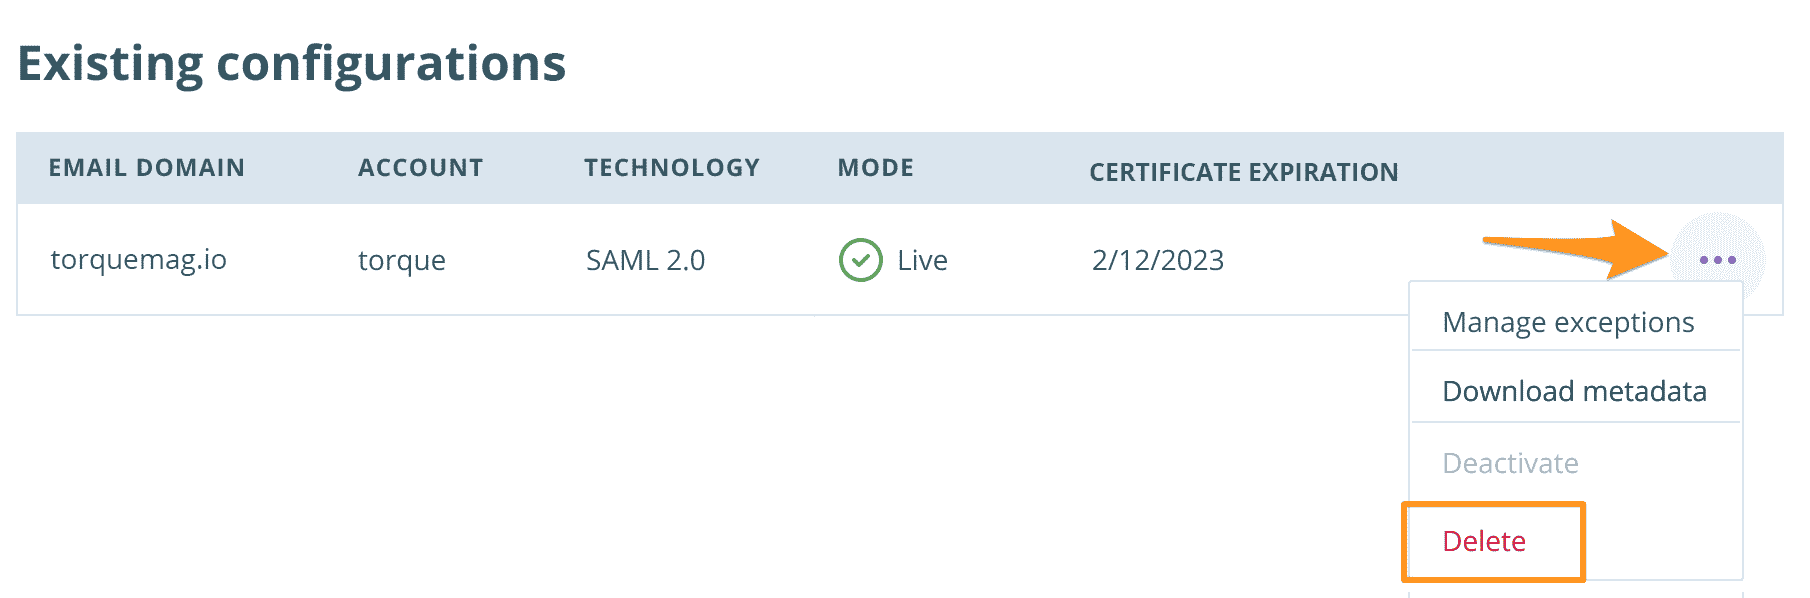
Delete SSO
Deleting the SSO configuration can only be done after deactivation, and will delete your SSO configuration from WP Engine. Email domain users will no longer log in to the WP Engine User Portal with your identity provider. Once a configuration is deleted, it cannot be restored. If necessary, it should be created again as a new configuration.
To delete an SSO configuration:
- Log in to the User Portal
- Expand Users in the lefthand menu
- Select Single Sign-On
- Locate the SSO email domain and click the 3 dot menu icon to the right
- Click Delete
Follow the prompts to complete SSO configuration deletion.
Manage Metadata
Once saved to the WP Engine User Portal, SSO configuration metadata can be downloaded at any time. Only account owners where the configuration was created can access SSO metadata.
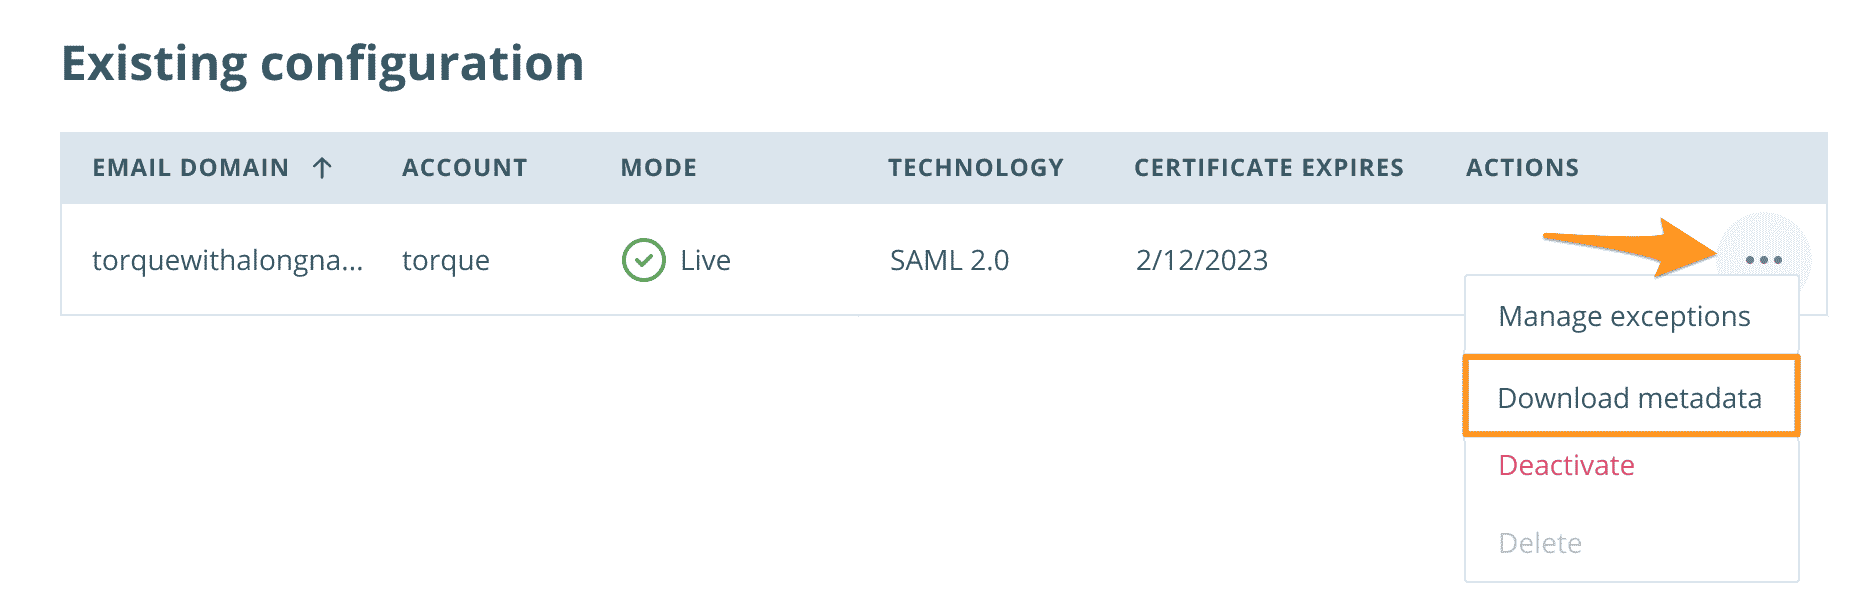
Download Metadata
Downloading metadata will allow you to export the current SSO configuration as an XML file. Only the current metadata can be downloaded, previous settings are not available for download.
To download SSO metadata:
- Log in to the User Portal
- Expand Users in the lefthand menu
- Select Single Sign-On
- Locate the SSO email domain and click the 3 dot menu icon to the right
- Click Download metadata
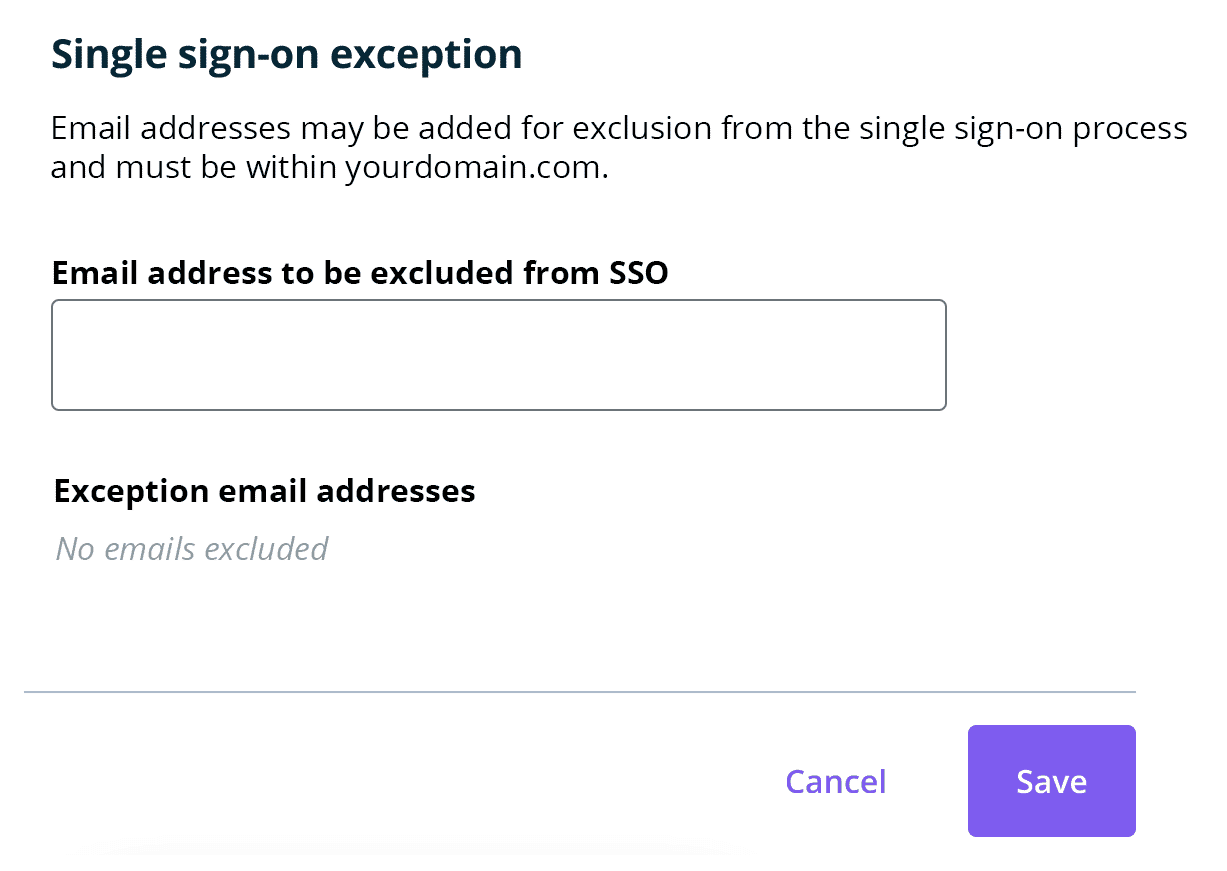
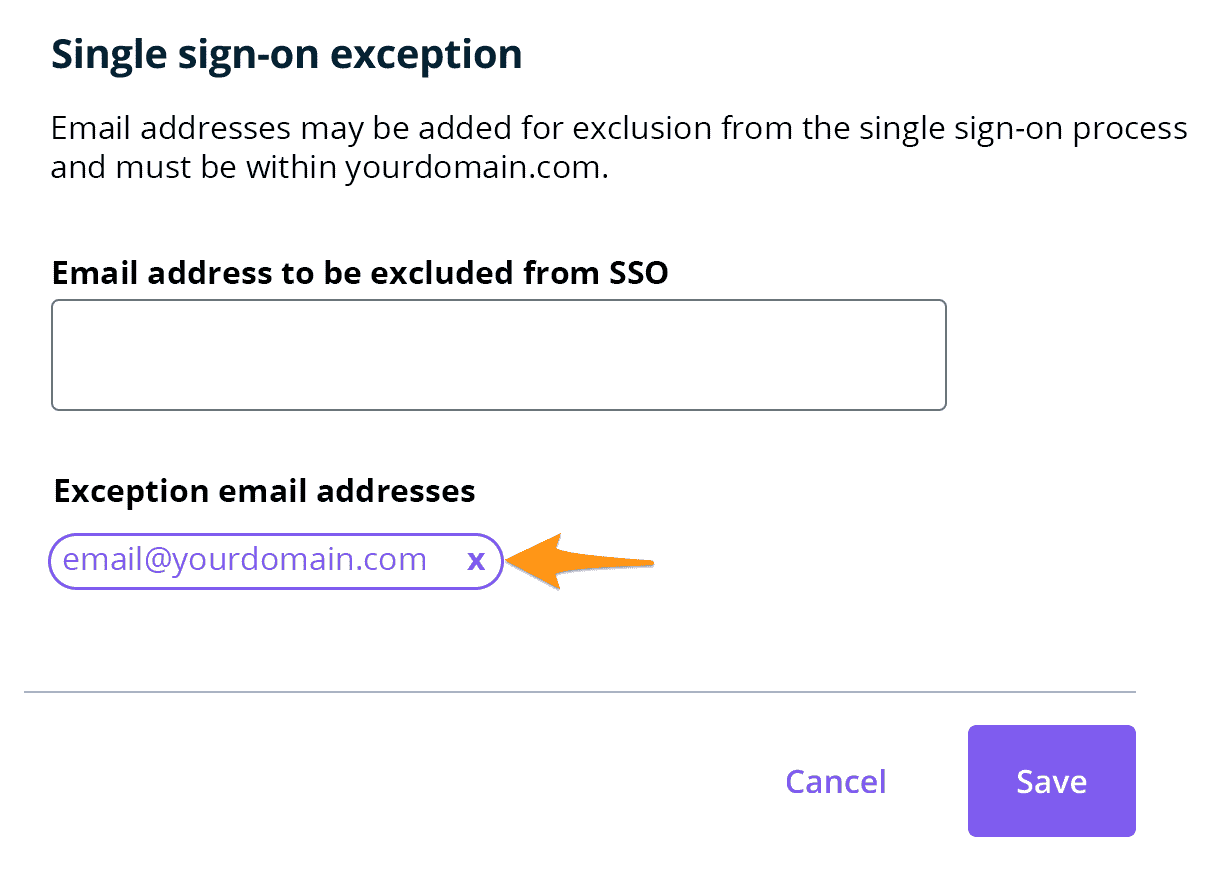
SSO Exceptions
Exceptions allow you to have an email address within the SSO-configured domain that does not have the SSO configuration applied. SSO exceptions will not redirect to your identity provider for login, and can be used as a backup should an SSO issue arise preventing access. Exception emails must share the email domain that you have configured SSO for and must exist as a user on the account. Multiple exceptions can be added. Exceptions can only be added to SSO configurations that are currently live.
Add Exception
To add an email exception to an SSO configuration:
- Log in to the User Portal
- Expand Users in the lefthand menu
- Select Single Sign-On
- Locate the live SSO email domain and click the 3 dot menu icon to the right
- Click Manage exceptions

- Add the exception email(s) to the exception field
- Click Save to activate the exception(s)
Remove Exception
To delete an exception from an SSO configuration:
- Log in to the User Portal
- Expand Users in the lefthand menu
- Select Single Sign-On
- Locate the SSO email domain and click the 3 dot menu icon to the right
- Click Manage exceptions
- Locate the email address under Exception email addresses
- Delete it from the exceptions list by clicking x
- Click Save to apply any changes
Troubleshooting SSO
Once SSO is enabled for a domain, WP Engine no longer owns any User Portal credentials for the attached email addresses. For this reason, what we’re able to assist with is limited, and any issues may need to be taken to the identity provider directly.
Some important points to note:
- Users must be added to the WP Engine User Portal. Learn about managing WP Engine users here.
- Users must be added to the corporate identity system.
- Users must be assigned to the SAML application in your identity system.
WP Engine WP Engine Support can confirm if an email address has been added to the User Portal. For security reasons, our team cannot add any user on your behalf.
Refer to SSO Limitations above for additional information.
Okta Lock Out
Users may get locked out from Okta if the incorrect credentials are entered too many times. If this occurs you must wait 24 hours before trying again.
Updating your SSO certificate
To update your SSO certificate you simply have to deactivate SSO for the email domain and then go through the configuration stepper again to add the new cert. Deactivating won’t remove your configuration details, so you won’t have to fully reconfigure your SSO.
- Log in to the User Portal
- Expand Users in the lefthand menu
- Select Single Sign-On
- Locate the SSO email domain and click the 3 dot menu icon to the right
- Click Deactivate
- Once the configuration is deactivated, click Continue to step through the SSO configuration
- When you reach the certificate configuration step, upload your new certificate
- Proceed to the end of the SSO configuration stepper and go live
Setup Instructions by Provider
Below are setup instructions for the top identity providers we see used. Be aware that because these identity providers are third party, the interface may be different than the one shown below, but the settings should remain the same.
- Active Directory Federation Services
- Azure Active Directory
- Google Single Sign-on
- Okta SSO
- OneLogin SSO
Active Directory Federation Services
For Microsoft’s official setup guide, see their article Configure a SAML 2.0 provider for portals with AD FS.
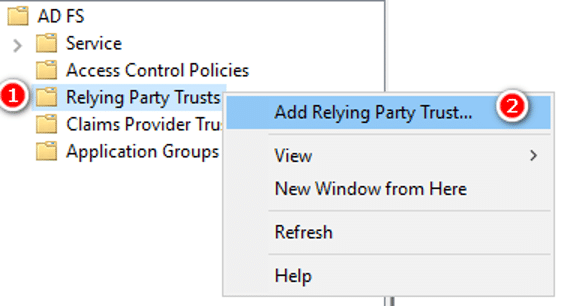
- In the AD FS console, under Trust Relationships, select Relying Party Trusts. Then click Add Relying Party Trust.
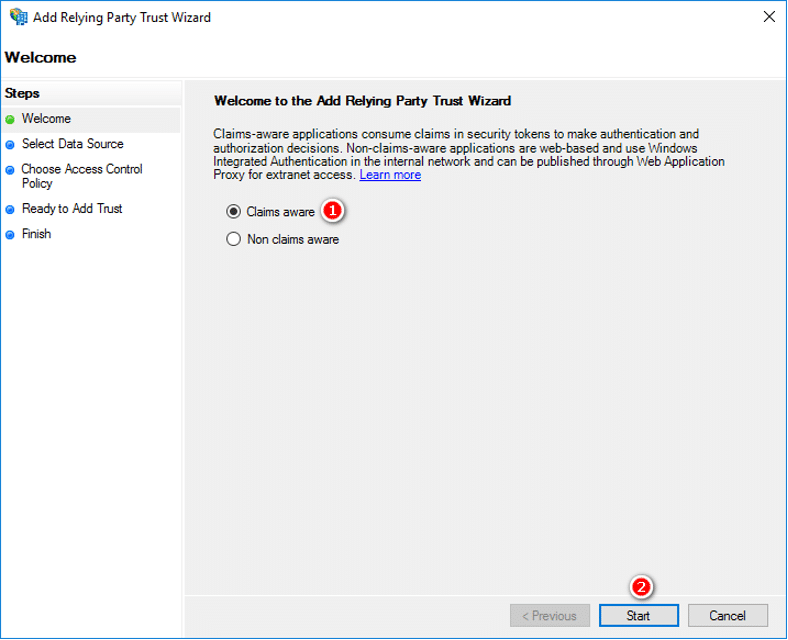
- In the Welcome step, select Claims aware, then Start.
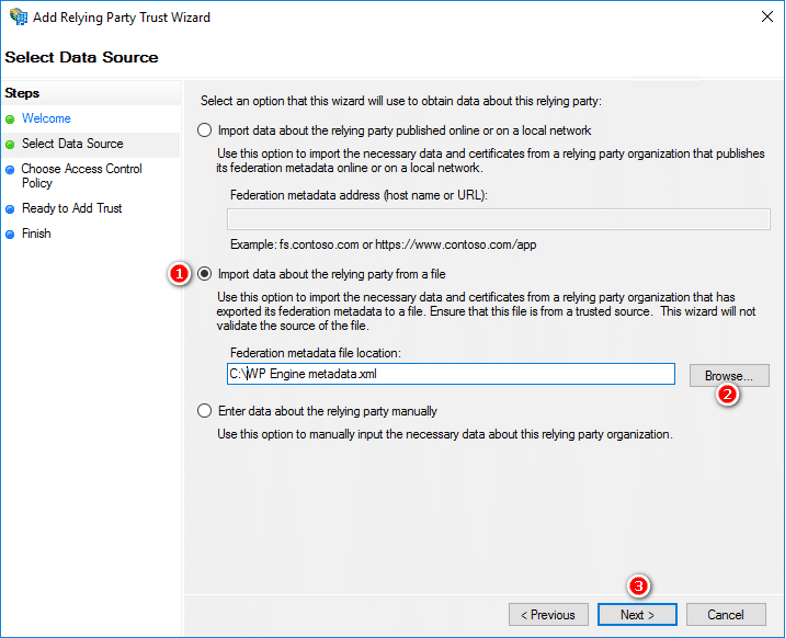
- In the Select Data Source step, select Import data about the relying party from a file and import the XML metadata you downloaded from the WP Engine User Portal during the Create SAML app step.
- Browse to the WP Engine metadata file and select it, then click Next.
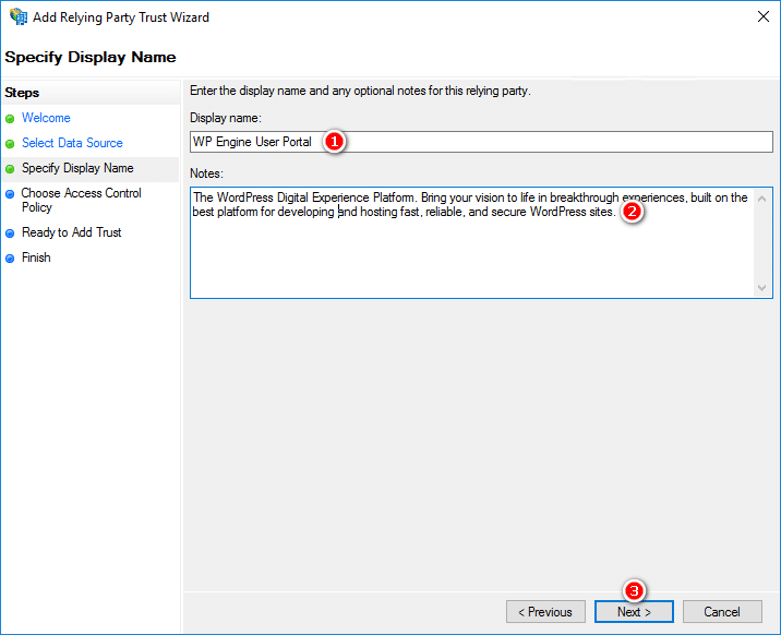
- In the Specify Display Name step, set the following, then click Next:
- Display Name: WP Engine User Portal
- Notes: The WordPress Digital Experience Platform. Bring your vision to life in breakthrough experiences, built on the best platform for developing and hosting fast, reliable, and secure hosting for WordPress sites.
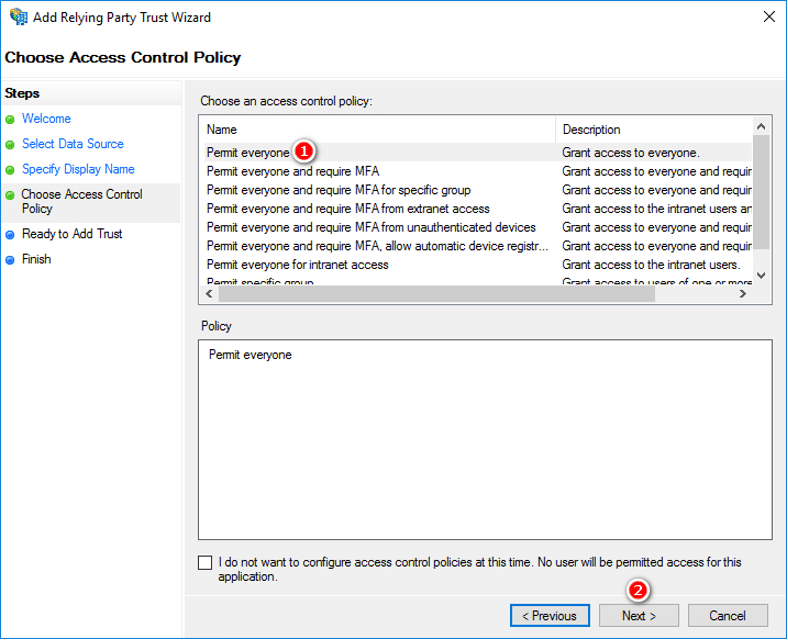
- In the Choose Issuance Authorization Rules step, select Permit everyone, then click Next.
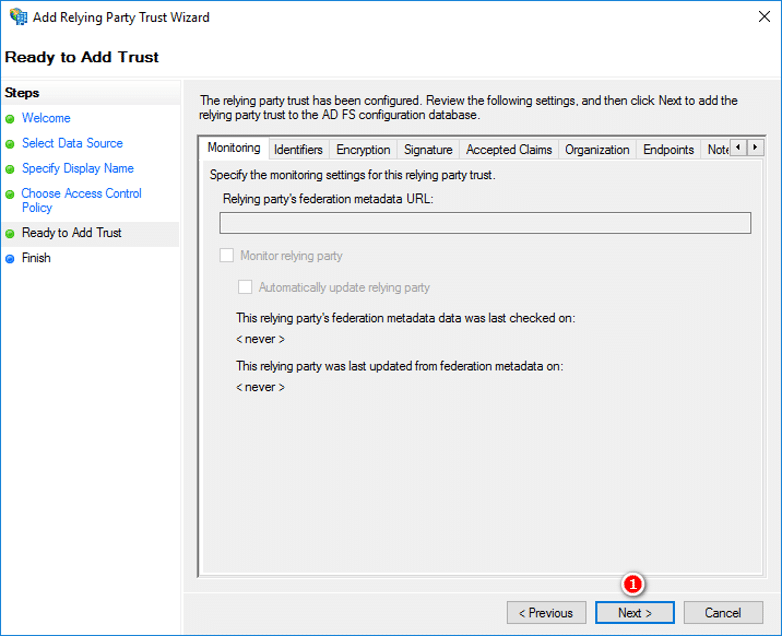
- In the Ready to Add Trust step, click Next to accept defaults
- In the Finish dialog, check Open the Edit Claim Rules dialog for this relying party trust and when the wizard finishes click Close.
- In the Edit Claim Rules for WP Engine User Portal dialog, click Add Rule to enter the Add Transform Claim Rule Wizard.
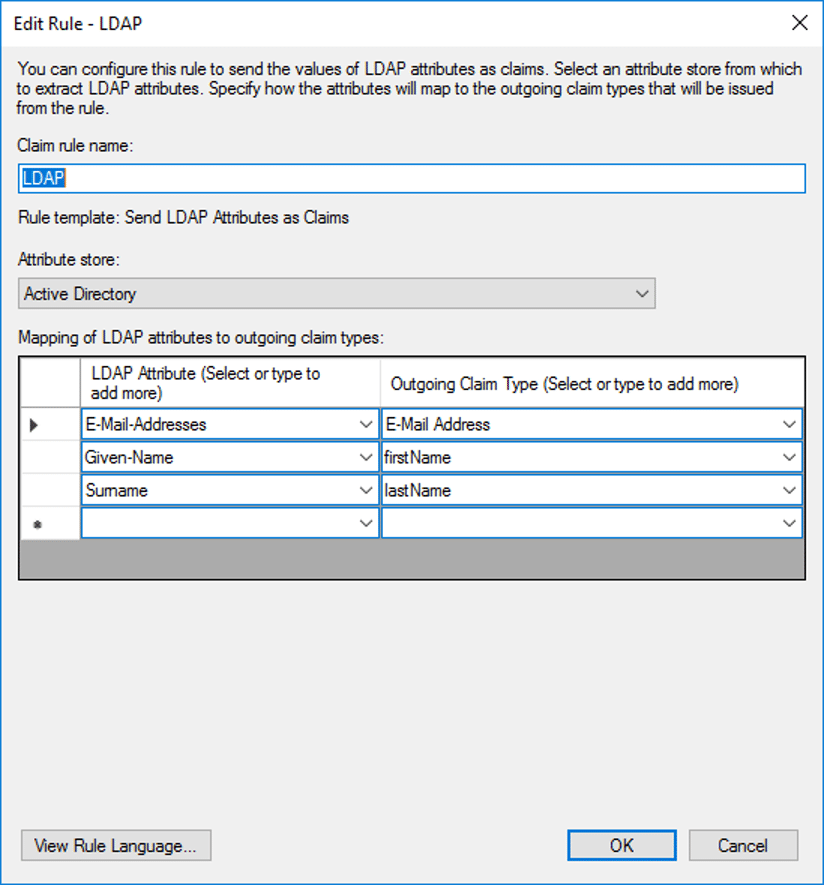
- In the Choose Rule Type step, select Send LDAP Attributes as Claims from the Claim rule template drop-down, then click Next.
- In the Configure Claim Rule step, enter the following, the click OK:
- (Row 1) LDAP Attribute: Email Addresses
- Outgoing Claim Type: E-Mail address
- (Row 2) LDAP Attribute: Given-Name
- Outgoing Claim Type: firstName
- (Row 3) LDAP Attribute: Surname
- Outgoing Claim Type: lastName
- Click Add Rule to enter the Add Transform Claim Rule Wizard
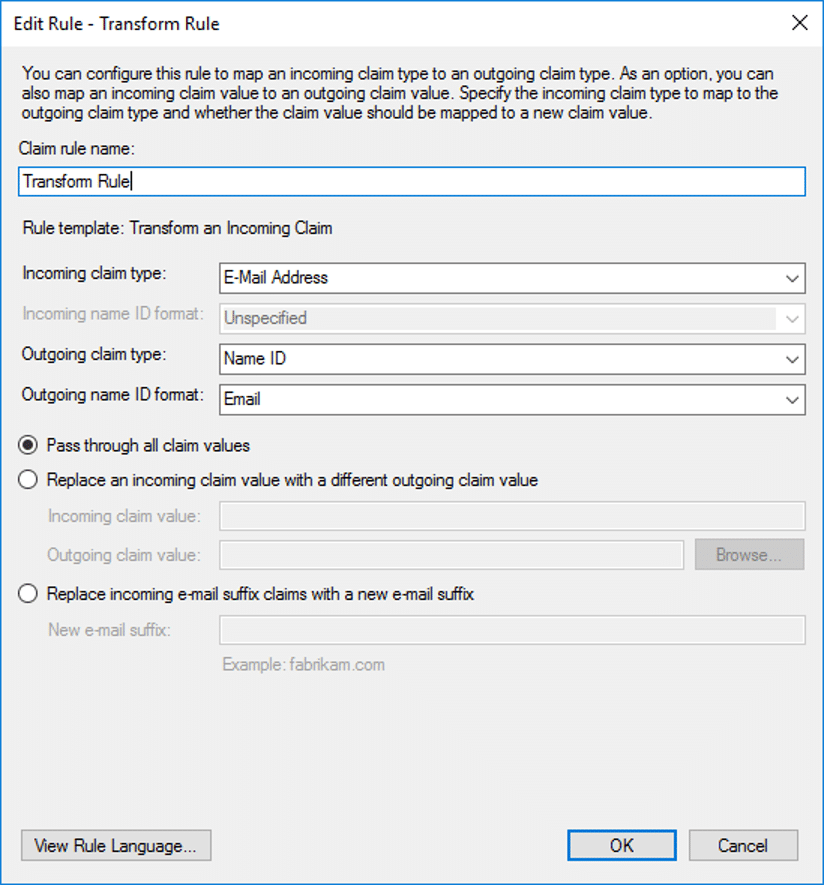
- In the Choose Rule Type step, select Transform an Incoming Claim from the Claim rule template drop-down, then click Next.
- In the Configure Claim Rule step, enter the following, then click Finish:
- Claim Rule Name: Transform Rule
- Incoming claim type: Email Address (matches the name from the outgoing claim type in the LDAP claims rule)
- Outgoing claim type: Name ID
- Outgoing name ID format: Email
- Select Pass through all claim values
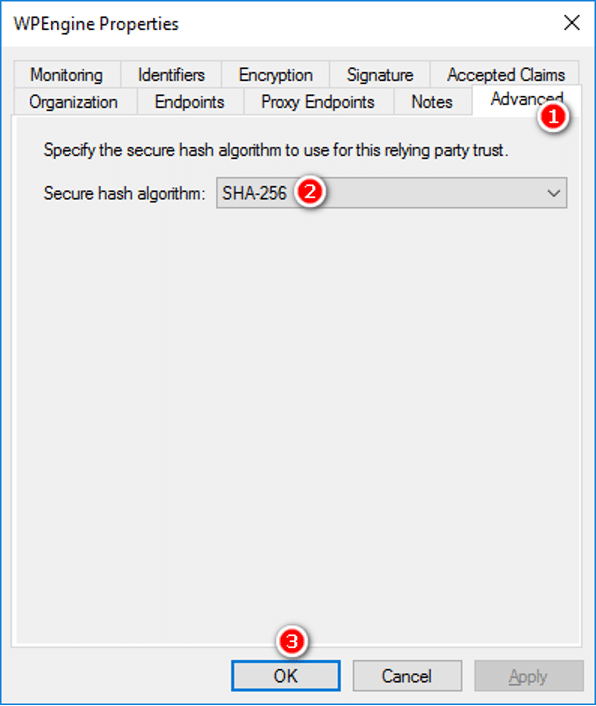
- Select Properties from the Actions sidebar while you have the relying party trust selected
- In the Advanced tab, make sure SHA-256 is specified as the secure hash algorithm, then click OK.
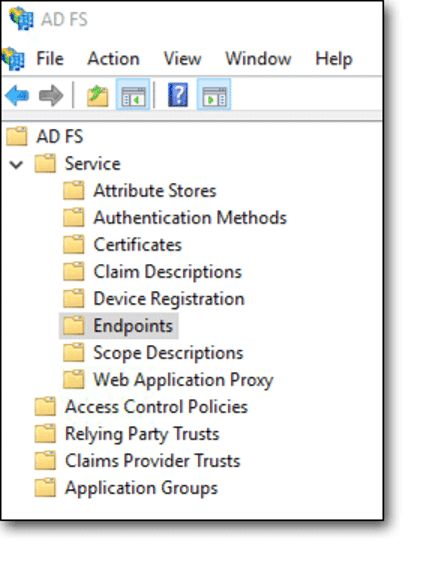
- Click on AD FS, Service, then Endpoints.
- Locate the URL path in the Metadata section. EX:
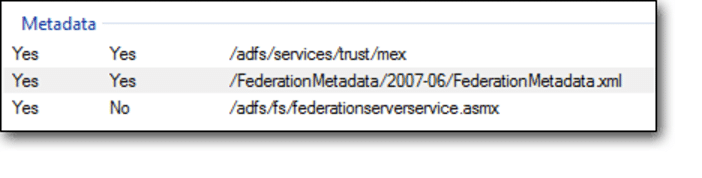
- Copy the path into a new tab in your browser, and prepend
https://followed by your ADFS hostname.- For example:
https://adfs.example.com/federationmetadata/2007-06/federationmetadata.xml
- For example:
- Download this metadata to a file on your computer.
- You will be prompted to upload this metadata file during the Integrate SAML step during the Single Sign-On setup in the WP Engine User Portal
In some cases you may have multiple certificates configured, and the metadata may not be clear about which certificate will be used. In these cases, you will need to export the ADFS certificate:
- Click AD FS Management (Server Manager > Tools), then Service, then Certificates.
- In the Token-signing section, right click the certificate and select View Certificate.
- On the Details tab, click Copy to file and Next.
- Select DER encoded binary X.509 (.CER), and click Next.
- Select where you want to save the file and enter a name for the file. Click Save, Next, and Finish.
- You can paste the contents of this certificate during the Integrate SAML step during the Single Sign-On setup in the WP Engine User Portal.
Azure Active Directory
If you have not done so already, this document can help you set up the Azure AD subscription which is included with Microsoft 365.
- Go to https://portal.azure.com/#home
- In the left hand menu, select Azure Active Directory
- Under Create, click Enterprise Applications
- Select New application Non-gallery application
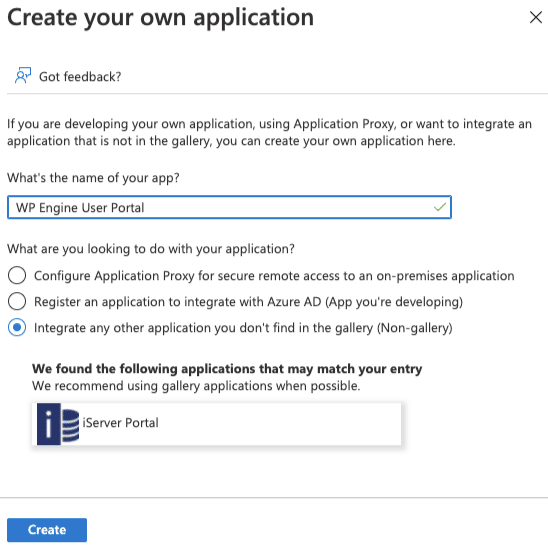
- Select Create your own application
- In the panel, set the Name to:
WP Engine User Portal - Select “Integrate any other application you don’t find in the gallery ”
- Click Create
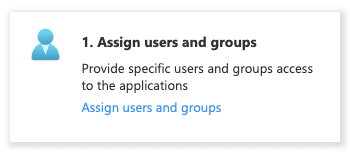
- Click Assign users and groups in the Assign users and groups box. Then assign the appropriate users to the WP Engine application. These users must also exist in the WP Engine User portal.
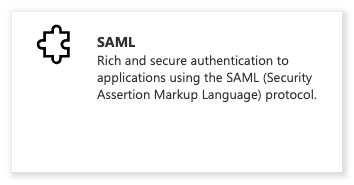
- Click Get Started under Set up single sign on.

- Choose SAML
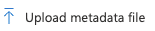
- Click Upload metadata file and select the XML metadata you downloaded from the WP Engine User Portal during the Create SAML app step.
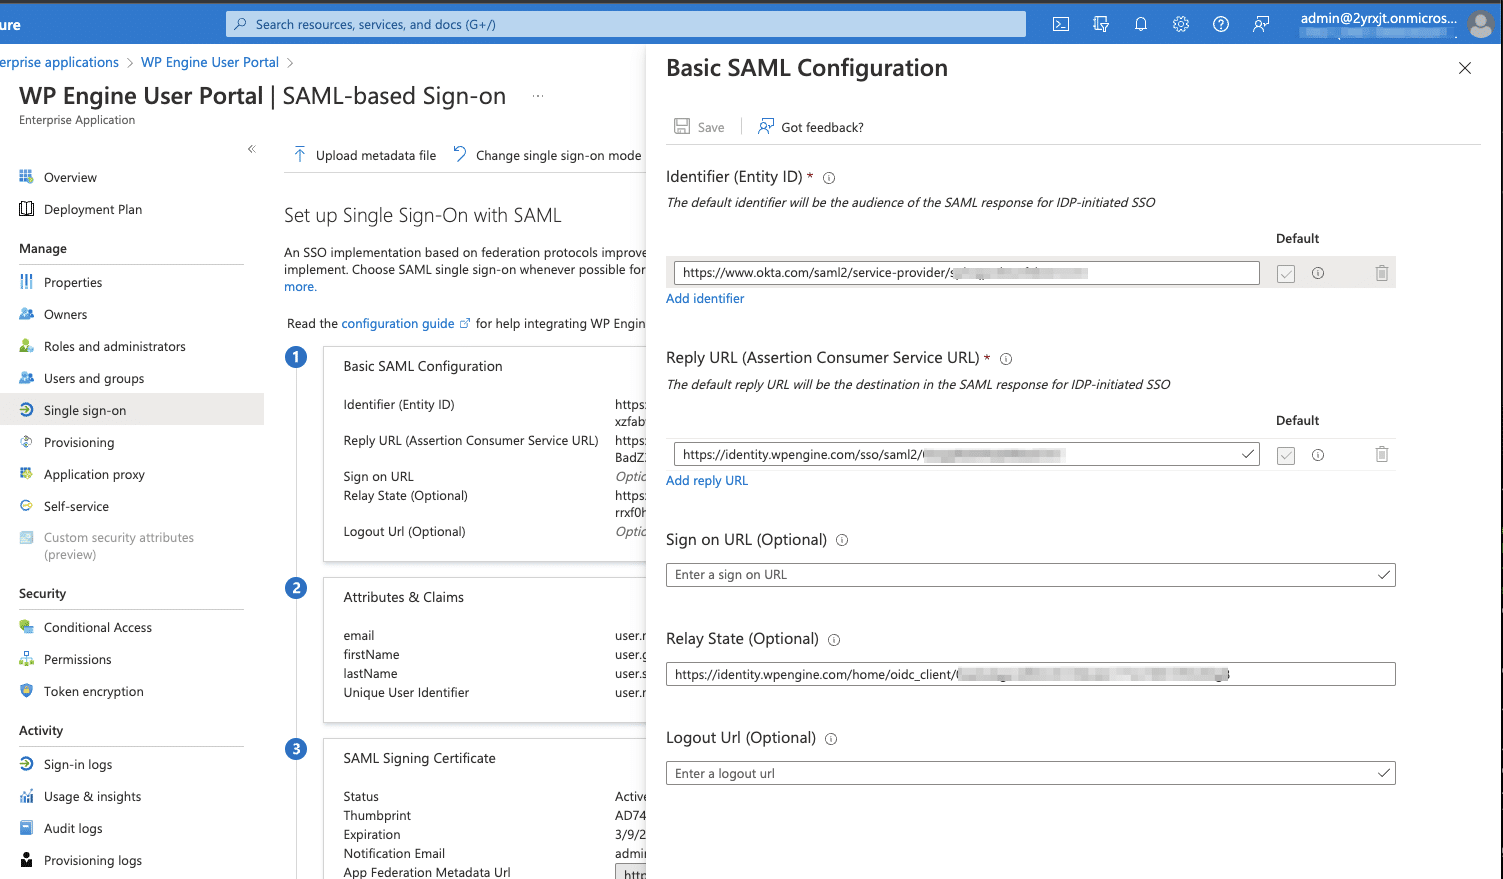
- In the Basic SAML configuration box, click Edit then fill in these fields. The information used here will be available on the Create SAML app step of Single Sign-On setup in the WP Engine User Portal.
- In the Relay State field, paste the Relay state / start URL you received from WP Engine.
- Verify the metadata import filled the Issuer (Entity ID) field with the Audience URI / entity ID from WP Engine.
- Verify the metadata import filled the Reply URL (Assertion Consumer Service URL) field with the ACS URL from WP Engine.
- Click Save, then X to close the Basic SAML Configuration.
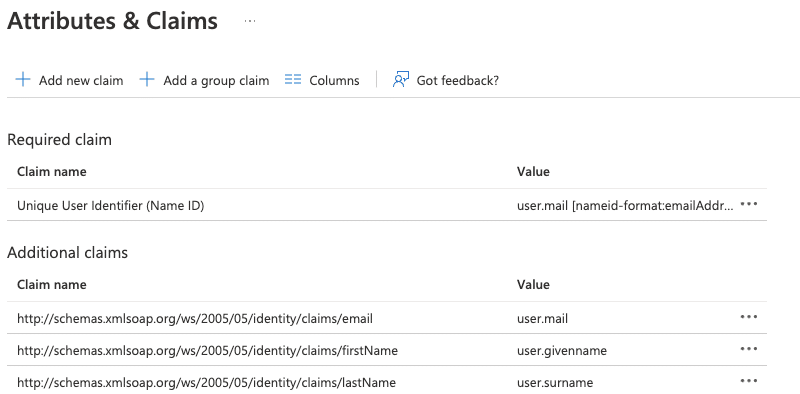
- Under user Attributes and Claims, click Edit:
- Click the Required Claim Unique User Identifier (Name ID)
- Under Choose name identifier format, verify the format is Email address. If not, you may need to change the Source attribute to: user.mail.
- Click Save if you made changes, then X to close.
- Click the user.mail claim and change the name to email.
- Then click Save and close.
- Click the user.givenname claim and change the name to firstName.
- Then click Save and close.
- Click the user.surname claim and change the name to lastName.
- Then click Save and close.
- Delete the claim user.userprincipalname
The resulting claims should appear as follows:
Before continuing to the last steps, your final settings should look similar to this:
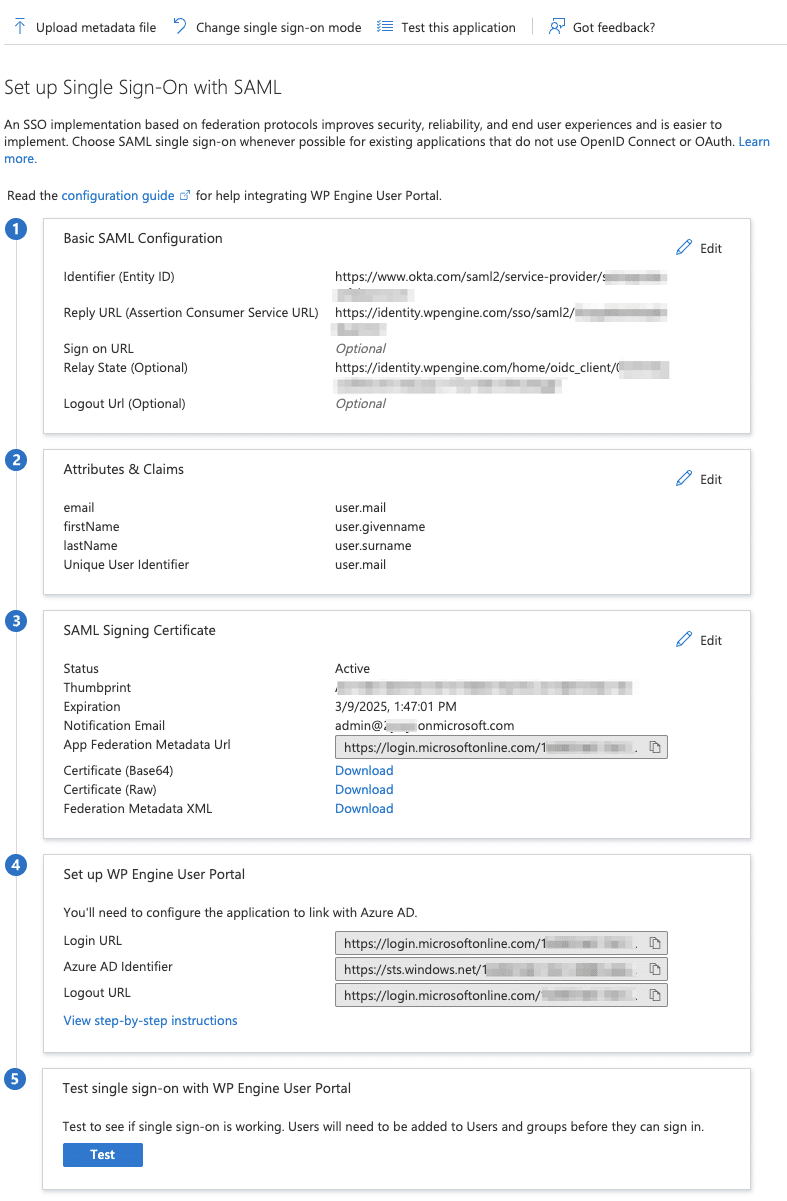
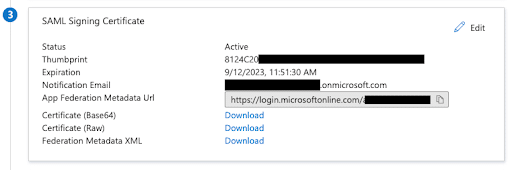
- Under Step 3 SAML Signing Certificate, click download to save the Federation Metadata XML file.
- You will be prompted to upload this metadata file during the Integrate SAML step during the Single Sign-On setup in the WP Engine User Portal.
OneLogin SSO
- Log in to the OneLogin Dashboard, and click Applications > Add App
- Search for SAML, and select SAML Test Connector (Advanced) to set up SAML 2.0
- On the initial screen and Info tab:
- Display Name: WP Engine User Portal
- Enable Visible in Portal
- Logo: On the WP Engine User Portal on the Create SAML app step of Single Sign-On Setup, download and extract
logos.zip. Upload a logo here.
- Description: The WordPress Digital Experience Platform. Bring your vision to life in breakthrough experiences, built on the best platform for developing and hosting fast, reliable, and secure hosting for WordPress sites.
- Click Save
- In the Configuration tab, set up the SAML connection. The information used here will be available on the Create SAML app step of Single Sign-On setup in the WP Engine User Portal.
- Relay State: Paste the “RelayState / Start URL” provided
- Audience: Paste the “Audience URI / Entity ID” provided
- Recipient: Paste the “Assertion Consumer Service URL” provided
- ACS (Consumer) URL Validator: This could be
.*or for more security you could escape characters in the provided ACS URL for additional security. Generally, this would mean putting a backslash in front of each forward slash/and period.However, it may vary if there are other special characters. For example, the final URL validator could come out like:https://identity.wpengine.com/sso/saml2/restofacs - ACS (Consumer) URL: Paste the “Assertion Consumer Service URL” provided
- The logout URL can remain blank. WP Engine log out should not log you out of your corporate identity system.
- The SAML Signature Element should be set to “Both” so that both the assertion and response are signed
- Other values can use the defaults.
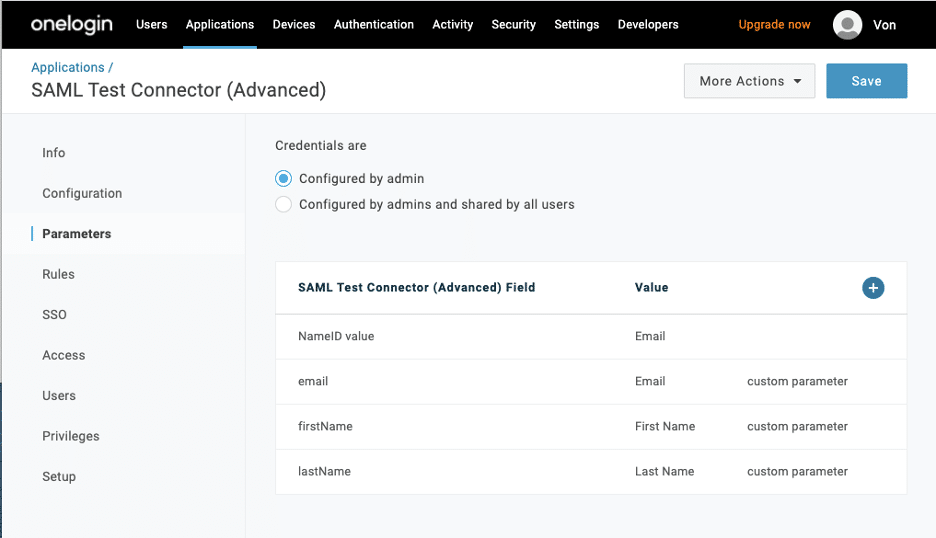
- On the parameters tab:
- Under Credentials are, select Configured by admin
- Select Add parameter, and create and map custom parameters for each field name used to identify user details.
- The default value includes the NameID (fka Email) field, with a value of Email. WP Engine requires email as the NameID.
- Click the plus to add a parameter:
- Select Include in SAML assertion
- Field Name: email
- Click Save
- Value: email
- Leave Include in SAML assertion checked
- Click Save
- Click the plus to add another parameter:
- Select Include in SAML assertion
- Field Name: firstName
- Click Save
- Value: First Name
- Leave Include in SAML assertion checked
- Click Save
- Click the plus to add another parameter:
- Select Include in SAML assertion
- FieldName: lastName
- Click Save
- Value: Last Name
- Leave Include in SAML assertion checked
- Click Save
- Back on the Parameters tab, you should now have 4 entries, click save. For example:
- Go to the SSO tab:
- Set SAML Signature Algorithm encryption to SHA-256
- Be sure Enable login hint is checked
- Click Save
- Click the More Actions dropdown at the upper right
- Click to Download SAML Metadata.
- You will be prompted to upload this metadata file during the Integrate SAML step during the Single Sign-On setup in the WP Engine User Portal.
- Assign users to the SAML app:
- Customers often set up a group for this.
- Initially, at a minimum assign the app to the identified test user
- Prior to going live for all users in your SSO email domain(s), get a complete list of users by going to the Users > Account Users tab in all accounts, and assign the app to each user.
Okta SSO
For official documentation, see Okta’s guide here: https://developer.okta.com/docs/guides/build-sso-integration/saml2/create-your-app/#create-a-saml-integration
- Navigate to Okta > Admin > Classic UI > Applications
- Click Add Application
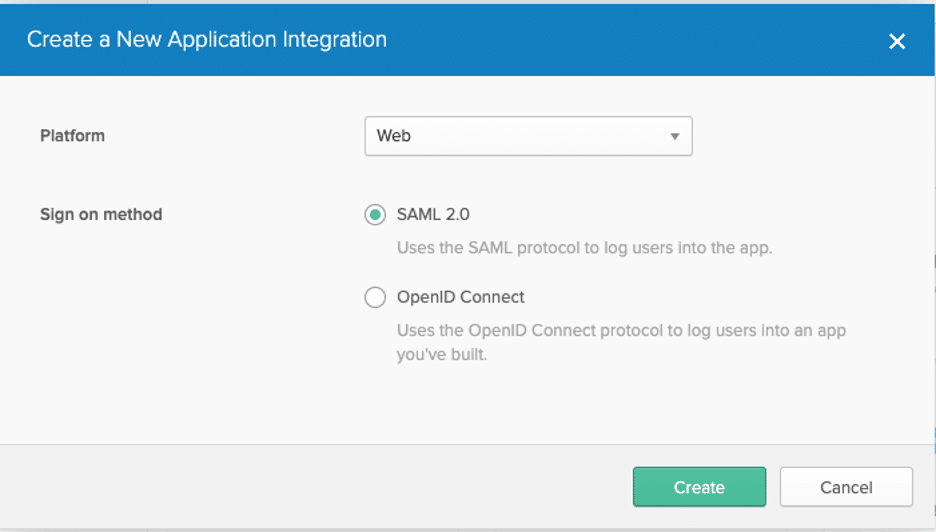
- Click Create New App
- For Platform, leave Web selected
- For Sign on method, select SAML 2.0
- Click Create
- Under General settings:
- App Name: WP Engine User Portal
- App Logo: On the WP Engine User Portal on the Create SAML app step of Single Sign-On Setup, download and extract
logos.zip. Then uploadWPEngine-SSO-Okta-Logo.pngthis file as the Logo icon.
- App visibility: Leave both unchecked
- Click Next
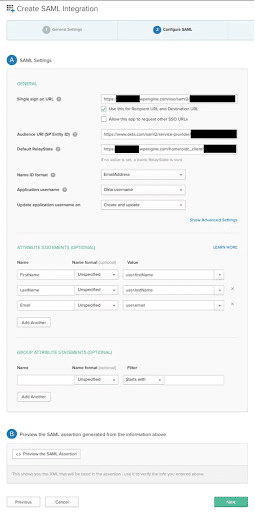
- In the Configure SAML tab fill in the following. The information used here will be available on the Create SAML app step of Single Sign-On setup in the WP Engine User Portal.
- Single sign-on URL: Fill in with the Assertion Consumer Service URL provided
- Use this for Recipient URL and Destination URL: Leave default checked
- Allow this app to request other SSO URLs: Leave default unchecked
- Audience URI: Fill in with the Audience URI provided
- Default Relay State: Fill in with the Relay State / start URL provided
- Name ID format: Email Address
- Application username: Okta username
- Update application username on: Create and Update
- Attribute Statements:
- FirstName / user.firstName
- LastName / user.lastName
- Email / user.email
- Group attribute statements: none
- Click Next
- On the Feedback page, you don’t have to select anything.
- Click Finish
- Select the Assignments tab and assign your WP Engine users
- Under the application, click Sign On, then under settings select View Setup Instructions
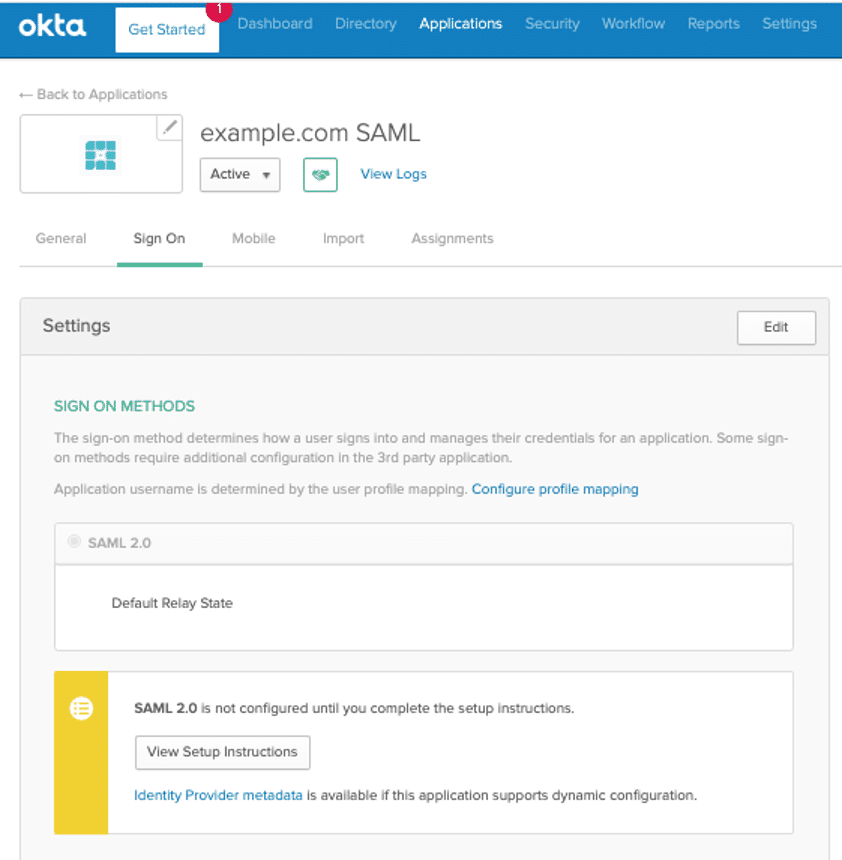
- Download the Identity Provider metadata.
- You will be prompted to upload this metadata file during the Integrate SAML step during the Single Sign-On setup in the WP Engine User Portal.
Google Single Sign-on
For Google’s official documentation, see their guide here: https://support.google.com/a/answer/60224
- From your Google Apps menu, launch the Admin app
- Click the Apps icon
- Select Web and mobile apps
- Click Add App then select Add custom SAML app
- Fill in the following App details:
- App Name: WP Engine User Portal
- Description: The WordPress Digital Experience Platform. Bring your vision to life in breakthrough experiences, built on the best platform for developing and hosting fast, reliable, and secure hosting for WordPress sites.
- App Icon: Download and save the
WPEngine-SSO-Google-Logo.pngfile here. Then upload this file as the app icon.
- Under Google Identity Provider Details, click Download Metadata. Save this XML file to your computer, you will be prompted to upload this metadata file during the Integrate SAML step during the Single Sign-On setup in the WP Engine User Portal.
- Under Service Provider Details, fill in the values available on the Create SAML app step of Single Sign-On setup in the WP Engine User Portal:
- ACS URL: Paste the “Assertion Consumer Service URL” provided
- Entity ID: Paste the “Audience URI / Entity ID” provided
- Start URL: Paste the “RelayState / Start URL” provided
- Check the Signed Response checkbox
- Name ID Format: EMAIL
- Name ID: Basic Information > Primary email
- Set up the needed attribute mapping. The values need to match exactly on both sides. EX:
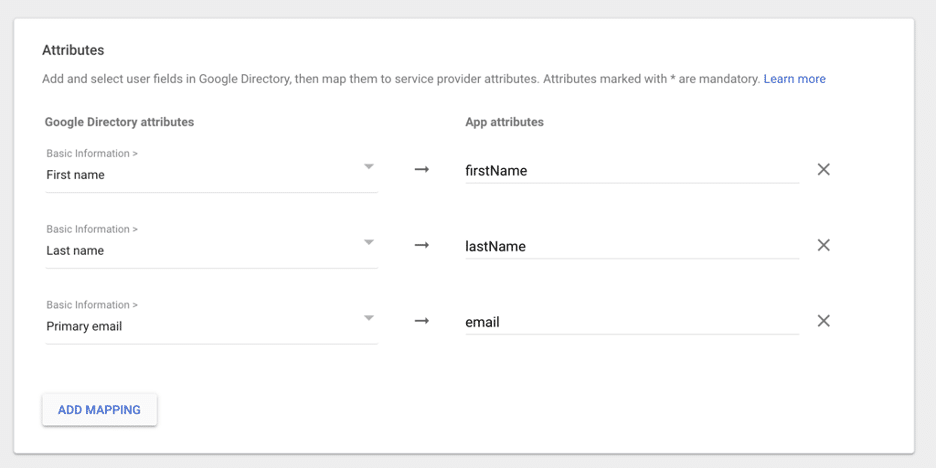
- Click Finish
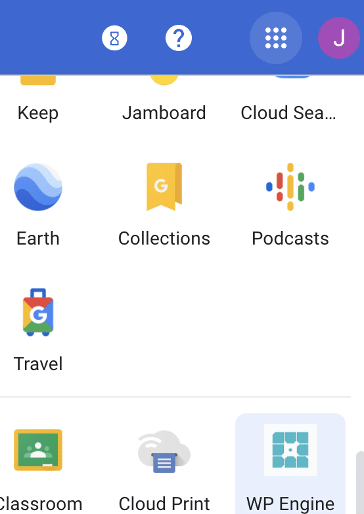
Once we have completed the SSO setup on the WP Engine side, we can begin testing. For the “Test launching User Portal from your system” step, you will need to pick this app from your Google Apps menu:
Multi-Domain SSO
Configuring SSO for multiple domains on a single account cannot currently be configured through the User Portal, and requires Support assistance to finalize the set up. If you need to configure SSO for multiple email domains on a single account, please take the following actions, and then reach out to the WP Engine Support team to have them complete this process.
- Complete the setup of your first domain through the User Portal using the steps above.
- This includes going live with the configuration.
- Click the three dot menu on your live SSO configuration and choose “Add Domain”. This will display the TXT records to be used to verify ownership for your additional domains.
- Add the TXT record entry in your DNS provider for all of the domains that you want to configure SSO for.
- Contact WP Engine Support to request multi-domain SSO setup.
- Include the list of the additional domains you want to configure.
NEXT STEP: Enable seamless login to WordPress