Import a WordPress Database
This article will cover how to import a database file into your WP Engine environment; accessing phpMyAdmin through our User Portal (our version of the cPanel), clearing out the current default database, and importing your database file. For this article you will need to already have exported and saved your database file as a .sql on your local computer. If you do not have a database file yet:
- Follow this article to export a database from another host
- Or, check out this article to get your database file from a WP Engine backup
If you are following along on the Migration Checklist in the User Portal or need a little more information, this is the first task in the Import phase.
Access phpMyAdmin
At WP Engine we use the phpMyAdmin utility to allow our customers to easily view and access their database directly from the browser. With one click you can securely login and access the database from the User Portal.
- Login to the User Portal
- Select the environment name to wish to import the database to
- Click phpMyAdmin at the top

Select Database
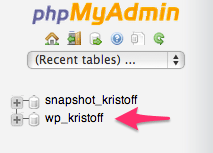
Expand the database name where you’d like to import the new database content by clicking the database name on the left.
- The primary database for the environment will be titled:
wp_environmentname- All Production, Staging, and Development environments will use this naming convention.
- If you have created a legacy staging site, you will see a second database called:
snapshot_environmentname- Only legacy staging uses this naming convention. If you’re not sure, you likely need to use the
wp_database instead.
- Only legacy staging uses this naming convention. If you’re not sure, you likely need to use the
Drop Database Tables
Before importing your database you must create a clean slate and make room for your incoming database.
- Click on Check All
- From the dropdown, select Drop
- Click Go
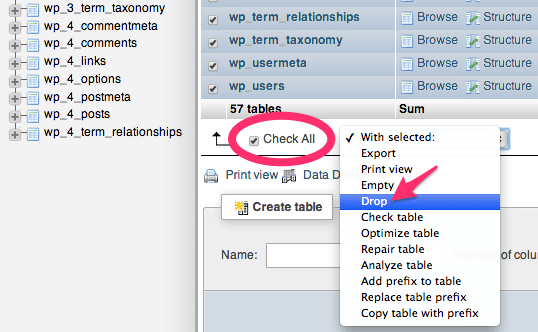
- Another screen will display confirming the change, click Yes

Typically all tables should be dropped before attempting a database import. These steps may need to be performed several times, until no tables show and the interface reads “No tables found in database.”

Import New Database
Now that the previous database has been cleared, we can import the new database file.
- Click on the tab Import near the top
- Click on Choose File
- Locate the new database file on your local system and select it
- In many cases this file is called something like
wp_environmentname.sql
- In many cases this file is called something like
- Click Go
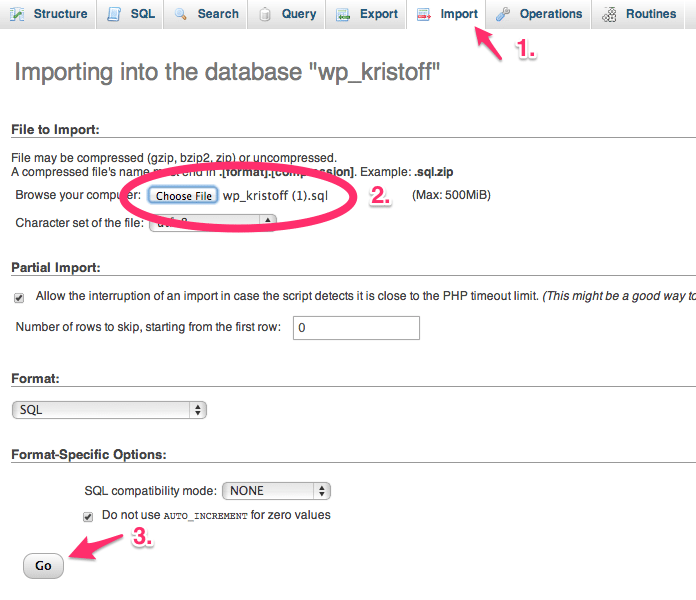
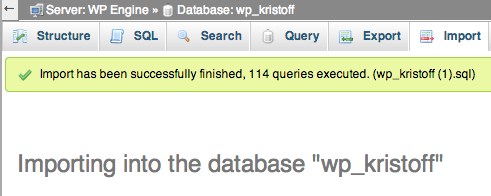
- You will now see the new tables in the database, along with a report stating that the import has been successfully finished.
If your site contains existing revisions, please contact our support team from your User Portal prior to migrating or importing your content to avoid a loss of data. WP Engine disables revisions by default and old revisions may be removed automatically.
NOTE: The server is limited to 50MB database imports. If you need to import a larger database, skip down to the Failed Import section for further options.
Confirm Database Prefix
Once you have successfully imported your database, you will need to check if your table prefixes are not default. A database using the default table prefix looks like the following. Note how each table begins with: wp_
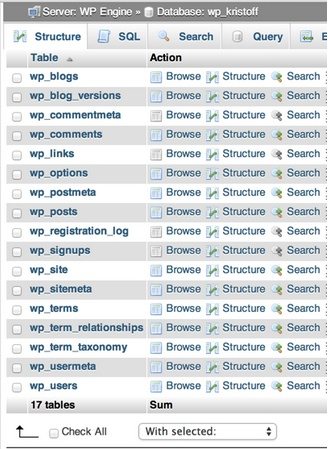
If your tables do not start with wp_, please read How to change the table prefix to ensure your site works properly on our system.
If your expected row count within phpMyAdmin doesn‘t match what’s on display, it may be due to how the table‘s information is handled within MySQL. To get more information on the desired table, run the following commands from the SQL tab within PHPMyAdmin after selecting a database:
View exact count of rows for a table:SELECT COUNT(*) FROM wp_posts;
View information from PHPMyAdmin table status:SHOW TABLE STATUS;
Failed Import
If your database import failed, there could be a few different reasons for this.
- Your database is too large, the maximum database import size is 50M. This limit is industry standard and cannot be increased. There are 3 alternatives:
- Upload the file to
_wpeprivateusing SFTP and reach out to Support to have it imported. - Connect using SSH Gateway and import the database using WP CLI.
- Export the database from the previous host as groups of fewer tables, rather than the whole database.
- Upload the file to
- There was an issue with the exported content.
- Attempt the export again, but this time with just a few tables. If this works continue importing tables a handful at a time until an issue is found.
- WP Engine runs daily maintenance processes that enforce limits on database options to preserve the stability of the site and the platform. Autoloaded rows (generally located within the
wp_optionstable) are limited to 1MB of data per option. Database rows that are not automatically loaded are limited to 4MB of data per option.
If your import failed, and you’re unable to deduce why, please contact our support team at WP Engine Support. We are more than happy to help!
NEXT STEP: Import your wp-content directory
