Domain Connect and Automatic DNS Setup
Domain Connect is an open source tool that allows WP Engine to update DNS records on your behalf when using a supported DNS provider. This tool makes it easy to point your DNS records to WP Engine!
Additionally, WP Engine can now order an SSL, update your primary domain in WordPress and even run a search and replace all on your behalf. This process ensures your website ready to use faster and easier!
If you add a domain registered with one of our supported providers, you will automatically see the workflow outlined below.
Supported DNS Providers
- 1&1
- GoDaddy
- Cloudflare
- More coming soon!
Domain Connect Process
Triggering the Domain Connect process only requires having a supported DNS provider then simply adding the domain to WP Engine’s User Portal.
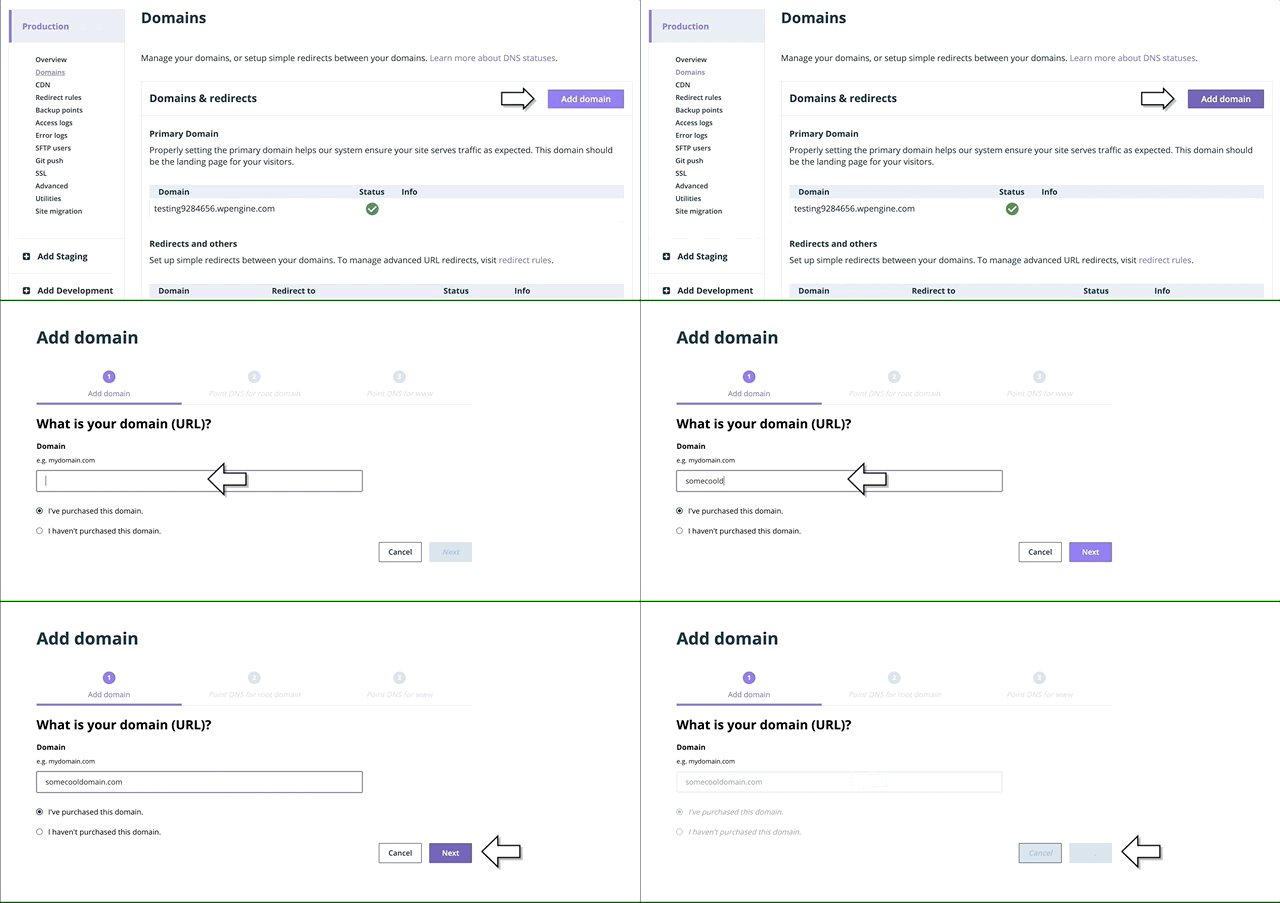
- Log in to the User Portal
- Click on the environment name
- Select Domains
- Click the button labelled Add Domain

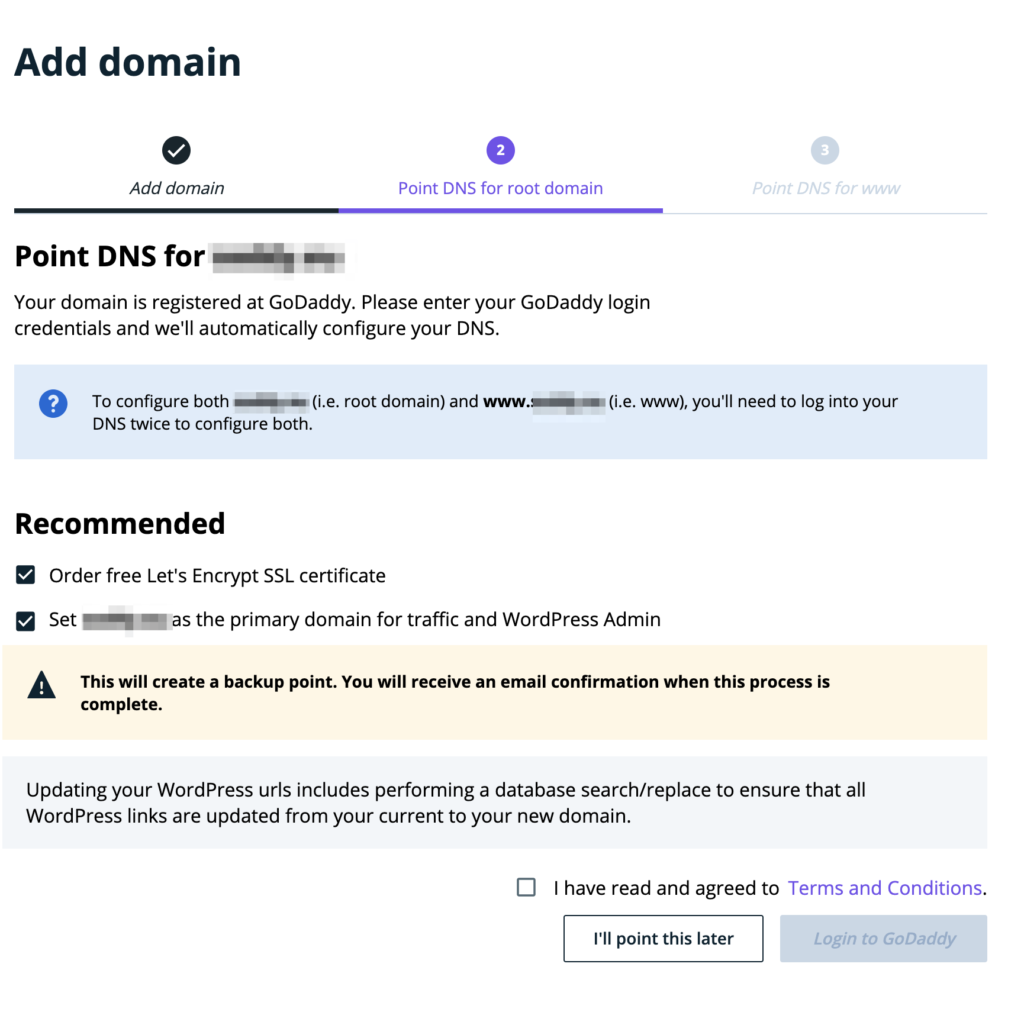
- If our system detects that your domain provider supports Domain Connect, you will see a screen like the following:
- If you don’t see a screen listing your registrar, but instead see a page telling you to configure DNS manually, then your domain does not support Domain Connect. Refer to our manual DNS guide instead.

- You will be offered two options on this page:
- Order free Let’s Encrypt SSL certificate. Learn more.
- Set [yourdomain.com] as the primary domain for traffic and WordPress admin. Learn more.
- Click the login button on the lower right to be taken to your domain host’s dashboard.
- You must complete all of the login prompts and grant WP Engine access when asked in order to successfully point DNS.
- That’s it! All that’s left to do is wait for the DNS change to propagate.
- If you selected the option to set your domain as primary, the process may also take a few minutes to complete. You’ll receive an email when it’s done.
Once these steps are complete, we suggest testing a few key pages on your website again to make sure everything works as intended.
Recommended Options
These options display prior to logging in to your DNS host. We recommend you leave both options selected so no manual changes will be needed on your part.
If you deselect either option, be sure to review our Going Live article to complete the steps manually.
Order free Let’s Encrypt SSL certificate
Selecting this option will ensure a free Let’s Encrypt SSL is ordered and installed as soon as possible. Learn more about Let’s Encrypt SSLs in our extended SSL guide.
Set [yourdomain.com] as the primary domain for traffic and WordPress admin
Selecting this option will trigger a few processes on your behalf to help ensure your website is ready to go as soon as possible.
- A backup checkpoint will be made. Read more about using backups and restoring.
- Your new domain will be set as primary in the User Portal. Learn more about the primary domain.
- Your WordPress home and site URL will be updated to the new domain within the website’s WordPress database. See what this process looks like when done manually.
- A search and replace will be run on the database to automatically change any instances of your WP Engine temporary domain to your new domain. For example:
coolsite.wpengine.comwill be changed tomynewdomain.com. Learn more about how our automated search and replace works.
NOTE: This option will not work for multisite environments. Learn how to update the primary domain in WordPress multisite.
Domain Connect Logs
You can view the Activity Log in the User Portal to see if a domain has successfully or unsuccessfully used Domain Connect to configure DNS settings.
Domain Connect actions will be logged like the following example:

Common Issues
If you are having trouble with using the automated Domain Connect system, check the following:
- Did you complete the entire process?
- You should have seen a login page for your domain provider. The login page would have asked for your username and password. After submitting those details, you should have been redirected back to WP Engine. If this doesn’t sound familiar, try again and be sure to complete the entire process.
- Did you use the right credentials?
- While using Domain Connect, you will need to use your login credentials for your DNS provider. Verify that you have the correct username and password. You can do this by going to your DNS provider directly and logging in there. If your credentials are incorrect, you will need to use your DNS providers “Reset Password” functionality. Once completed, try using Domain Connect again using your username and new password.
- Did you log in to the right DNS account?
- The username you use for Domain Connect to login to your DNS provider must own the domain name you are adding to WP Engine. You can verify this by logging into your DNS provider and checking if the domain exists for that user. If not, you will have to determine what user owns the domain and use those credentials instead.
Additional Information
- Domain Connect currently works with a few DNS providers, make sure yours is on the list here. (More coming soon!)
- Domain Connect implementation using 1&1 or Godaddy will not work on our clustered solutions (AWS), as these DNS providers do not support the CNAME flattening a cluster requires. You can instead point your domain’s nameservers to Cloudflare, then use Domain Connect to configure DNS.
- If you are using Domain Connect with Cloudflare, clustered environments and CNAME flattening are both supported.
- If your website is migrated to a new server environment, and are not pointed with Cloudflare, Domain Connect will not automatically know to update your DNS records.
- Either remove and re-add the Domain to your Domains page in the User Portal to trigger the automatic DNS connection process.
- Or, manually update the entries directly through your DNS host.
- When using Cloudflare, Akamai, Incapsula, or other services involving a reverse proxy, Domain Connect will not be able to update your DNS records. Your DNS records will need to be configured manually with these services.
NEXT STEP: Learn about domain status messages in the User Portal
