Legacy 1-Click Staging
IMPORTANT: Accounts created after March 2021 no longer include legacy staging sites. Learn more about new environments here.
One of the benefits of WordPress hosting through WP Engine is the ability to set up a 1-click staging site from your WordPress Admin Dashboard. A 1-click staging site is a copy of your live production site that can be easily created to test plugins, themes, and custom code. You can also copy the 1-click staging site back to the live site at any time after making changes.
NOTE: 1-Click Staging is now considered “legacy” and will ultimately be retired. Check out our new Sites workflow with Staging and Development environments.
Legacy Staging Specifications
- There is no server caching on legacy staging. Ensure anything that could conflict with cache is tested on Live (Ex: custom login pages and forms).
- Backups for Legacy Staging are enabled and work exactly like Live backups.
- Only the current year’s /uploads and /blogs.dir directories are copied. Our system will fallback to Live to find an image if it 404s on Legacy Staging.
- Some plugins should not be used in the staging area, specifically those that automate tweeting, posting or emailing.
- If you have mapped a custom domain to your production area, be sure to redirect the “environment.wpengine.com” default URL to your custom domain on the Domains page in the User Portal. This will ensure the custom domain is used in the search and replace when copying from Legacy Staging to your Live website.
- Plugins requiring a license to validate against your domain will likely have issues. You may need to purchase a second license for Legacy Staging or check with author about a Staging site licensing option.
- Copying to and from Legacy Staging always takes place within the WP Engine plugin on the Live site.
- The URL structure for every 1-Click Legacy Staging area is: installname.staging.wpengine.com
- All existing users’ information is copied, so your login credentials will be the same as they were on Live when you last copied to staging.
- Staging and live do not actively sync. If you have added changes to live you will need to copy them back down to staging. It is not advised to modify both sites’ files during the same time period, as changes may be overwritten and lost after a deployment.
- The 1-click staging area is not indexed by search engines. The robots.txt file is set to “disallow all” user-agents (bots).
Deploy Live to Legacy Staging
- Open WordPress wp-admin
- Click on WP Engine plugin on top left
- Select Legacy Staging
- Click blue Copy site from LIVE to STAGING button
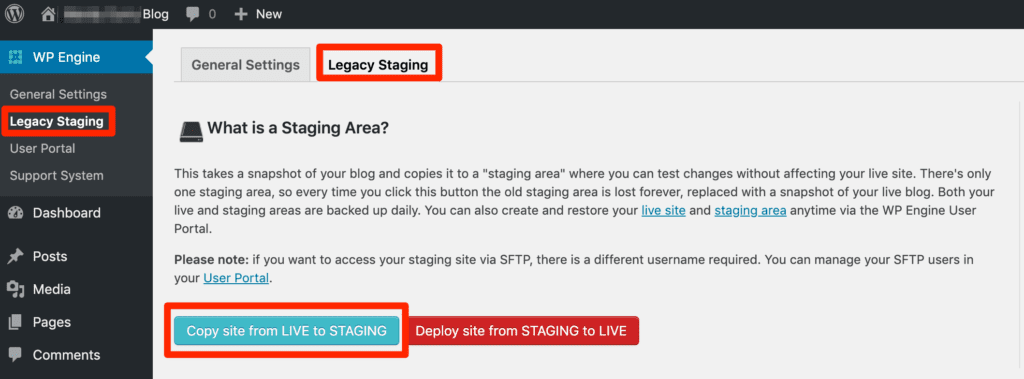
Your site will now be copied to the staging area and a green box will pop-up showing the status. The larger the size of your Live site, the longer it will take to deploy to Legacy Staging.
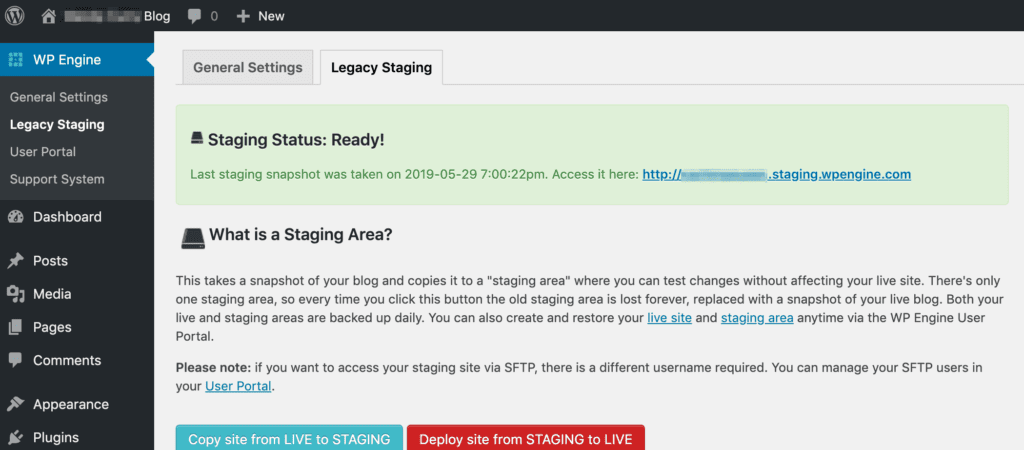
When your live site has been copied into the 1-click staging environment, you will see a green banner and be given a link to access it.
Deploy Legacy Staging to Live
If you’ve made changes to the staging site and want to push those changes to the live site, you can do so easily. Some important information to note about the Legacy Staging deploy process:
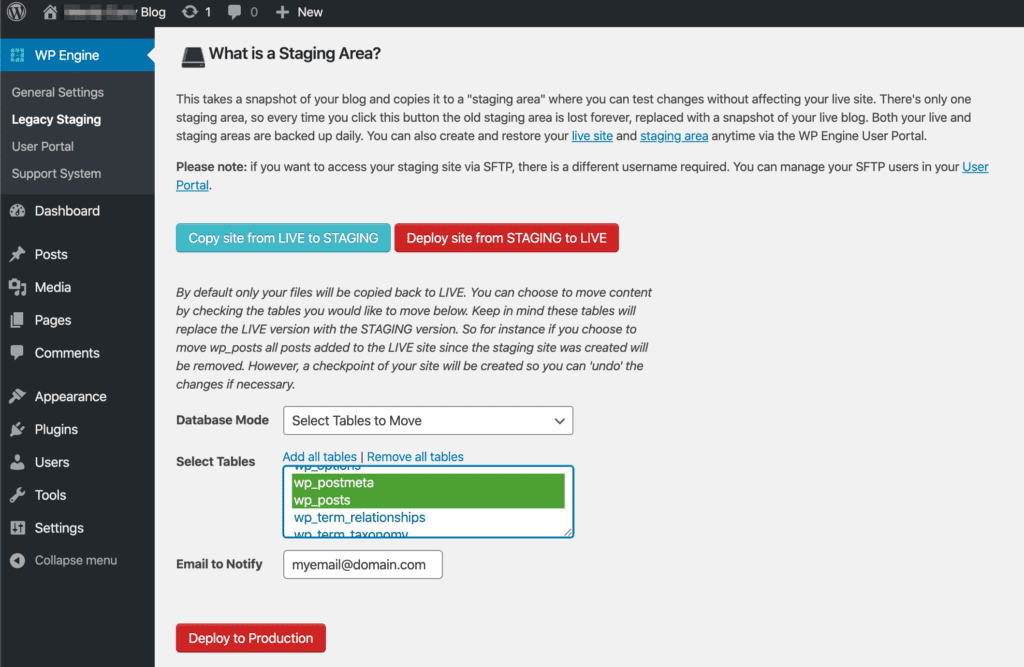
- When deploying to live there are 3 database options. Tables cannot be merged, only overwritten.
- Move All Tables — Overwrite all tables on live
- Select Tables to Move — Overwrite specific tables on live
- Move No Tables — Copy no tables to live from staging
- You cannot specify which files from the filesystem are pushed.
- The legacy file system deployment is non-destructive. This means files updated on staging will overwrite existing files on live. Files deleted on staging will not be deleted on live.
- The WordPress core version on staging must match live or the deployment will not start.
To start a deployment to live:
- Open WordPress wp-admin
- Click on WP Engine plugin on top left
- Select Legacy Staging
- Click red button Deploy site from STAGING to LIVE
- Select a Database Mode
- Click red button Deploy site from STAGING to LIVE
Commonly Excluded Database Tables
If you’ve added content to the live site since the last push to staging and you hope to preserve that data when pushing back, you can exclude that table when pushing to live. Ultimately you may need to refer to the plugin support if you’re not sure which tables hold data you wish to keep.
To select multiple tables, hold CTRL and click the table names.
To deselect a table, hold CTRL and click the table name.
To push all changes except for pages, posts and users to your live site, select all database tables except:
wp_posts
wp_postmeta
wp_users
wp_usermeta
If you are using WooCommerce the tables WooCommerce stores Order data you may want to exclude from the deployment. It might be a good idea to exclude the user information as well.
wp_posts
wp_postmeta
wp_woocommerce_order_items
wp_woocommerce_order_itemmeta
wp_users
wp_usermeta
NOTE: If you’re using a custom database prefix, these would read yourprefix_tablename instead of wp_tablename.
Access Legacy Staging File System
All SFTP users are restricted to one environment, including legacy staging. To access your staging site’s file system using SFTP simply use the normal instructions for connecting to SFTP.
When creating the new SFTP account, however, be sure to set the user to the Legacy Staging environment instead.
You can also edit any existing SFTP user’s settings and change the “Environment” to Legacy Staging
Legacy Staging Database
You can access to the staging site database in the same way that you access the live site’s database, but the database itself will be titled differently.
- Login to the User Portal
- Select the Live environment name from the list
- Click phpMyAdmin at the top
- Once inside phpMyAdmin, select the database starting with
snapshot_(EX:snapshot_environment).- The database starting with
snapshot_refers to the legacy staging database. (Ex:snapshot_installname) - The database staging with
wp_refers to your Live site’s database. (Ex:wp_installname)
- The database starting with

NEXT STEP: Check out our new Staging and Development environment workflow