Add Domain in User Portal
Adding a domain in the User Portal should be done when you are ready to go live with your WordPress website and should be done before modifying DNS records. This process is necessary to ensure that after DNS is pointed, your traffic can be routed to the correct environment.
Add Domain in User Portal
A new domain must be added to the WP Engine User Portal in order to properly route the domain to the intended WordPress website.
NOTE: Shared hosting plans– Custom domains can only be added to your Production environment. Custom domains cannot be added to Staging, Development, Legacy Staging or Transferrable sites. Dedicated hosting plans– Custom domains can be added to any environment.
- Log in to the User Portal
- Click on the production environment name
- Click Domains
- Click Add Domain
- Enter your domain
- Select either:
- I’ve purchased this domain. If you have already purchased the domain name.
- I haven’t purchased this domain. If you haven’t purchased the domain and wish to see registrar recommendations.
- Click Next
At this point a new page will load and your domain has been added to the User Portal. You can exit the process now if you wish, or continue following the prompts if you’re ready to finish going live with the domain.

NOTE: If you receive the error “Domain name has already been taken”, check out the Duplicate Domain section below.
Domain Connect Options
If our system detects your domain register supports Domain Connect, you will see the name of your registrar listed on the page after adding your domain to the User Portal. Domain connect will then request you log in to your registrar so we can point DNS on your behalf. Learn more about Domain Connect in the extended guide.
If your DNS provider does not support Domain Connect, you will be provided the manual DNS connection information here instead.
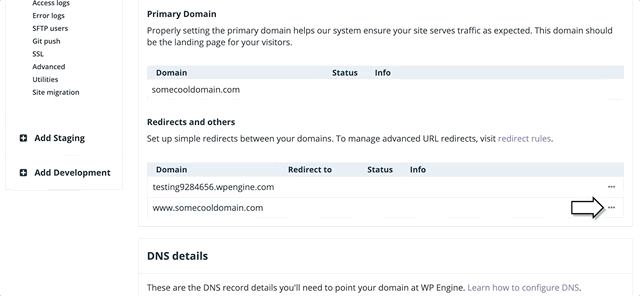
Primary Domain
Your website can ultimately only resolve to only one domain in the browser, we call this the Primary Domain. The Primary Domain can impact 301/302 redirects as well as the copy environment process, so it’s important to set this correctly when going live.
The Primary Domain can only be one of the following types of domains:
- A domain without “www“. EX:
mydomain.com - A domain with “www“. EX:
www.mydomain.com - A subdomain. EX:
blog.mydomain.com
A Primary domain cannot be a subdirectory (EX: domain.com/blog). For more information, review this guide.
Set Primary Domain
- Log in to the User Portal
- Select the Production environment name from the list
- Click Domains
- Next to a domain, click the 3 dot menu icon
- Click Set as Primary
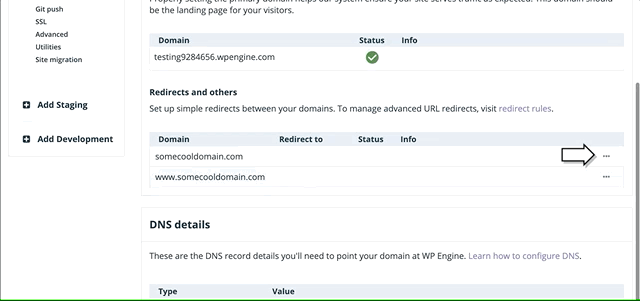
Domain-level Redirect
A domain-level redirect is useful because it tells the entire server to immediately send requests to one domain to another.
For example, if your primary domain is mydomain.com then requests to www.mydomain.com should immediately forward. Doing this as a domain-level redirect in the User Portal will ensure the redirect can be performed as quickly as possible.
It will also ensure any 301/302 redirects configured in the User Portal for a domain will function for all domains redirected to it, now and in the future.
Set Domain-level Redirect(s)
- Locate the domain you wish to redirect
- Click the 3 dot menu icon to the right
- Select Add Redirect
- From the dropdown, select the domain you’d like to Redirect to
- The dropdown will default to your Primary Domain
- Click Save Changes
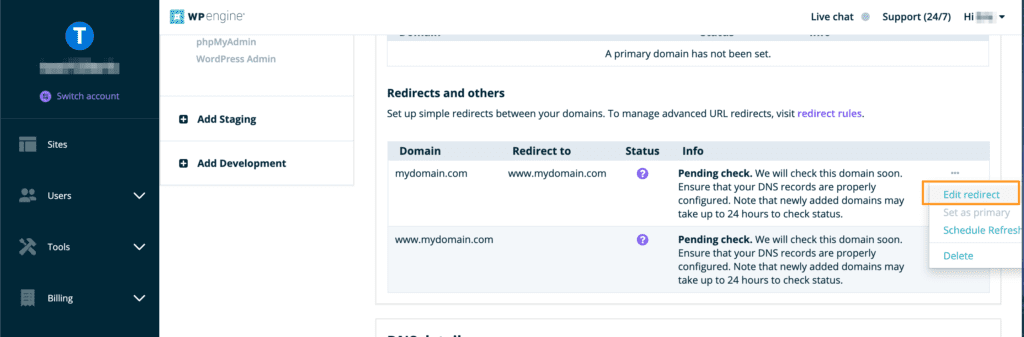
Edit/Remove Domain-level Redirect
Incorrectly setting your domain-level redirects can cause a redirect loop. Additionally, if you’re attempting to set a 301/302 redirect from the User Portal and cannot select the desired domain from the dropdown, there is like a conflicting domain-level redirect set.
To edit or remove an existing domain-level redirect:
You may find that redirecting at the domain level impedes some other more custom redirect you’d like to do on one of your domains. In this case the domain-level redirect would need to be removed or modified.
- Click the 3 dot menu next to the domain
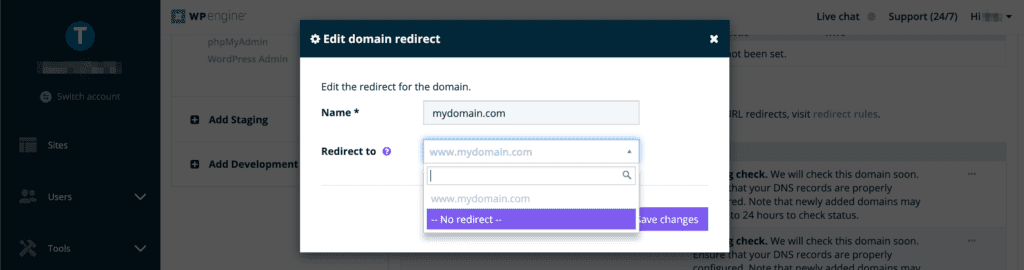
- Click Edit Redirect
- Click the dropdown for Redirect to
- Select –No Redirect– or an alternate domain option
- Save changes
Duplicate Domains
A custom domain can only be applied to one environment at a time. The same domain cannot be added to multiple environments across any WP Engine accounts. You will see either of the following errors if you try to add a domain that is already associated with another Environment.
Domain name has already been taken
Or
Domain name is already configured as a domain on the install "xyz". Please choose a unique name.
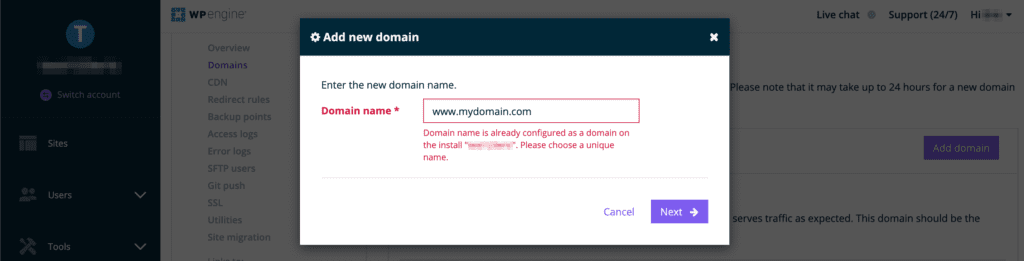
If you encounter one of these errors, please remove the domain from other Environments before attempting to add it to this one. You can use the search bar at the top of the User Portal to search for the domain across all of your accounts.
If you cannot locate the domain name on your account, you will need to verify ownership of the domain so we can move it. Log in to your DNS host and add the following TXT record:
wpe-verification=yourenvironmentname
Be sure to replace yourenvironmentname above record with the specific name of the environment you’d like the domain added to, or we will not be able to verify the record. For example: If your environment is mycoolsite.wpengine.com the record would be: wpe-verification=mycoolsite
Finally, contact WP Engine Support and we will help verify ownership of the domain and add it to your User Portal.
NEXT STEP: Update your website’s URL in WordPress