WP Engine’s Advanced Network
WP Engine’s new advanced network is the fastest and most secure way for visitors to access your website. The advanced network utilizes our custom blend of Cloudflare features to improve the speed, scalability, and security of your website. Best of all, the advanced network feature will be provided at no charge to all WP Engine customers!
We will be granting advanced network access to accounts across WP Engine in phases during the coming year. Please be aware that once the feature is made available to your account, that you must next update to the advanced network for each environment from the User Portal, and perform a DNS change to complete the advanced network conversion process.
Not sure what the differences between the advanced network and our other network types are? Check out our network comparison guide.
About the Advanced Network
At WP Engine, we’re focused on delivering the most innovative, fast, and secure platform in WordPress to power your digital experiences. We have been hard at work this past year to create and deliver innovative improvements to our platform at no additional cost to you. One of these innovations is our new advanced network, in partnership with Cloudflare.
This advanced network delivers increased security and performance out of the box. When you update to this network option you will have Layer 3 & 4 DDoS protection, Cloudflare’s powerful CDN, and Cloudflare Polish lossless image compression.
Additionally, our advanced network supports HTTP/3. HTTP/3 accelerates HTTP requests by using QUIC, which provides encryption and performance improvements compared to TCP and TLS. Learn more on the Cloudflare blog.
Advanced Network Entitlement
We are currently in the process of entitling the advanced network feature for all WP Engine accounts. This means that currently not all accounts will be able to start using the advanced network and its benefits.
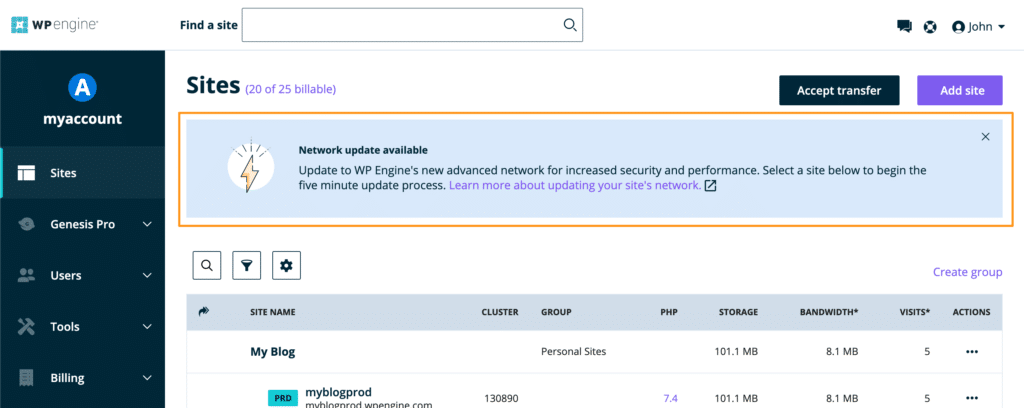
If you do not see a Network update available banner in the User Portal on the Sites page, like the one below, then your account does not have the feature available yet. Don’t worry- it will be made available to you in the coming weeks!
Update to the Advanced Network
An environment can be updated to the advanced network through the User Portal. This step ensures that the new and exciting Cloudflare features are enabled and ready to go for the environment.
Each domain must have this step performed independently before pointing DNS. Pointing DNS alone will not enable the advanced network and can take your site offline. The option to bulk update will be made available in the future.
- Log in to the User Portal
- Select an environment from the Sites page
- Click Domains in the secondary menu, on the left
- Scroll down on this page and locate your domain
- Click the button labelled Update Network near the domain
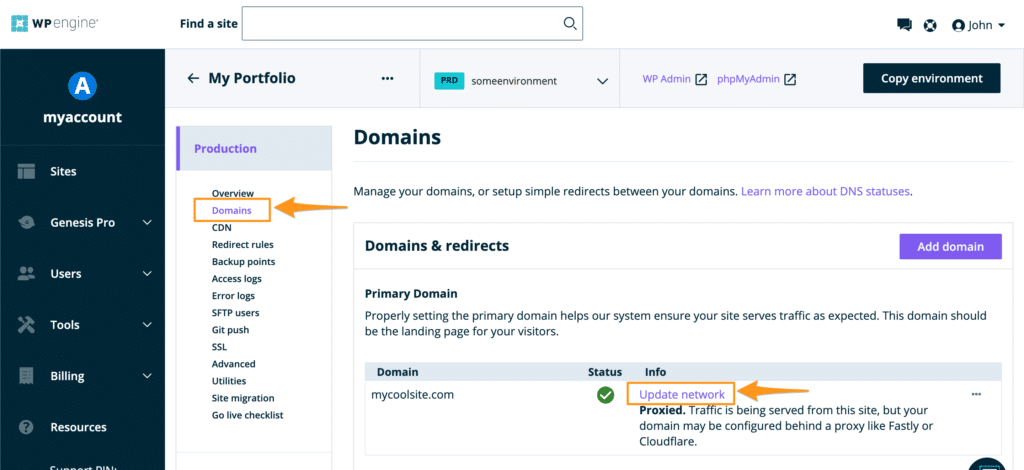
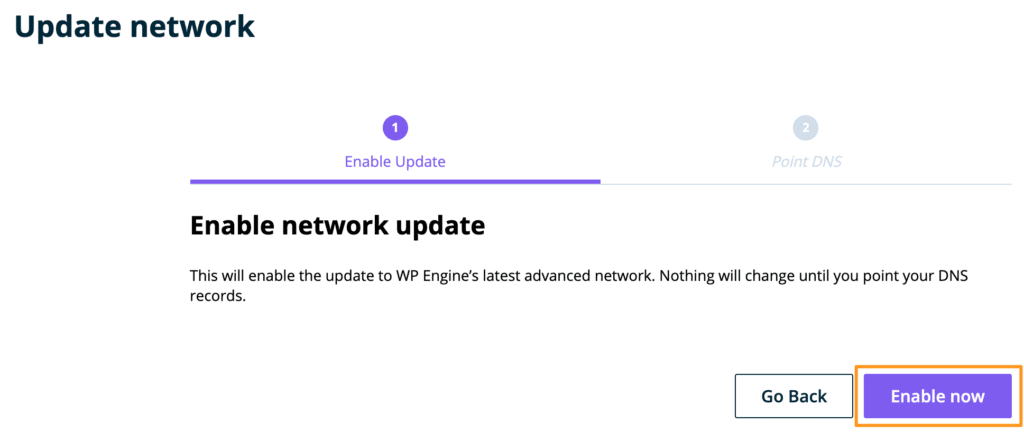
- The page will verify you want to make the change
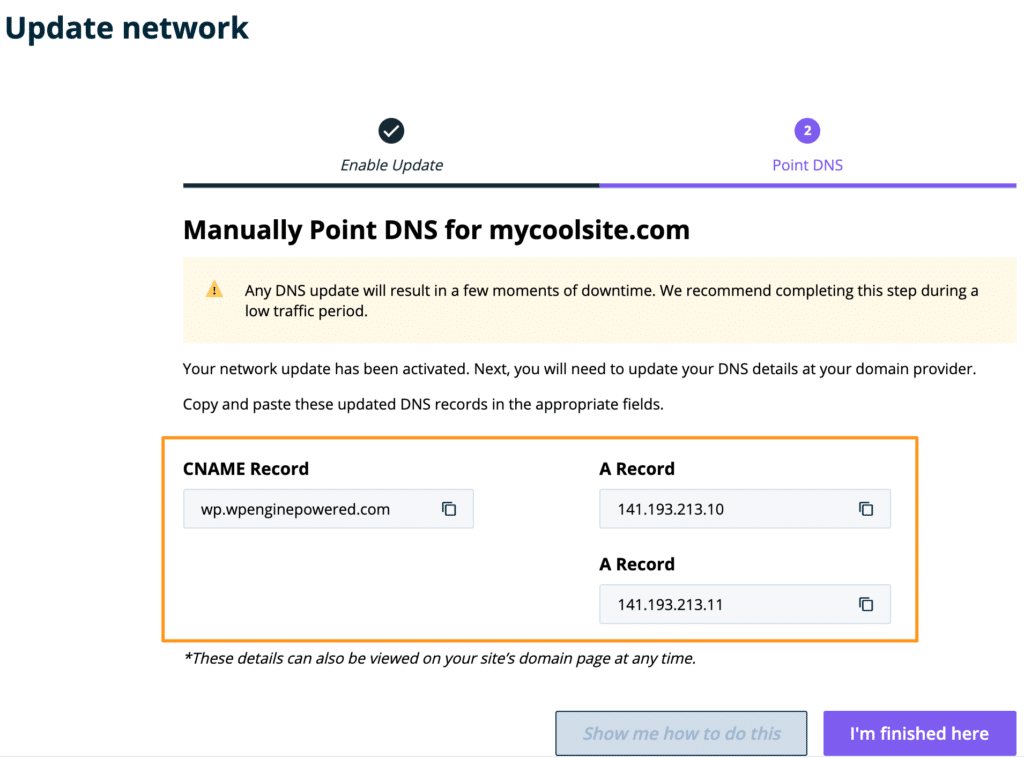
- Finally, the advanced network CNAME and IP information will be displayed
If you utilize both the www and non-www versions of your domain name, we recommend clicking I’m Finished here to return to the Domains page. Next, click Update Network by the additional domain variant. This will ensure both versions are configured with WP Engine to take effect after pointing DNS in the next step.
NOTE: At this time nothing has changed with the way your website is being served. You must update your DNS records in the next step to the advanced network CNAME or IP addresses to complete the network conversion process.
Point DNS to the Advanced Network
The advanced network uses the same CNAME and IP addresses across all WP Engine hosted websites. This will simplify the DNS configuration process, especially when updating DNS for several websites.
Domain Connect will be available later this year to automate the DNS configuration process for the advanced network. Until then, you will need to manually point your records by logging in to your DNS host.
While a single platform CNAME is in contrast to the standard DNS configuration (where each environment has a different CNAME), it is still considered best practice to point DNS using CNAME flattening, rather than with A records.
NOTE: If your DNS is hosted with Cloudflare, ensure the DNS records below have the orange cloud proxy disabled (the cloud icon should be grey). Learn more about the orange cloud here.
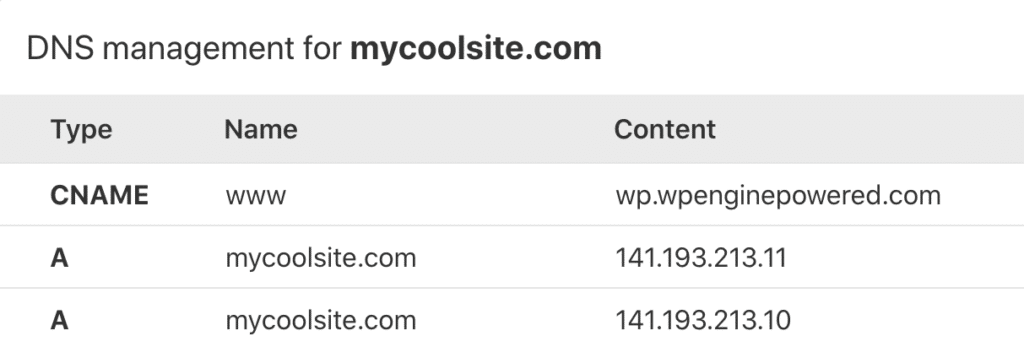
Advanced network CNAME: wp.wpenginepowered.com
When configuring DNS, simply use the new advanced network CNAME instead of your WP Engine CNAME (EX: environment.wpengine.com). To review the DNS configuration steps for CNAME records, see our extended DNS guide.
Correctly configured CNAME records for advanced network will look like the following example:

Advanced Network IP Addresses
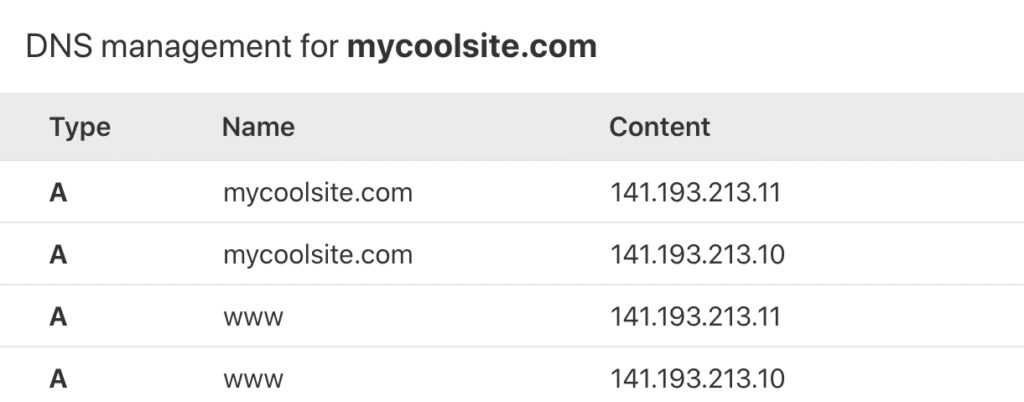
Alternatively, the advanced network also has two A records available, similar to our Global Edge Security (GES) feature. If you choose to point DNS using the A record method, it is ideal to use two A records.
Advanced network IP addresses: 141.193.213.10 and 141.193.213.11
The advanced network DNS can successfully be configured using either A record shown. However, we highly recommend configuring your DNS using both A records to ensure you are able to take full advantage of our Cloudflare load balancing configuration.
Correctly configured A records for advanced network will look like the following example:
The following example is also an acceptable configuration when pointing with A records:
That’s it! Once your records have been updated with your DNS host you will have successfully enabled the advanced network.
A Cloudflare SSL will be issued after the DNS has been verified. This process may take a few minutes.
If you have questions, or run into an issue, please reach out to our Support team at any time.
Cache and CDN
The advanced network utilizes Cloudflare’s CDN and caching at a DNS level. If you are utilizing WP Engine’s basic CDN offering with MaxCDN it will no longer be used when switching to the advanced network.
While the zone URL for MaxCDN will remain active your assets will no longer be loaded over it. We recommend removing the zone URL from your website to ensure functionality is maintained. Cloudflare does not utilize custom zone URLs as the CDN is operated at the DNS level.
Advanced network cache can be purged from the User Portal > Caching page, under Clear network caches.
NEXT STEP: Learn how to point your DNS to WP Engine
