Git Version Control System
** This article is written for users on the User Portal “Sites” experience, which allows users to create sites made of three environments: Production, Staging, and Development. For users working with the Legacy 1-Click Staging sites, such as environment.staging.wpengine.com, consult our Legacy Git Guide instead.
Git is a powerful development tool which enables developers or a development team to securely push code changes from their local machine to their site on WP Engine with the benefit of version control.
Generate SSH Key
The first step to enabling Git on your WP Engine site is to add your SSH Key to the User Portal. SSH Keys cast aside traditional username and password and opt instead for a public and private key pair for authentication.
If you don’t already have a SSH key, use the steps below to generate your public/private key pair:
Option A: Generate Key Pair in Terminal
Option B: Generate Key Pair with PuTTY
NOTE: For additional assistance generating SSH keys, see GitHub’s “Generating a new SSH key” article.
Option A: Generate Key Pair in Terminal
- Open a Terminal window
- Mac: Use the Spotlight utility and type “Terminal”
- Windows: Use Git Bash
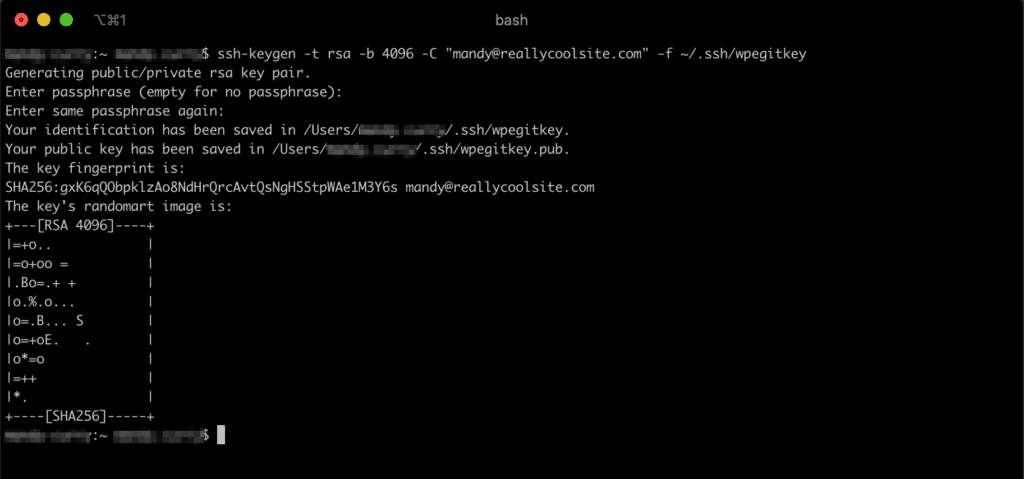
- Use ssh-keygen to generate a new key as shown below. Be sure to replace
[email protected]with your own email address.ssh-keygen -t rsa -b 4096 -C "[email protected]" -f ~/.ssh/wpegitkey

- Leave the passphrase blank by hitting enter or return again, without typing anything.
- If you wish to set a password, you may. However the security benefit is debatable and it cannot be recovered if lost.
- Press enter or return again to confirm the password entry

- Doing this will generate your public/private key pair
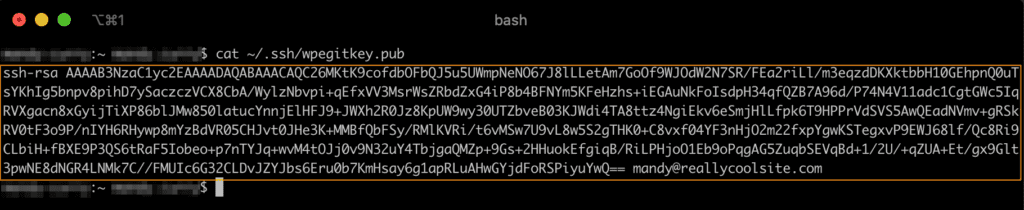
- Print and copy the text of your new public key file, called
wpegitkey.pubcat ~/.ssh/wpegitkey.pub
- Copy and use this output when entering a key on the Git push page in the User Portal in Step 3
- Key content will begin with
ssh-rsaand end with the email address you used in the keygen command in step 2
- Key content will begin with
Option B: Generate Key Pair with PuTTY
- When you install the PuTTY program, also install the PuTTYgen utility
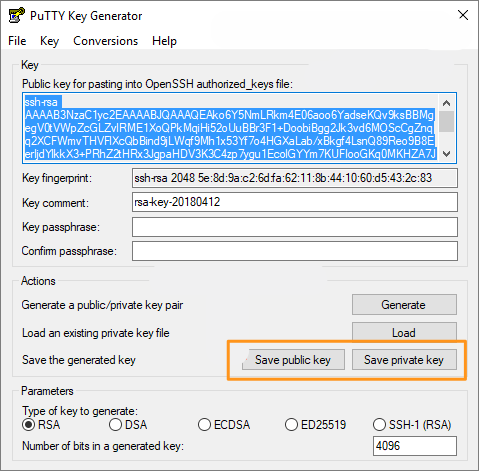
- Open the PuTTYgen utility to generate your SSH key
- When asked which type of key to generate, select SSH-2 RSA
- Click the Generate button to create your public and private key pair
- Save both the public key and the private key locally and take note of where the files will reside on your computer
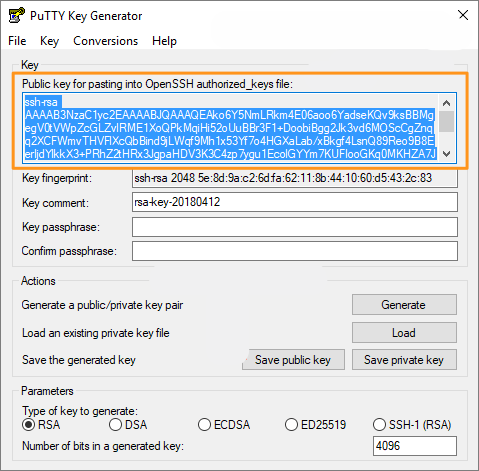
In a future step you will be asked to enter the public key into the WP Engine User Portal. We recommend simply copying the key from the top of the window in PuTTY.
Create SSH Config
The SSH config file tells your computer which key file to use when connecting to a specific server hostname. SSH Gateway and Git use different hostnames on WP Engine and we do not recommend using the same key for both.
By setting up a SSH config file now, and telling your computer in advance which SSH key is used for which service, you will prevent any possible connection issues down the road.
- On your local machine, first navigate to your
.sshdirectory.- MacOS – Open Terminal and type:
cd ~/.ssh/
- Windows – Use Git Bash and navigate to:
/c/Users/[youruser]/.ssh/
- MacOS – Open Terminal and type:
- Create the config file by running:
touch config
- Open the new config file by running:
nano config
- Once open, use the arrow keys to ensure you’re at the very bottom of the file
- Paste the following contents:
Host git.wpengine.comUser gitHostname git.wpengine.comPreferredAuthentications publickeyIdentityFile ~/.ssh/wpegitkeyIdentitiesOnly yes
- To save and exit the nano editor:
- Hold
ctrlbutton then pressx
- Hold
If you are using a different key file than what we generated in Step 1, be sure to update ~/.ssh/wpegitkey to your own private key file path.
If you are using SSH Gateway and Git, additional SSH Config contents must be added for SSH Gateway.
You will need to test that the SSH config works but can only do this after your SSH key has also been added to the User Portal in the next step.
Add SSH Key to User Portal
To securely use Git with a WP Engine environment, you must add your SSH key to the User Portal in the Git Push section. Your key must be added to each environment independently that you wish to use Git push with.
If you need to generate a key, review the previous step here. We do not recommend using the same SSH key for both Git and SSH Gateway.
- Navigate to your User Portal
- Click the environment name where you would like to connect with Git
- Then click Git push from the left-hand navigation
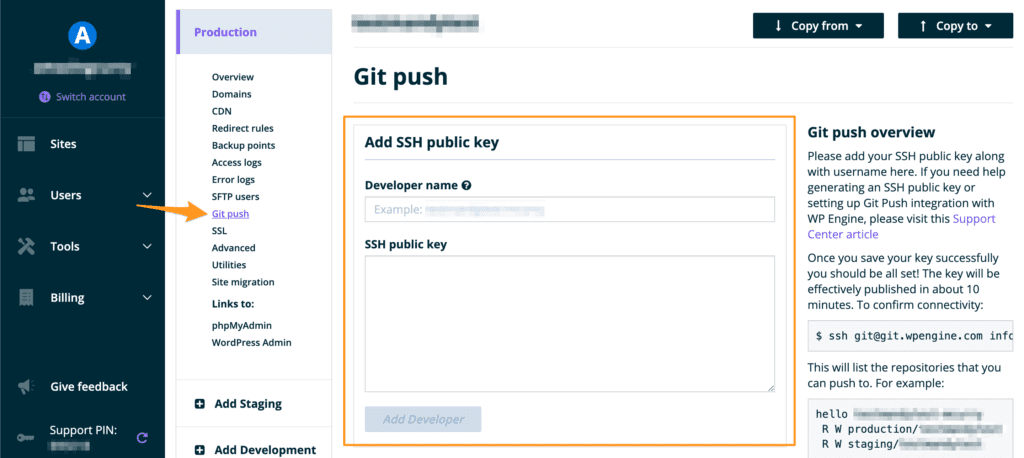
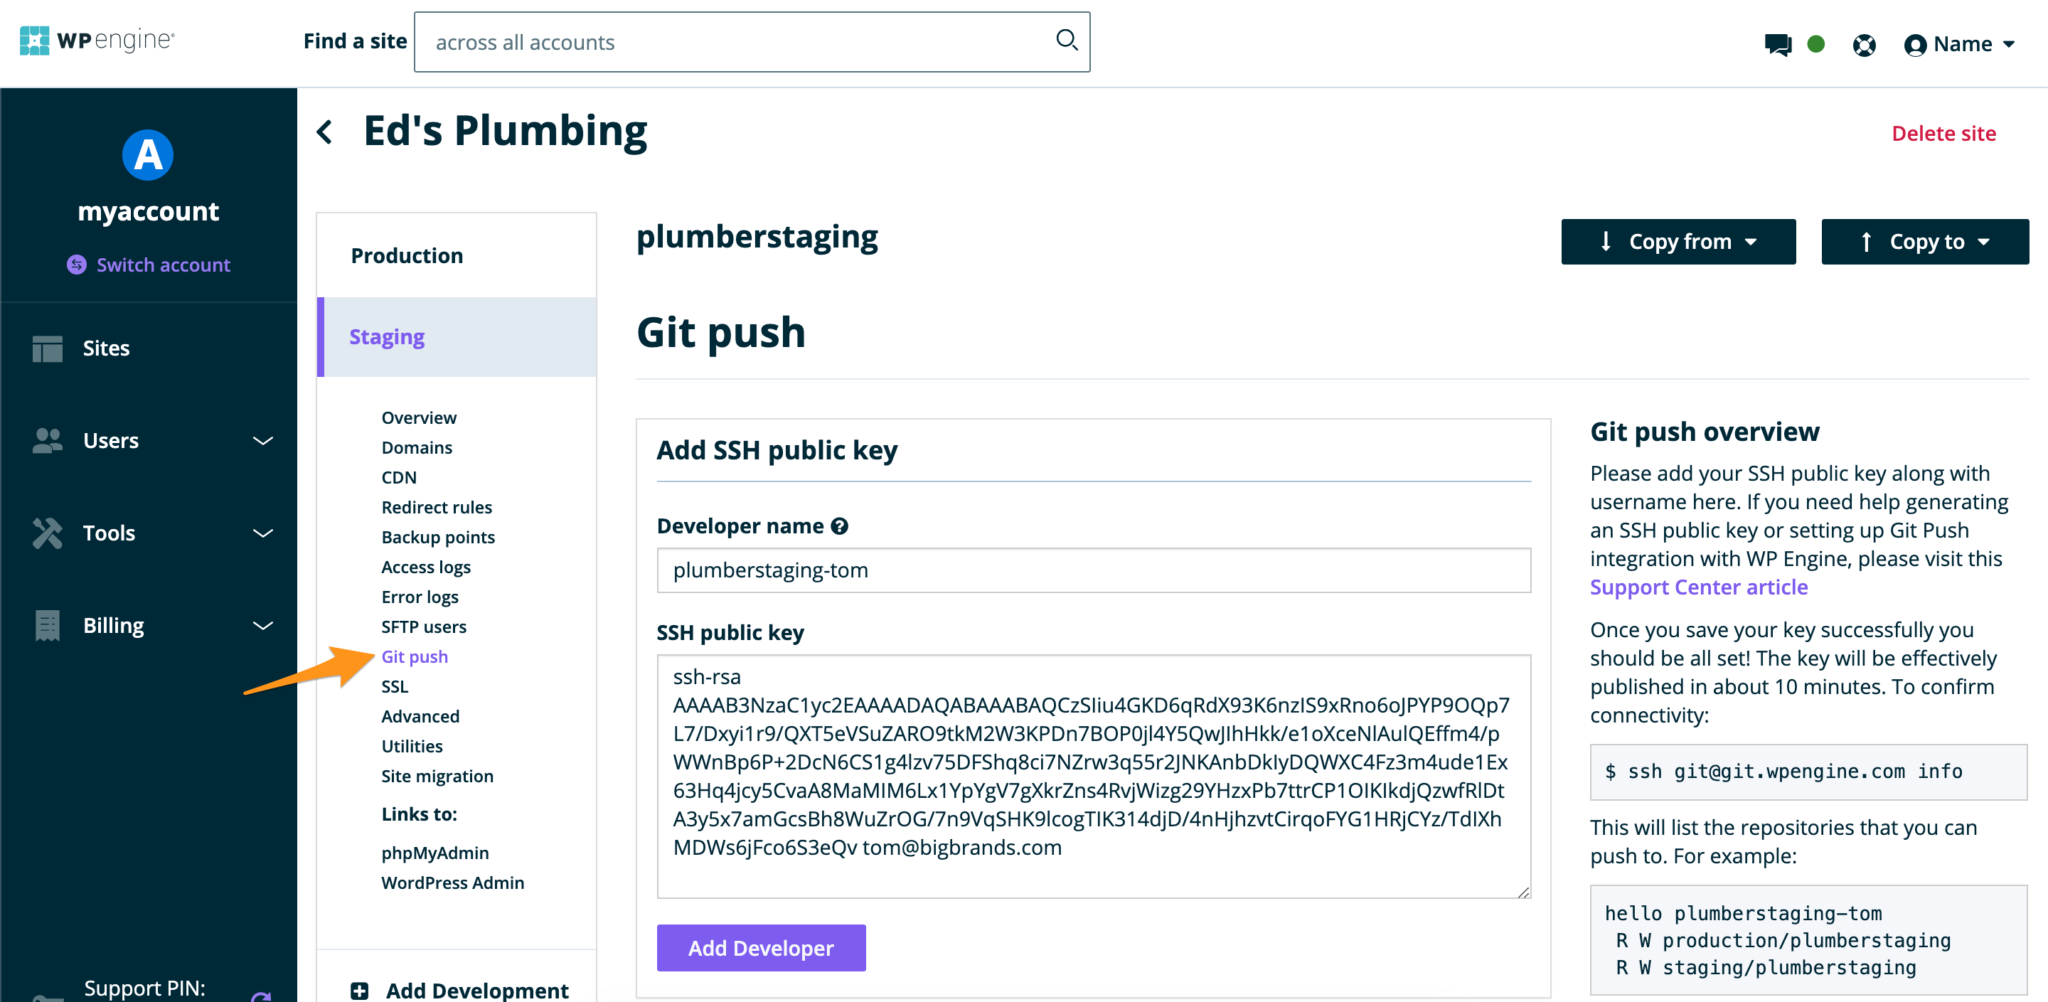
- Fill in a Developer name
- We will automatically append the environment name to this username in the following format:
environmentname-yourname - If you choose a username that is already in use, you will receive an error and will be prompted to choose another username
- We will automatically append the environment name to this username in the following format:
- Paste the contents of your public key in the SSH public key field
- This is the key generated in the previous step Generate SSH Key
- Ensure there are no extra spaces or line breaks before or after the key
- Click Add Developer
NOTE: If you receive an error, please ensure you are copying directly from the id_rsa.pub file that is created when following the Generating SSH Keys instructions.
Your key will be typically be published approximately 10 minutes after saving, but may take as long as 45 minutes. In the meantime you will see an error if you try to connect to Git in the following steps.
Add Existing Git User to Another Environment
Be sure to add the public key for all environments individually for which you wish to use git. Once you have added a key the first time to the WP Engine User Portal it can be added to additional environments by adding the key and full username (acoolsite-anothername in our example below) to the new environment, in the same way as above.
You will receive a prompt at the top of the screen to confirm adding the same key to a new environment. Be sure to click Yes.
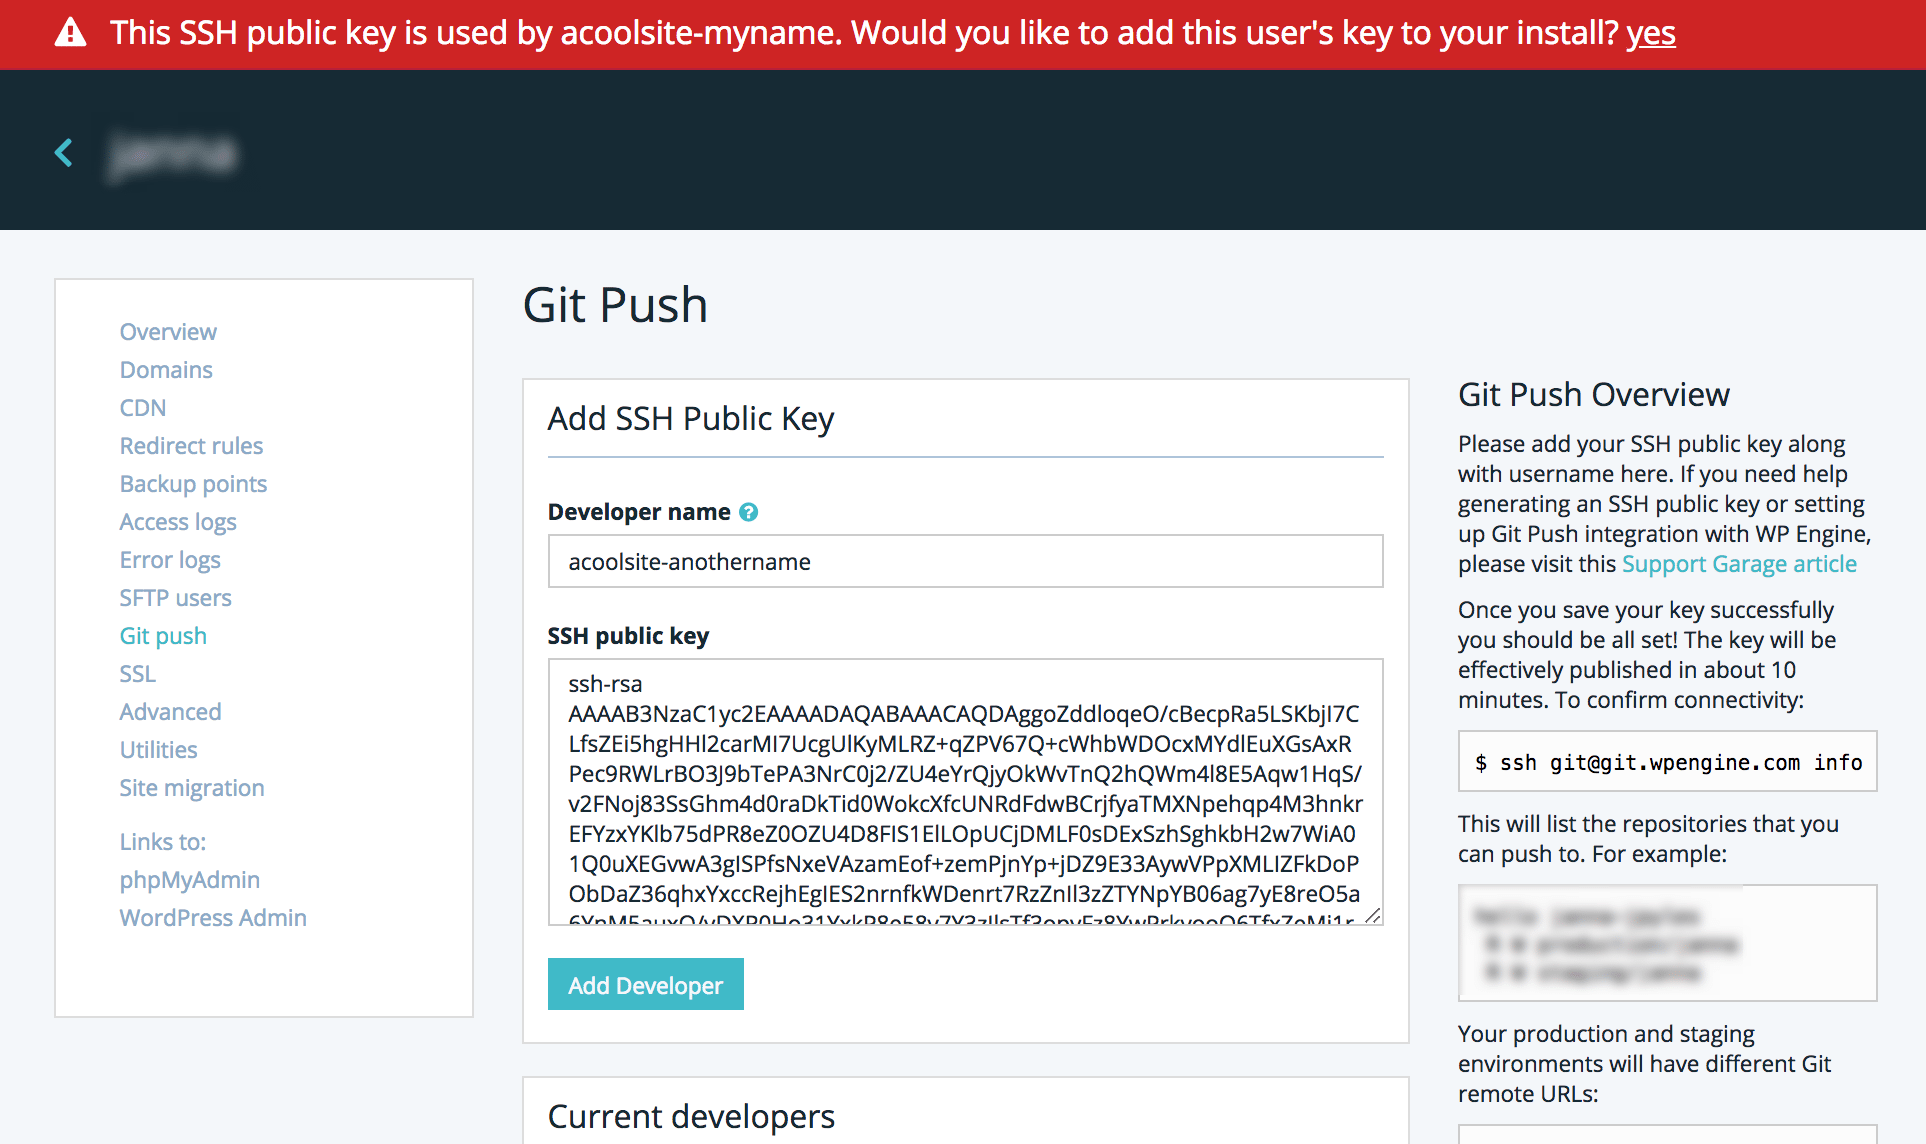
NOTE: If you attempt to add a key that already exists but provide a different username, you will be prompted to confirm that you want to add the existing username to the install.
Remove Git User
If you ever need to remove a Git user from an environment, follow these steps.
- Log in to the User Portal
- Click on the environment name you wish to add the SSH key to
- Click Git push
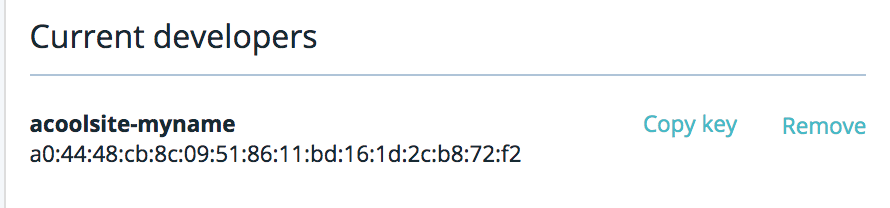
- Scroll to Current developers
- Click Remove next to the developer you wish to revoke access
NOTE: The key can also be copied to your computer’s clipboard for addition to other environments using Copy key.
Should you see an environment name that does not match your environment, keep in mind that the developer keys are often created with the name of the original environment as part of an identifier for the developer. Some developers may have developer keys that are tied to environments that are not associated with your account. This does not grant the owners of the referenced environment any unauthorized access to your account, nor does it grant you any unauthorized access to theirs.
Test SSH Config
Now that you’ve created your keys, added them to WP Engine and configured an SSH config file, let’s make sure the SSH config file is functioning.
Run the following command in your terminal:
ssh -v [email protected] info
You’ll see output similar to the following if your SSH Config file is successfully configured got Git (line numbers and version numbers will vary):
OpenSSH_8.1p1, LibreSSL 2.7.3
 debug1: Reading configuration data /Users/yourlocaluser/.ssh/config
 debug1: /Users/yourlocaluser/.ssh/conf.d/wpengine line 1: Applying options for git.wpengine.com
 debug1: /Users/yourlocaluser/.ssh/config line 4: Applying options for *
 debug1: /Users/yourlocaluser/.ssh/config line 31: Applying options for git.wpengine.com
 debug1: Reading configuration data /etc/ssh/ssh_config
 debug1: /etc/ssh/ssh_config line 47: Applying options for *
 debug1: auto-mux: Trying existing master
 hello user-environment
 R W    production/environment
 R W    staging/environment
Your system will display line numbers in the above output. These can help narrow down the source of any issues by displaying which lines are or are not being used for the connection.
In our example above, you’ll see line 31: Applying options for git.wpengine.com indicating that specific part of the file that is being read and applied to the [email protected] connection that we requested the information for.
If the connection was unsuccessful, we would then want to read this output carefully and adjust our local config file settings accordingly. This is a great place to start when troubleshooting SSH connection issues.
Copy Content Locally
The next step is to download a copy of your site’s content to your local machine so a remote repository can be created.
If you already have a repository for your application’s code, you will only need to add the Git ‘remote’ end points (Step 7) and perform a push (Step 8). You can Skip to Step 4, if this is the case and you do not wish to create a repo from a backup.
If you don’t already have a local copy, we recommend downloading a backup point from your User Portal to accomplish this step.
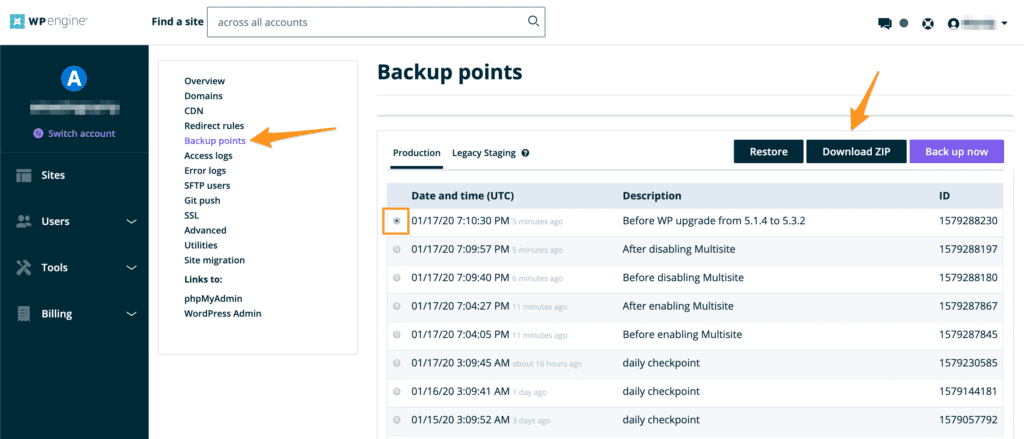
- Log in to the User Portal
- Select the environment name you’re connecting Git to
- Click Backup points in the left navigation
- Select a backup to use as a starting point for the local repository
- Click Download Zip
- Confirm which email address(es) should receive the backup zip file
- You will receive an email within a few minutes containing the backup zip file
- Move the zip file to the folder on your local machine where you will be managing your Git repository
- Unzip the backup archive locally
Add .gitignore
The next step is to configure a .gitignore file on your local machine, which will define which files and folders should never be edited and pushed via Git. Below we have provided two templates for your .gitignore file.
- Download the starter
.gitignoretemplate of your choice - Add any other files that should be ignored
- Move the
.gitignorefile into the folder on your local machine where you will be managing your Git repository- Be sure to place the
.gitignorefile in the root directory of the local copy of your website
- Be sure to place the
We suggest only tracking the minimal amount of files if possible. This helps reduce issues down the line. For example, if only working on a theme file, the .gitignore file should exclude everything but that file. Feel free to add any of your own site-based exclusions as-needed to the provided template files.
Option A: Ignore WordPress core files
This option is recommended.
We can and will continue to keep your application’s WordPress install up-to-date – it’s easier if the repository doesn’t contain WordPress core files.
WordPress core is available from WordPress.org or directly from several locations (svn, Git mirrors) – why version something someone else is already versioning elsewhere?
Option B: Keep WordPress core files versioned
This is an alternative version.
If you prefer the Git repository to contain WordPress core files, we will create a new commit and push the WordPress core upgrade back to your repo.
Option C: Utilizing Smart Plugin Manager
When utilizing Smart Plugin Manager automated plugin updates along with Git on a website, a more specific gitignore should be used. These gitignore files are similar to the two previous options in that you may choose to ignore or keep WordPress core files versioned.
Ignore WordPress core files & Smart Plugin Manager
Keep WordPress core files versioned & Ignore Smart Plugin Manager
SPM keeps your plugins up to date with the version available on the WordPress plugin repo, or Github when utilizing a custom integration. This means the entire plugin directory is excluded so the files can be versioned elsewhere. If you choose to not have SPM manage a particular plugin, you can modify the gitignore file to include it by adding the following to the bottom of the # smart plugin manager specific section:
!wp-content/plugins/your-plugin-name/
Disallowed Files and Types
In envisioning what Git deployment would look like and how it would function, it was important to be providing a means to quickly deploy code, not manage repositories. Sure, a repository is created as a result of using Git but it’s important to us to not be in the business of repository management. Plenty of others in the space are doing this, and doing it well – GitHub.com, BitBucket.org, Unfuddle, et. al.
We also wanted the deployment process to be fast and agile. Versioning large media files is not only an inefficient way to use source control (as the files are binary so differences between commits are not easily tracked or displayed), but it can also make the process time consuming. In some cases for these known large file types, it’s best to use a CDN, and you can continue to use your SFTP access to upload these files to your account.
In order to keep your application running smoothly, we don’t allow you to push any files that are essential to the operation of your application. This includes files like object-cache.php, wp-config.php, and a number of compressed and executable file types. To prevent errors, these files should be always be in the .gitignore file and are added by default to both .gitignore examples above.
The following files and types cannot be pushed with Git.
wp-config\.php
_wpeprivate
wp-content\/uploads
wp-content\/blogs\.dir
wp-content\/upgrade
wp-content\/object-cache\.php
wp-content\/mysql\.sql
wp-content\/mu-plugins\/mu-plugin\.php
wp-content\/mu-plugins\/slt-force-strong-passwords\.php
wp-content\/mu-plugins\/wpengine-common
wp-content\/mu-plugins\/limit-login-attempts
\.hqx$
\.bin$
\.exe$
\.dll$
\.deb$
\.dmg$
\.iso$
\.img$
\.msi$
\.msp$
\.msm$
\.mid$
\.midi$
\.kar$
\.mp3$
\.ogg$
\.m4a$
\.ra$
\.3gpp$
\.3gp$
\.mp4$
\.mpeg$
\.mpg$
\.mov$
\.webm$
\.flv$
\.m4v$
\.mng$
\.asx$
\.asf$
\.wmv$
\.avi$
In addition, it’s never wise to store sensitive information in source control such as passwords and/or API keys.
Confirm Git Access
If it has been at least 10 minutes since adding your SSH public key to User Portal, you may now test to confirm your user has access to Git for your environment.
- Copy the command below into your Terminal, Git Bash, or PuTTY window:
ssh [email protected] info
- If you have never connected to Git on WP Engine before, you will be prompted to verify host authenticity before connecting, like this:
ssh [email protected] info
The authenticity of host 'git.wpengine.com (<no hostip for proxy command>)' can't be established.
ECDSA key fingerprint is SHA256:Jgp8bPftGbM0rzQaeA7KTBrZa1UfEN1nqQMLIwu5i18.
Are you sure you want to continue connecting (yes/no)?
- WP Engine’s host fingerprints are:
RSA 19:17:ee:d2:1d:8d:c9:3e:dc:3e:0d:21:a7:c6:52:fc
ECDSA 0c:4b:07:92:dd:e0:be:50:90:7d:0d:c3:30:56:fa:9a
ECDSA SHA256 Jgp8bPftGbM0rzQaeA7KTBrZa1UfEN1nqQMLIwu5i18
- If the host fingerprint matches the above, type yes to continue connecting
- You will receive a message indicating
git.wpengine.comwas added to your known hosts- This does not indicate a successful connection! It simply means your local machine will remember that git.wpengine.com is an accepted host with a valid fingerprint.
Warning: Permanently added 'git.wpengine.com,' (RSA) to the list of known hosts.
If the Key is Recognized
If your key is recognized by the Git service on WP Engine, you will see a list of environment names to which your user has access to.
$ ssh [email protected] info
hello developer-name
R W production/environmentname
R W staging/environmentname
Please see http://git.wpengine.com for more help
If you have added your public key to your Production, Staging, and Development environments within a Site you will see the unique environment name for all listed as production/environmentname regardless of their Prod/Stage/Dev label in the User Portal.
Remember! Any remotes listed as staging/environmentname refer to the Legacy 1-Click Staging site for that particular environment name, which may not actually be in use. In most cases, simply ignore any staging/environmentname remote. Learn how to use Git with legacy 1-click staging.
If the Key is Not Recognized
If your key is not recognized by the Git service on WP Engine, you will see this error:
[email protected]: Permission denied (publickey).This error indicates that the WP Engine Git service does not recognize the key. Either:
- You haven’t waited long enough for the key to be fully added (up to 45 minutes)
- Simply wait longer, then attempt to connect again
- Or, you are connecting with an incorrect key
- Create a SSH config file to ensure your computer presents the correct key to
git.wpengine.com
- Create a SSH config file to ensure your computer presents the correct key to
First Git Commit
If your local copy of your site has not been used as a Git repository before, you will need to make it into a repository by using the Git init command.
cd ~/path/to/localrepo
git init .
Now that your copy is setup as a Git repository, you can make your first commit. This will add all modified and new files (other than those in your .gitignore file) to Git for them be tracked. Since this is a new copy of your website that we’ve made into a Git repository, all files will be “new” to git.
git add . --all
git commit -m "First Commit"
NOTE: At this point, nothing has changed on the front-end of your WP Engine environments. First, we will need to setup remotes in Step 7 so we can use the Git push command to deploy files.
Add Git Remotes
The next step is to map your local repository to the remote endpoints where you will deploy file changes on WP Engine. If you added your key to production, staging, and development environments within your site in the first step, you will need to add a remote for each of these environments.
First, navigate to the local Git directory that you have created:
cd ~/path/to/localcopy
Then add your remotes individually:
git remote add production [email protected]:production/prodenvname.git
git remote add staging [email protected]:production/stageenvname.git
git remote add development [email protected]:production/devenvname.git
In the above commands be sure to replace prodenvname, stageenvname, and devenvname with the unique User Portal names of each environment.
You may also rename the “production,” “staging,” and “development” remotes names, if you prefer. We suggest naming them according to their role in your Site to avoid any confusion down the road.
For example:
git remote add mysitename-production [email protected]:production/myprodenvname.git
To confirm the remotes were successfully added, use the following command:
git remote -v
This will list all the remotes that were successfully added. Now that the remote endpoints for Git have been established, you can perform a Git push to deploy code changes.
Git Push Deploy
It is time to deploy using the Git push command. To deploy:
- Type git push
- Type the name of the remote you would like to push
- Type the name of the local branch you wish to push
- We also recommend that
-vflag to show a verbose output, which can be helpful if there are any errors.
EX: git push -v remote-name branch-name
To push the production master branch, for example, would look like this:
git push -v production master
The above command will push the local “master” branch to your remote endpoint named “production.” If you named the remote endpoint something else, be sure to replace “production” with that name instead (EX: git push -v mysitename-production master).
Be sure to pay attention to your Git push output, as it will indicate whether the push was successful or if it encountered any errors.
If more help is needed, please contact our Support team via the User Portal and provide the full output of your Git push.
NOTE: If you are using the Legacy 1-Click Staging environment (environment.staging.wpengine.com) rather than the new Sites with Production, Development, and Staging environments, follow our guide at Using Git with Legacy Staging instead.
Remove Files with Git push
The deployment end of the Git push process will only remove files from your application that you have also removed from your repository. For example:
- You add a file to your application, commit and push it to WP Engine,
- You later decide this file is no longer needed,
- You remove this file from your application, commit and push back to WP Engine,
- The file is now removed from your live application.
If a file never existed in your repository at all, it won’t be removed from either your live or staging application.
Git Support Commands
Should you need to reach support with a ‘git push’ question or issue, here are some commands to execute and provide the output of. This will help our support staff get your ‘git push’ issue addressed quickly and efficiently.
| Requested Output | Reasoning |
|---|---|
ssh-keygen -E md5 -lf ~/path/to/keyfile.pub | Provides your SSH public key. ~/path/to/keyfile.pub should be replaced with the actual path to the SSH public key on your system that matches the SSH public key you provided us. If the fingerprint we have for your SSH public key matches the output, then authentication to your repository will be successful. |
ssh -vv [email protected] info | Provides verbose output of your SSH connection to git.wpengine.com which can be used to troubleshoot connection and authentication issues. |
git remote -v | Provides a list of all the Git remote endpoints associated with your Git repository. This allows us to see that your production and/or staging endpoints have been configured correctly. |
git push -v | Provides output and feedback during the ‘git push’ deployment to your production or staging application. This output can be used to diagnose an issue or error with your ‘git push’ attempt. |
SFTP and Git
Do not attempt to control a file with both SFTP and Git. Git is a one-way versioning tool. Any changes you make to your file system through a web interface or via SFTP will not propagate back into Git. There is also no warning if you push up code via Git that is older than code that’s presently on the installation. We recommend setting up a local dev environment and making all code changes there and pushing those changes to your app through Git. Read more about setting up a local development environment here. If you would like to preserve changes made to versioned files, download the files via SFTP and commit them to your local repository.
If you have code in use on your site that resides outside of your Git repository, it’s best to avoid updates using SFTP and file editors in the WordPress admin unless necessary. If you find either one necessary to use, be sure to avoid making changes to any code that’s versioned via Git Push, as it will be reverted to the versioned content on your next push.
Remove Files From Git
Should you decide to no longer version your WordPress core files via Git Push, you’ll need to remove them from tracking locally with git rm --cached, which will remove them from the repository, but leave them in place in your working directory.
Once done, commit the change, reset the Git Push point repository, then push your commits to your site again.
Database Versioning
The database file cannot be versioned by default, at least in a way that will be automatically imported to your WP Engine website on push. Pushing a database via Git does not automatically import the database file to a website.
The ideal method is to perform a database export locally, add the SQL file to your repository, then commit and push the change. Once the database file is on your WP Engine server, import it to your WP Engine website using using SSH Gateway.
You can also connect to your database remotely, if you have a remote database management system and prefer to import the database from the local machine directly to WP Engine. Please see Setting up Remote Database Access for more information.
Backups and Git
When a restore is made, the Git repository does not receive an update. You will need to download that backup and merge it with your local files, then commit and push again to get the repository in the state you want it.
Submodules
Submodules can work with WP Engine Git push, so long as the submodule can be cloned without requiring a specific SSH key or username/password combination and responds to the ‘git’ protocol. It wouldn’t be possible to say, clone a private GitHub repository from your own account though – it has to be publicly accessible.
To setup the submodule, the external repository needs to use the HTTPS URL and not the GitHub SSH URL. For example:
[submodule "SUBMODULE"]
 path = wp-content/plugins/SUBMODULE
 url = https://github.com/USER/REPO.git
WP Engine’s Git User Public Key
If you’re attempting to clone private repositories from a service such as Github or BitBucket, you may require the public key of WP Engine’s Git user. Public keys on sites like GitHub require that the key be unique across all of GitHub. If WP Engine were to provide our “Git” user’s public key, it would have to be unique to your account so that other users can benefit from the same thing. This increases the management overhead of the feature because we would have to manage both the public keys provided to us to grant access, and the public keys we provide so that we can clone private repositories during the “git push” process. At this time, we are not supporting this feature but it may be something we add in the future!
Git Clone
In order to clone a repo:
- The repo must exist
- A commit has to have been Git pushed to WP Engine
- SSH keys must be added for every user who wants to connect to the repo
View a list of remotes your user has access to:
ssh git.wpengine.com
This will give you an output similar to:
$ ssh git.wpengine.com

hello user-name
R W production/environmentname.git
R W staging/environmentname.git

Please see http://git.wpengine.com for more help
Shared connection to git.wpengine.com closed.
To clone the existing repository, take the Git remote address (EX: environmentname.git) and add it to a git clone command. Be sure to replace environmentname with the unique WP Engine name of your environment.
git clone [email protected]:production/environmentname.git
You will see a success output similar to the following:
Cloning into 'environmentname'...
remote: Counting objects: 677, done.
remote: Compressing objects: 100% (532/532), done.
remote: Total 677 (delta 129), reused 669 (delta 126)
Receiving objects: 100% (677/677), 14.11 MiB | 7.69 MiB/s, done.
Resolving deltas: 100% (129/129), done.
A git clone, by default, will create the repository directory. The repository now exists, in this example, in ~/environmentname/. The repo can be pushed normally after making a commit.
NOTE: Unlike services like GitHub, WP Engine only supports SSH-type clones and does not offer http/https access for Git repositories.
WP Engine support for branch is unique in that whichever branch was last pushed is the one that gets copied to the environment on WP Engine. For example, you can’t switch branches and have the changes on that branch take precedence – it’s purely based on previous push.
For more information on Git clone, such as flags, please see: https://www.git-scm.com/docs/git-clone .
NEXT STEP: Resetting the Git push repository