Point DNS to WP Engine
The last step to “go live” with your WP Engine managed WordPress website is to update your DNS. This will allow traffic to come from your domain to your WordPress website hosted on WP Engine. This process starts at your DNS manager, which is most often where you bought the domain.
There are several methods for pointing DNS to WP Engine. The preferred method is flattening DNS records because we find it be the most scalable solution. CNAME, ANAME, Alias and A record methods will all work to point DNS to WP Engine. Domain masking is not supported directly on WP Engine, however this configuration may still be setup from your DNS host.
NOTE: Before changing your DNS records, complete the rest of the Going Live steps!
DNS Record Values
To properly configure DNS records you will first need the IP or CNAME value where your website is hosted.
- Log in to the User Portal
- Click on the Environment name you wish to find the IP and CNAME for
- Select Domains from the left menu
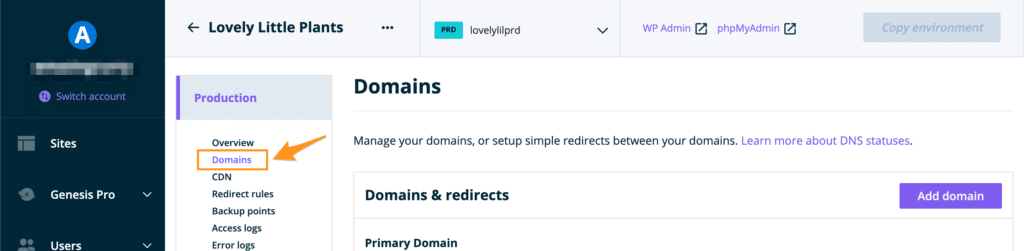
- Once on the Domains page, scroll down. Your DNS values can be located within the DNS Details section.

The WP Engine CNAME value may vary depending one what type of network you are using: basic networking, advanced networking, or Global Edge Security.
Leave this page open for easy copying when pointing your DNS later on.
Should I point DNS using an IP Address or CNAME record?
As a managed WordPress host, WP Engine may migrate your site to another server, either by request or in an emergency. While migrations are quite rare, it’s important to understand how this possibility may impact your peace of mind down the road and set yourself up for success. Because WP Engine is not a DNS host, if you site is migrated, the task of updating your DNS records will fall on you or your team. There are ways to prevent the need for DNS updates later on, however.
To understand how to point DNS, you’ll need to know the various types of records and why they’re significant to WP Engine websites.
The non-www version of your domain (EX: domain.com) is also called apex or the root domain. This specific version of your domain is where the different configurations we describe below become relevant. The www domain (EX: www.domain.com) and any subdomains (EX: blog.domain.com) can always be pointed using a CNAME, so these records can be configured like you would with any other host.
If the root domain is pointed with an A record, it will use a static IP address (EX: 123.456.78.90). Think of this IP address as the street address of your server. If your website moves to a new server, information can forward for a while, but there will very likely be deliverability issues until you update your IP address again at the DNS host.
If you point the root domain to WP Engine servers in a flexible and non-static way, then instead of an IP you’ll use your WP Engine subdomain (EX: mycoolsite.wpengine.com). By doing this you won’t have to make DNS changes should your site migrate to another server with us because we control the address of that subdomain. The following methods are considered flexible in this way: CNAME, ANAME and Alias.
The method you use to point your DNS is ultimately up to you and what your DNS host supports. The four DNS options we’ve detailed here will all successfully direct traffic to WP Engine. While our Support team is always happy to help clarify these options at any time, be aware that our agents cannot log in to your DNS host on your behalf. If you’re unable to configure DNS on your own, reach out to your DNS host with the record type you’d like to use and your WP Engine DNS record values.
Point DNS Using CNAME Flattening
Several services offer CNAME flattening support, meaning your root domain (non-www) can be pointed with a CNAME record. Be aware that CNAME flattening is required for website’s hosted on clustered (AWS) server environments.
CNAME flattened records will look like the following:
| PURPOSE | TYPE | NAME | TARGET/HOSTNAME |
|---|---|---|---|
| Root (non-www) | CNAME | @ or yourdomain.com | environment.wpengine.com |
| www | CNAME | www | environment.wpengine.com |
| Subdomain | CNAME | blog, shop, etc. | environment.wpengine.com |
NOTE: If your website lives on a subdomain, such as shop.mydomain.com, only the subdomain record is required to point a subdomain.
Cloudflare is our recommendation for CNAME flattening, as it makes adding supplementary features through Cloudflare down the road far easier. The steps below will have you first configure your CNAME records in Cloudflare, then update your domain’s nameservers to point to Cloudflare from your domain name registrar.
- Sign up for a Cloudflare plan (we’re using the free plan here)
- Click Add a Site and enter the domain name
- Cloudflare will detect and display any existing records for your domain
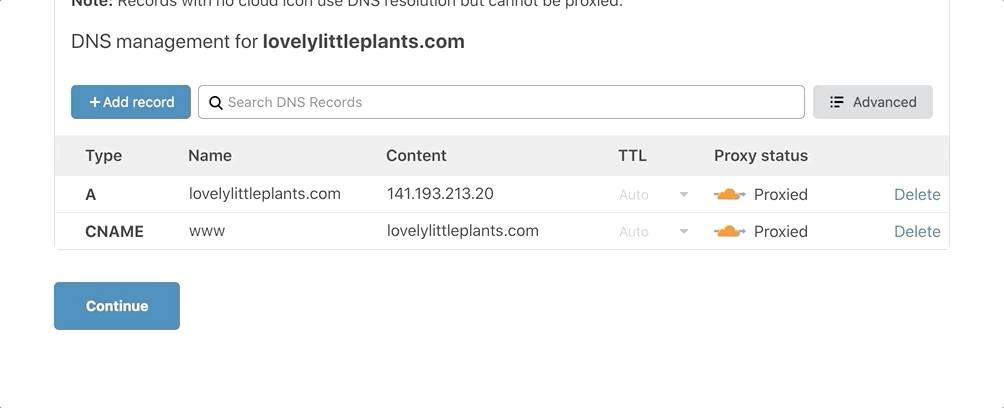
- Delete any A records shown for your root domain
- EX:
yourdomain.com, it may also be denoted as@and will be pointed to an IP address
- EX:
- In the Type dropdown, select
CNAME - Set the Name to
@ - In the Target field enter your WP Engine CNAME
- If you are using Global Edge Security or advanced network, be sure to use the alternative CNAME here.
- Now look for
wwwin the name column:- If this record has
@, your domain name, or the WP Engine domain in the Content column next to it, you can leave the record as-is. - If this record has an IP address in the Content column next to it (EX:
123.456.78.90):- Delete the
wwwrecord - Click Add Record
- Set the Type dropdown to
CNAME - In the Name field enter
www - In the Target field enter
@ - Click Save
- Delete the
- If this record has
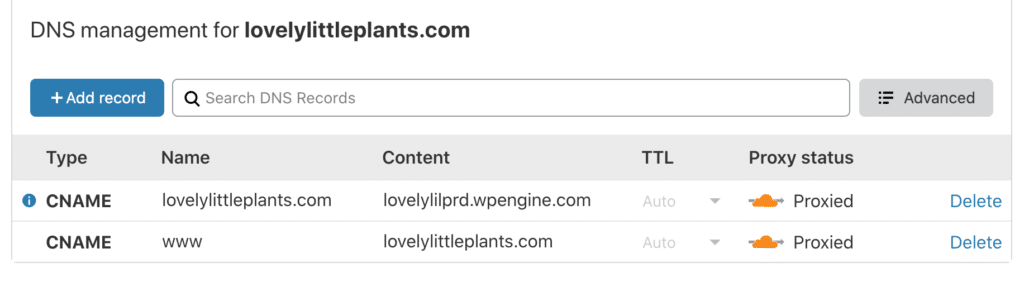
- You will end up with two records that look similar to this example:
- Click Continue.
- Cloudflare will display two to four nameservers. These must all be copied exactly into your DNS registrar’s dashboard (where you bought the domain).
- At your DNS host find the area to edit your nameservers. Often this is in the same area where you manage DNS records. You may need to select an option to set “custom nameservers”.
- Once you have changed the nameservers to those shown in the Cloudflare pane, be sure to save.
That’s it! You can track propagation of your DNS changes on a site like this. Be advised, the nameservers and DNS settings may take some time to change over from here. This is largely dependent on your DNS host itself, so if you have concerns regarding propagation, reach out to the DNS provider where you purchased the domain and where you pointed the nameservers to Cloudflare.
NOTE: Updating the nameservers for your domain will affect all records associated with it, including email addresses. Cloudflare does its best to import existing records but be sure to work with your email host be sure you’ve copied over any extra DNS records into Cloudflare.
Cloudflare offers many extra services and options so be sure to configure them properly. Learn more about Cloudflare in our Best Practices guide.
Point DNS Using an ANAME Record
Some services allow your root domain to be configured using an ANAME record. This is very similar to an ALIAS or CNAME record, in the sense that it can point to a dynamic CNAME address. You will add an ANAME record for the root domain and a CNAME record for the www or any subdomains.
Records configured in this way will look like the following:
| PURPOSE | TYPE | NAME | TARGET/HOSTNAME |
|---|---|---|---|
| Root (non-www) | ANAME | Leave blank | environment.wpengine.com |
| www | ANAME | www | environment.wpengine.com |
| Subdomain | ANAME | blog, shop, etc. | environment.wpengine.com |
NOTE: If your website lives on a subdomain, such as blog.domain.com or shop.mystore.com, adjusting the root and WWW records are not necessary. Only the subdomain record is required to point a subdomain.
In this example we’re using DNSMadeEasy.
- Log in to DNSMadeEasy
- Select your Domain
- Click Records
- Locate ANAME Records section
- Click + to add a new ANAME record
- Leave the Name field blank
- Enter your WP Engine CNAME in the field labelled Name
- If you are using Global Edge Security or advanced network, be sure to use the alternative CNAME here.
- Add a period to the end of the CNAME:
- EX:
mysite.wpengine.com.
- EX:
- Set a TTL (time in seconds for the changes to take effect)
- Click Submit to save
- Click + again to add another ANAME record
- Enter
wwwin the Name field - Enter your WP Engine CNAME in the field labelled Name
- If you are using Global Edge Security or advanced network, be sure to use the alternative CNAME here.
- Add a period to the end of the CNAME:
- EX:
mysite.wpengine.com.
- EX:
- Set a TTL (time in seconds for the changes to take effect)
- Click Submit to save
View full instructions from DNSMadeEasy.
Point DNS Using an Alias Record
Alias records work the same as ANAME and CNAME records in the sense that your root domain can be pointed to a dynamic CNAME. You will configure your root domain using an alias record (which is typically denoted with a blank record name, rather than @), as well as the www or any subdomain records using a CNAME record.
Records configured in this way will look like the following:
| PURPOSE | TYPE | NAME | TARGET/HOSTNAME |
|---|---|---|---|
| Root (non-www) | Alias | Leave blank | environment.wpengine.com |
| www | CNAME | www | environment.wpengine.com |
| Subdomain | Alias | blog, shop, etc. | environment.wpengine.com |
NOTE: If your website lives on a subdomain, such as blog.domain.com or shop.mystore.com, adjusting both the root (non-www) and www records is not necessary. Only the subdomain record is required to point a subdomain.
In this example, we’re using DNSimple.
- Log in to DNSimple
- Click Domains
- Select your domain name
- Click DNS
- Click Add Record
- Select Alias
- Leave the Name field blank
- Set the Value field to your WP Engine CNAME
- If you are using Global Edge Security or advanced network, be sure to use the alternative CNAME here.
- Choose your TTL (time in seconds for the change to take effect)
- Click Add Record to save
- Click Add Record again to add a second record
- Select CNAME
- Enter
wwwin the Name field - Set the Value field to your WP Engine CNAME
- If you are using Global Edge Security or advanced network, be sure to use the alternative CNAME here.
- Click Add Record to save
View full DNS configuration instructions from DNSimple.
Point DNS Using an A Record
Pointing your A record to your static WP Engine IP will work just fine, but you will need to update your DNS records if your website is ever migrated to a new server while your website hosted with us.
Records configured in this way will look like the following:
| PURPOSE | TYPE | NAME | TARGET/HOSTNAME |
|---|---|---|---|
| Root (non-www) | A | @ or yourdomain.com | WP Engine IP EX: 123.456.78.90 |
| www | CNAME | www | @ |
| Subdomain | CNAME | blog, shop, etc. | environment.wpengine.com |
NOTE: If your website lives on a subdomain, such as blog.domain.com or shop.mystore.com, adjusting the root and WWW records are not necessary. Only the subdomain record is required to point a subdomain.
Once you retrieve the IP address value, log in to your DNS host. This is most often the Registrar where you purchased the domain. If you are not sure who your DNS host is, search for your domain on WHOIs.
We’ve created separate guides for the most common DNS hosts:
- Godaddy
- 1&1
- NameCheap
- Google Domains
- HostGator
- NetRegistry
- Bluehost
- Register.com (RCOM)
- Amazon Route53
- Dreamhost
If your DNS Host is not included above, log in to your DNS host’s dashboard and locate the area to manage DNS records. Your existing records will look similar to this:

- Edit the A record with the name
@and change the “Value” field to your WP Engine IP address.- If you are using Global Edge Security or advanced network, be sure to use the alternative IP address(es) here.
- Now check the “www” record:
- If it points to
@then no further changes are needed. - If it points to a CNAME or IP address, make sure to edit them to the correct WP Engine DNS record value.
- If you are using Global Edge Security or advanced network, be sure to use the alternative IP address(es) here.
- If it points to
NEXT STEP: Learn how to add an SSL and secure all pages over HTTPS