Web Rules Engine
The Web Rules Engine is a User Portal-based service that enables you to self-serve site access rules as an alternative to .htaccess rules. The service currently supports management of the following rule types: IP-based Allow/Deny rules and response headers.
Overview
The Web Rules Engine enables you to self-manage certain site traffic behaviors from the User Portal, such as:
- Disallowing IP/Range access to protect against malicious attacks and other negative site behavior
- Allowing IP/Range access for known good actors
- Preventing direct access to private files
- Modify cache-control headers and security headers
For those who previously leveraged .htaccess file rules to self-manage and control these behaviors, the Web Rules service can now be used instead via the User Portal.
Access Web Rules
To manage access and header rules for any environment:
- Log in to the User Portal
- Select the environment name
- Click Web Rules in the menu
Web Rules functionality is enabled by default on all environments. If you do not see the “Web Rules” link in your User Portal, please reach out to our Support team.
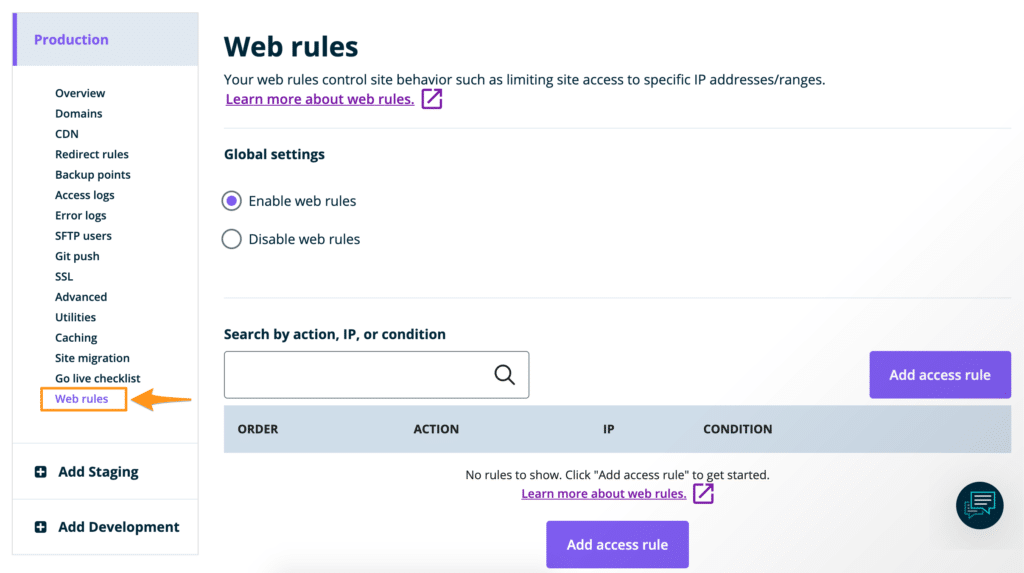
NOTE: In some cases there may temporarily be a third Global Setting available on the page above that reads “Enable .htaccess support”. This option is only available in specific cases, you can learn more about it here.
Add Access Rule
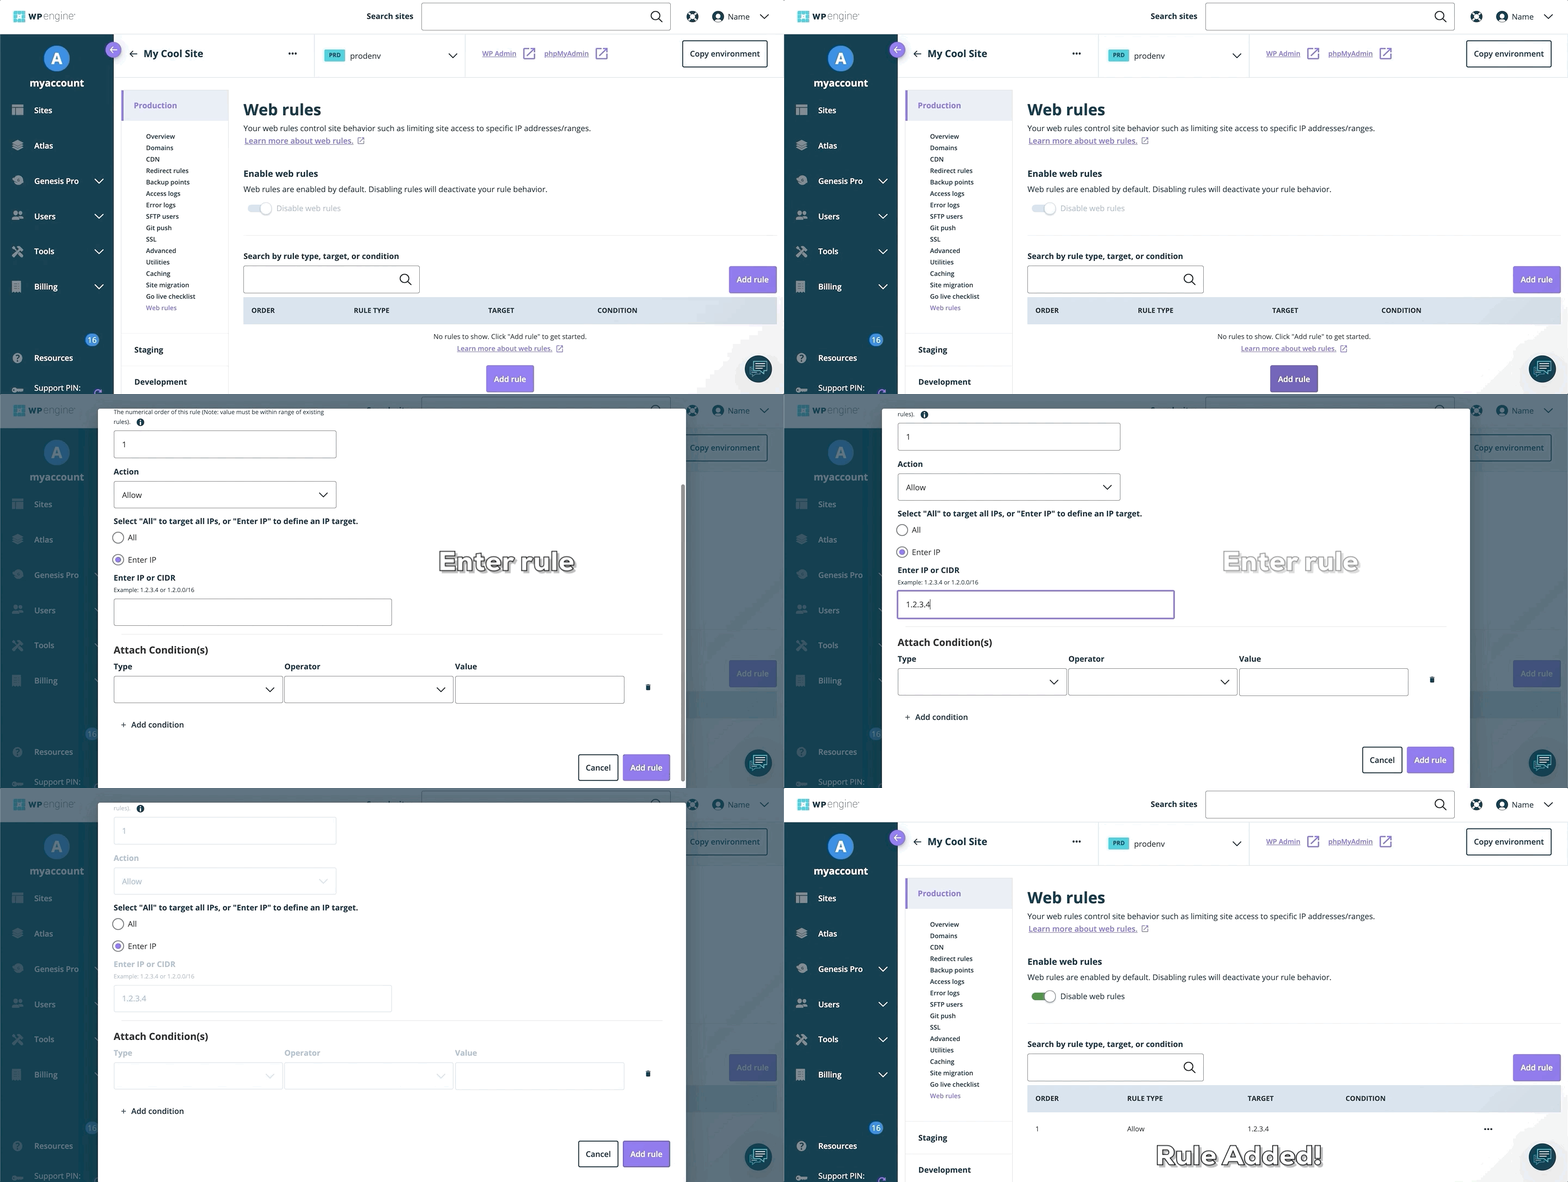
To add a new web rule:
- Open the Web Rules engine
- Select Access Rules
- Click Add Rule
- Enter the rule
- Click Add Rule to validate and save the new rule
- Once your web rules have been validated and applied, they will populate in the rule table
Insert Relative Access Rule
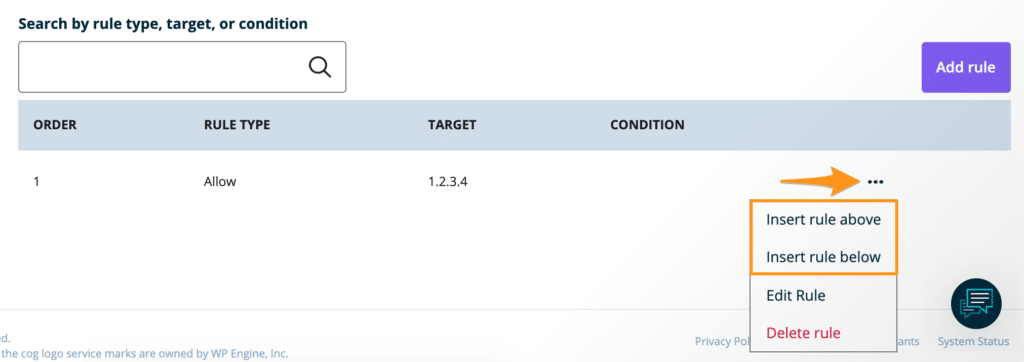
Users with existing web rules have additional options for adding new rules in relation to existing rules. This can be useful when creating rules whose order is significant.
- Open the Web Rules page
- Locate an existing rule
- Click the 3 dot menu icon to the right
- Select Insert rule above or Insert rule below
Edit Access Rule
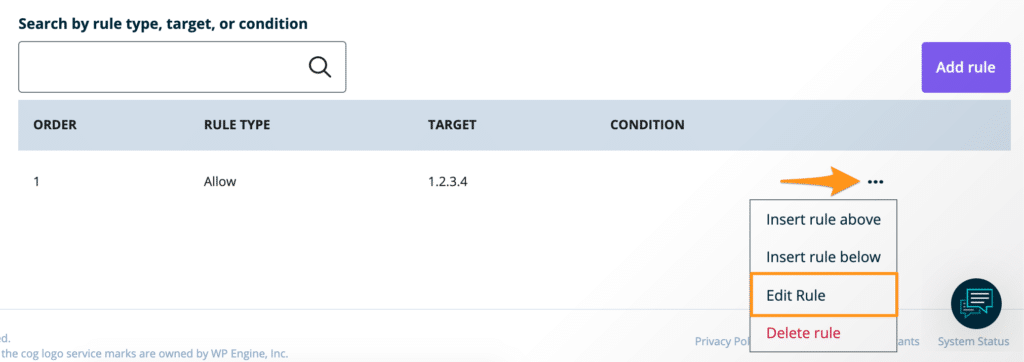
To edit an existing access rule, for example manually changing the order or IP:
- Open the Web Rules page
- Locate the rule you wish to edit
- Click the 3 dot menu icon to the right
- Select Edit Rule
- Make the necessary changes, then click Save and apply to revalidate and apply the update
Delete Access Rule
To delete an existing web rule:
- Open the Web Rules page
- Locate the rule you wish to edit
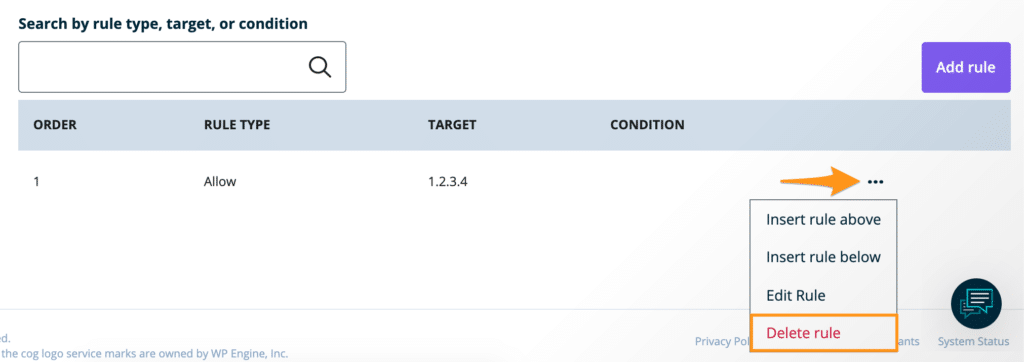
- Click the 3 dot menu icon to the right
- Select Delete Rule
Access Rule Order
Web rules are read from top to bottom and the web Rule order allows you to manually organize the rules. The lowest order number is at the top of the list (read first) and the highest order number is at the bottom of the list (read last). Rules must have an order value that is greater than zero and should be within a reasonable range. For example, if you have two rules they should have the order 1 and 2, not 1 and 100.
The order of web rules can be critical to how they function because rules can impact each other depending on the order they are read. Rules that are read first take priority. For example, an IP range can be blocked but a specific IP address within that range can be allowed. To do this the rule allowing the specific IP address must be read before (listed above) the rule blocking the IP range.
For example, to block all IPs from accessing the wp-admin but allow a single IP access, the rules should look like the following:
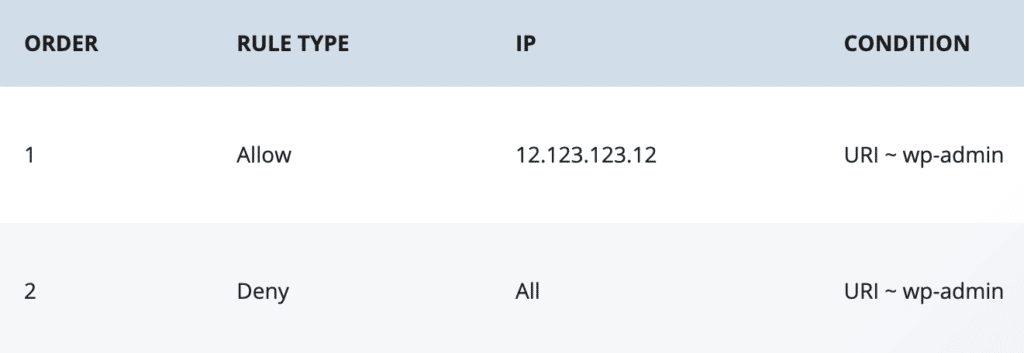
When adding a rule relative to another rule the order values will be updated automatically. It’s recommended to use the relative adding method when possible, rather than manually setting each value, to ensure the order is applied as intended.
Access Rule Conditions
Conditions can be one of the following types:
- URI
- QUERY_ARG
- REQUEST_METHOD
- HEADER
Conditions can with the following operators, depending on the type:
- Equal to ( = )
- Not equal to ( != )
- Regex match ( ~ )
- Negative regex match ( !~ )
Below are the supported parameters for each conditional variable type:
| Type | Name [Optional] | Operator(s) | Value |
| URI | null | =, ~, !=, !~ | str |
| QUERY_ARG | null | =, ~, !=, !~ | str |
| REQUEST_METHOD | null | =, != | enum |
| HEADER | str | =, ~, !=, !~ | str |
Access Rule Examples
Below are some examples of common rules you may use. Rules can be modified as necessary, for example switching deny and allow, or using an IP range versus a single IP.
Deny an IP address:
- Action: Deny
- IP: [IP address to deny]
- Conditions: None are needed
Deny a bot by way of its user agent:
- Action: Deny
- IP: All
- Conditions:
- Type: Header
- Name: User-Agent
- Operator: Regex matches (~)
- Value: [Enter the actual user agent name in this field] EX: badbot
Block xmlrpc.php for all IP addresses:
- Action: Deny
- IP: All
- Conditions:
- Type: URI
- Operator: Regex matches (~)
- Value: xmlrpc.php
Allow a single IP address access to wp-admin and deny all other IPs access:
First rule:
- Order: 1
- Action: Allow
- IP: [IP address to allow]
- Conditions:
- Type: URI
- Operator: Regex matches (~)
- Value: wp-login
Second Rule:
- Order: 2
- Action: Deny
- IP: All
- Conditions:
- Type: URI
- Operator: Regex matches (~)
- Value: wp-login
Header Rules
Using the Web Rules Engine, response headers can be set. This section can be used to add security headers or to modify cache behavior via cache control headers.
Header rules function the same as access rules; they are read in cascading order and can be set/unset by header name.
Add Header Rule
To add a header rule to Nginx:
- Log in to the User Portal
- Select the environment name
- Click Web Rules
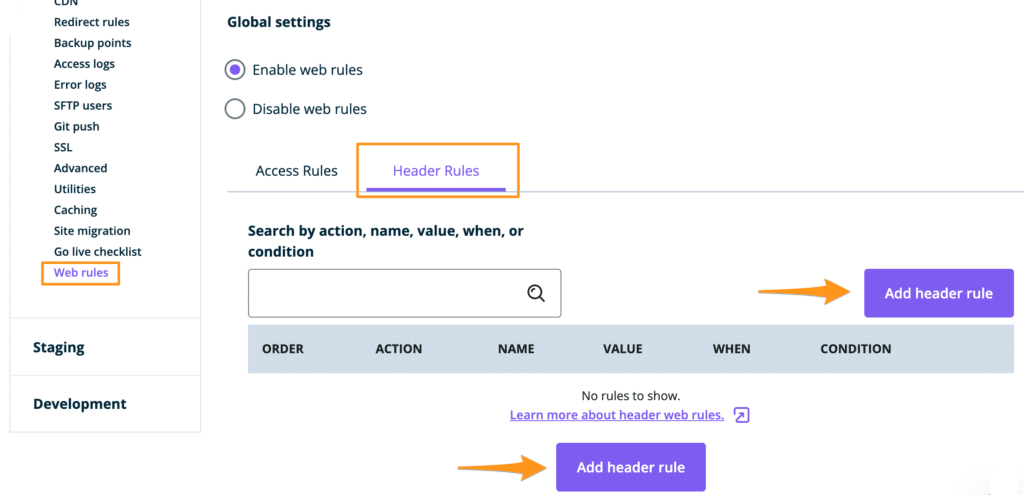
- Select Header Rules
- Click Add header rule
- Enter the rule, then click Save
Header Rule Examples
Set a Header to Allow All Access Control for 2xx status responses:
- Action: Set
- Name: Access-Control-Allow-Origin
- Value: *
- When: Only on successes
- Conditions: None are needed
Unset Set-Cookie header for all responses:
- Action: Unset
- Name: Set-Cookie
- When: All responses
- Conditions: None are needed
Set Cache Control for URIs in /resources:
- Action: Set
- Name: Cache-Control
- Value: max-age=604800, public
- When: Only on successes
- Conditions:
- Type: URI
- Operator: Regex matches (~)
- Value: /resources/
Set HSTS header for 2 years, include subdomains, and preload:
- Action: Set
- Name: Strict-Transport-Security
- Value: max-age=63072000; includeSubDomains; preload
- When: Only on successes
- Conditions: None are needed
Unsupported Headers
- “x-powered-by”,
- “server”,
- “date”,
- “x-orig-cache-control”,
- “nr-enabled”,
- “x-cache”,
- “x-cache-group”,
- “x-cacheable”,
- “X-pass-why”:
