Get Started

Key Takeaways
Building a new site on WP Engine involves creating three independent environments: production, staging, and development. Each environment serves a unique purpose in the site development process, facilitating testing, building, and going live efficiently.
Selecting the right theme and plugins is crucial for website functionality and aesthetics. Choosing from the available StudioPress themes and recommended plugins ensures a smooth user experience and optimal site performance.
Adding quality content and going live with a custom domain are key steps in launching a successful website. Ensuring engaging content and securing the site with SSL are essential for user trust and search engine visibility.
Optimizing page speed and user experience post-launch is critical for site performance. Regularly measuring and improving page speed, along with optimizing images, enhances user satisfaction and SEO rankings.
Learn how to build a new WordPress site on the WP Engine platform. This guide will show how to create a site, log into WordPress, add content, and go live.
Building a new site can seem like a daunting task. In this article we will walk through the easy steps to build and launch a brand new site on the WP Engine platform.
Create New Site and Environment
A “site” refers to the group of 3 “environments”; production, staging, and development. Each environment is a completely independent installation of WordPress®.1 Copying between these environments is also easy through the User Portal and uses our backup system.
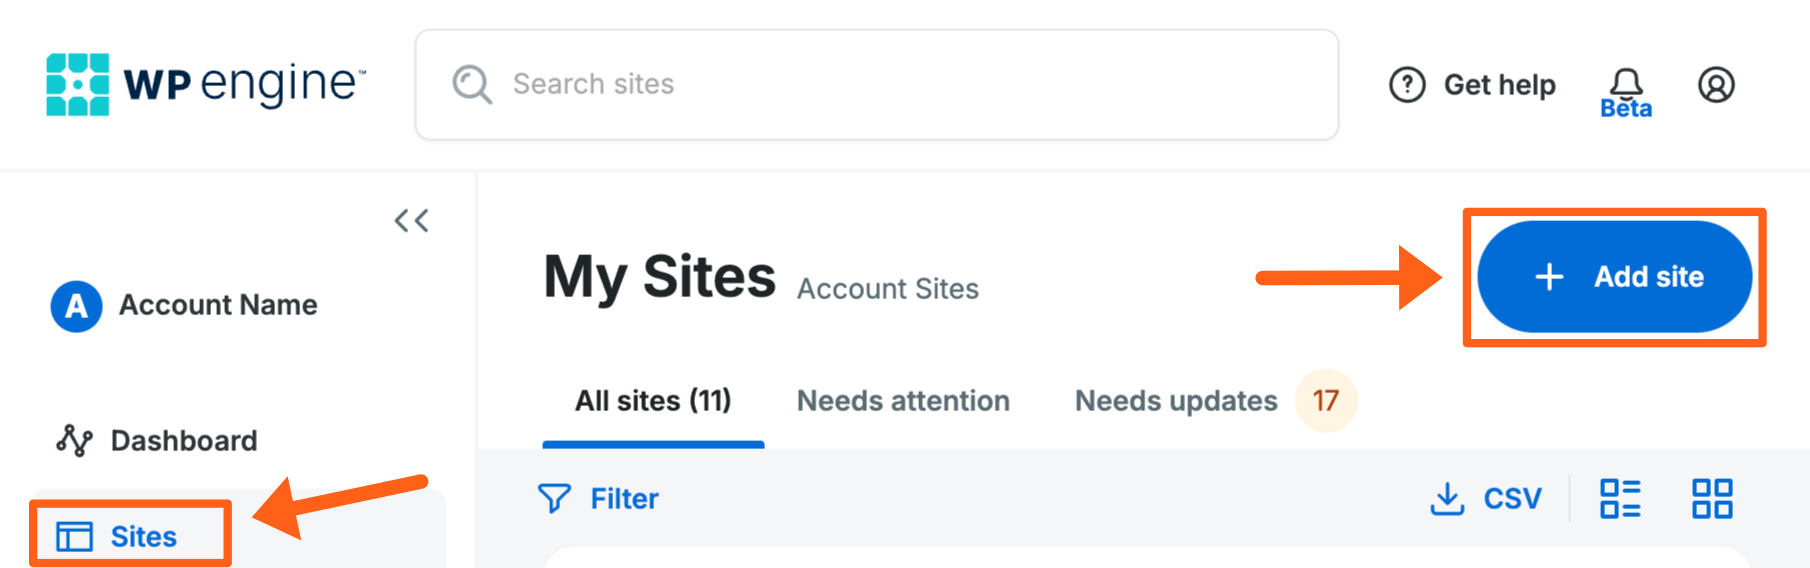
- Log into the User Portal
- On the Sites page, click Add site
Note
If you don’t have any sites yet you’ll see a different screen where you can use the Build a new site or Migrate a site to WP Engine workflows like the image below. You’ll also see an Accept a site transfer option at the bottom, but you won’t see the Copy Environment option if you don’t have any sites yet.
- Select what type of site you want to add:

- Build a new site: Choose this option if you want to build a brand new site
- Migrate a site: Choose this option if you want to migrate an existing site to WP Engine from a different web host
- Copy or move an environment: Choose this option if you want to copy or move one of your existing environments to a new site
- Accept a transfer of a site: Choose this option if someone has initiated a transfer of a site to you from a different WP Engine account and you received an email with a transfer code
- Choose who will own the site

- I will own it. (Most common) Choose this option if the site is intended to Go Live on your account. The new site will count towards your account’s site allowance.
- Someone else will own it. Choose this option if you want to make this site transferable to easily build and then transfer it to another WP Engine account later. It will not count towards your site allowance and cannot be taken live.
- Choose a site creation option or template:

- Blank site: Add an empty WordPress site pre-installed with the (removable) Genesis Pro theme. Learn more about Genesis Pro.
- WooCommerce® site: Create a new site with the WooCommerce plugin already installed.1 Learn more here.
- Click Next
- Fill in a Site name and Environment name
- The Site name can be changed at any time.
- The environment name must be unique and cannot be changed.

- Select the Environment type for this new environment. Any type can be used, but there are limitations for any non-production environment,
- Production — Intended to be taken live on a custom domain. If the site is transferable, no custom domain can be added unless on a Premium plan.
- Staging — Intended for testing updates or debugging errors. Cannot have a custom domain added unless on a Premium plan.
- Development — Intended for building and development. Cannot have a custom domain added unless on a Premium plan.
- Click Add site to begin the creation process.
That’s it! Your new Site will be added and a new WordPress environment to your specifications will be created within it. You will receive an email when the environment has completed it’s setup process.
Build Your Website
Once your environment has been created to your specifications, you can access it and begin building it out. Your environment’s default domain is formed automatically from the environment name you selected: yourenvironment.wpengine.com
For example, if you named the environment “acoolsite” the default domain will be “acoolsite.wpengine.com”.
Note
If you created the site as a copy with database, everything (including users) will be brought over as-is from the backup point selected.
Log in to the Environment
After creating an environment, you will receive an email to complete the setup of your WordPress admin user. This WordPress user is assigned the email address of the Owner of the WP Engine plan. The first admin user has the same username as the environment name (set in step 7 above).
EX: If you named your new environment “acoolsite” then your first admin username is also “acoolsite”.
If you do not receive the email to setup your admin user, there are several options:
Choose a Theme
If you created a new website with the blank website template you’ll notice when you log into your website that you are using a Genesis Pro theme. These themes are designed to be quick and optimized, while also being beautiful and customizable. This is where your creativity can really shine!
At WP Engine we offer the powerful Genesis Framework and 10 premium StudioPress themes for free, right in your User Portal. Learn more about StudioPress themes in our guide.
Need more help designing your website? Our many agency partners would love to help you out. Check out a directory listing of our Agency Partners.
Add Plugins
Plugins can help add special functions (like a contact form or social icons), change default WordPress functionality (add custom post types or special user roles), or change the appearance (add more menu fields, or add custom fields to your editor page).
There are thousands of plugins available to help you get the job done and we highly advise reading reviews and ratings to ensure the plugin you’ve chosen is of good quality.
To add plugins:
- From your wp admin dashboard, click Plugins
- Click Add New
- Search for the plugins you would like to add
- Click Install Now
- Click Activate

For a list of recommended plugins and services that work seamlessly with the WP Engine platform, check out the WP Engine Solution Center.
Be aware that some plugins are disallowed because they cause high load or are redundant of services already in place. Review our disallowed plugin list.
Note
Keeping your plugins up to date keeps your site secure. Read about the WP Engine Smart Plugin Manager.
Add Content
Once you’ve decided on the overall appearance of your website, it’s time to add some substance.
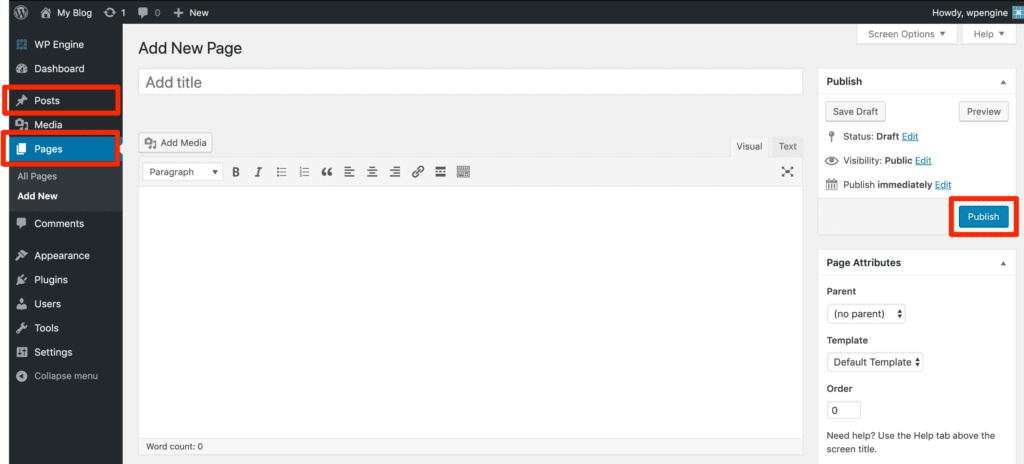
- From the wp admin dashboard menu, select either Pages or Posts
- Pages — Content that will always be relevant and should in the navigation menu of your website, such as About us, Pricing, Menu pages
- Posts — More topical and current content, such as an announcement for a new restaurant location or a recipe
- Select Add New
- Add a title, content, media and anything else you may want to display
- Click Publish
Go Live with a Domain
Once you have finished creating a website that meets all your needs, you will likely want to take the website “live” and start using your own custom domain.
There are three steps to take your website live:
- Add domain to the User Portal
- If your DNS provider supports Entri, you will be prompted to have DNS records configured on your behalf. This will complete steps 1 and 3 at the same time.
- If not, you will be shown your DNS records to be used in step 3 below.
- Update WordPress URL Settings
- If you’ve set the domain as the Primary Domain then this is already taken care of for you with our new Automated Search and Replace for your database. If you want to do it manually before setting the domain to Primary then you can follow the steps here to update the URLs in your WordPress admin dashboard.
- Point DNS
Our full Going Live Guide will walk you through each step, including pointing DNS. Once these steps have been completed, you will have finished building and launching your website on the WP Engine platform!
Add an SSL
If you’ve pointed DNS to the Advanced Network or Global Edge Security, you’re site is secured by SSL automatically.
If you’d like to add an additional third-party SSL, see our guide.
Optional Follow-Up Steps
Now that your site is live, there are some additional options for further polishing your website.
Add Users to Plan
Additional users can be added to your hosting plan, granting them access to various environments on the account. Users can be granted multiple levels of access, ranging from accessing one or two environments, to the entire account and billing-level changes. Learn how to add users and what each user role includes. Note, new accounts will likely not be able to add new users for around 15 minutes after account creation.
Seamless Login can also be enabled. This feature allows all account users the ability log in to WordPress sites you’ve granted them access to with a single click.
Measure and Improve Page Speed
At WP Engine, we optimize the server to give your users a blazing fast experience. Keeping your content responding quickly may take some changes on your end.
Review our guide to identify and correct performance issues.
Optimize Images
Optimizing images is a great option for quickly improving your site’s load time and improving end user experience.
Learn best practices for optimizing images.
NEXT STEP: Check out the WP Engine Developer Guide for more tips and tricks on creating a WordPress website