Point DNS to a Clustered Server (AWS)
If you are on a custom dedicated plan with WP Engine, in which you are using clustered architecture to achieve redundancy, this article will guide you in how to setup your DNS, and provide insight into why settings must be configured in this way.
Not on a cluster? Check out our standard DNS configuration guide instead.
About Clustered Architecture
With a cluster on WP Engine, your server is actually a group of servers distributed between two data centers, harnessed together to achieve redundancy. In this way, if one data center experiences an outage, the other is active to help support website traffic.
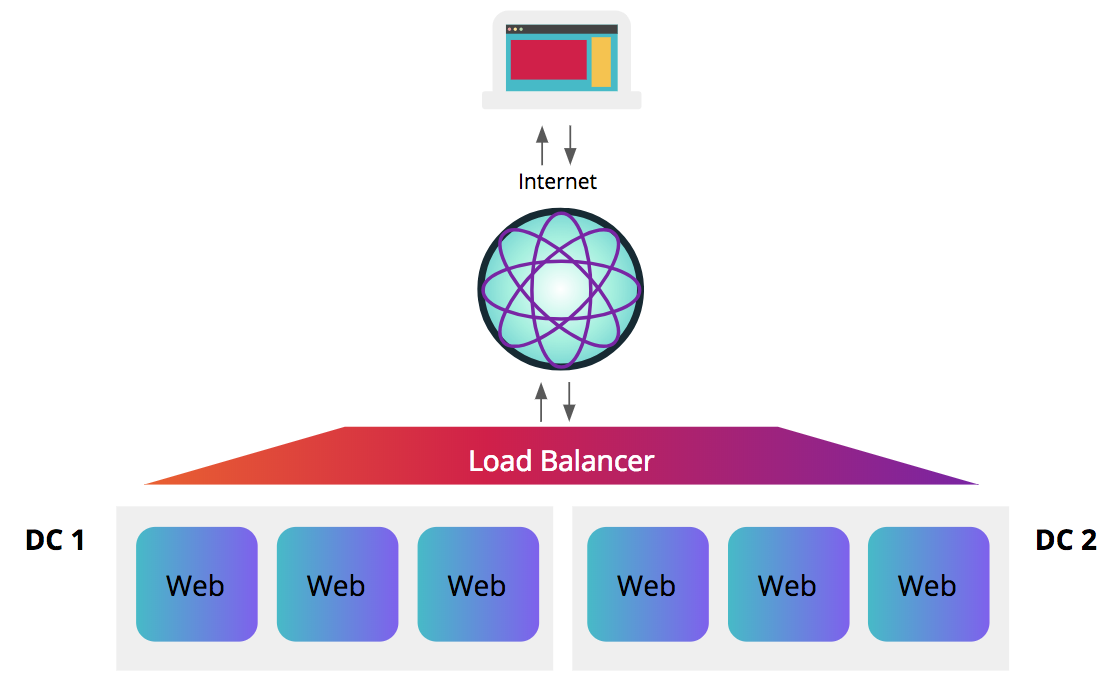
In a clustered solution, the load balancer sits in front of several “web nodes” which are web server environments which can actively process page requests. The load balancer distributes traffic evenly to all web nodes, and in the case of an outage, routes traffic to the web nodes in the healthy data center.
Because clusters at WP Engine are powered by AWS, the load balancer is an Elastic Load Balancer (ELB), which means the IP addresses being used are dynamic, and could change at any time. In turn, this means in order to resolve properly to the Elastic Load Balancer of your cluster, you must point DNS using a CNAME record for your domain.
About CNAME records
DNS, or Domain Name System, is like the phone book of the internet. When you type “ilovecutepuppies.org” into your web browser, the browser looks up the DNS records to see what IP address hosts the domain requested.
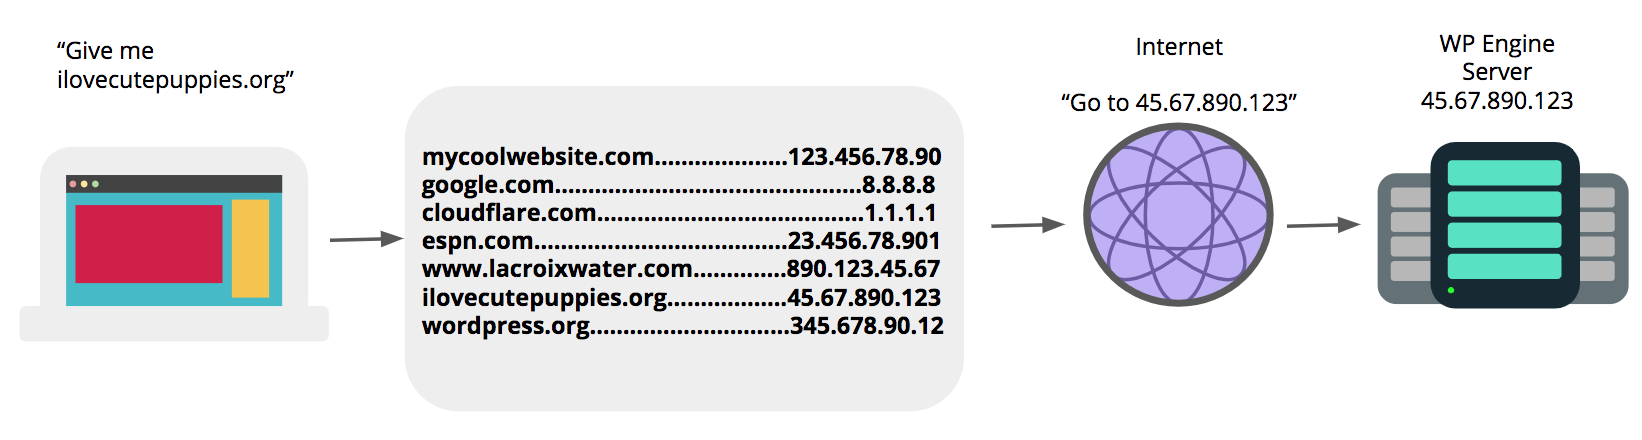
When hosting with WP Engine, you configure the DNS records for your domain to point to WP Engine servers. While you may be used to changing your DNS records to point to an IP address (known as an A record), on a cluster you must use a CNAME record. CNAME records point a domain name to another domain, instead of to an IP address. By pointing to your WP Engine CNAME, this ensures your DNS will always resolve correctly to your ELB in your clustered solution, because WP Engine is automatically resolving your [environment].wpengine.com CNAME to the dynamic load balancer on the back end.
CNAME records are most often not supported for apex/root domains, however. The standards governing the domain name system generally require that the root domain be mapped to an IP address instead. That means changing your DNS records for a cluster can take some extra configuration, due to the dynamic nature of a clustered hosting solution. Though most DNS hosts certainly allow CNAME records for subdomains (such as “www.ilovecutepuppies.com”), there are services like Cloudflare, DNSimple, and DNSMadeEasy which offer services that help bypass the requirements of DNS for your apex/root domain by offering Alias-type records. Or, if you host your DNS with AWS Route53, you can point your domain directly to the ELB for AWS to dynamically resolve on the back end. In the next section we will explain how each of these DNS solutions works.
How to Set a CNAME Record
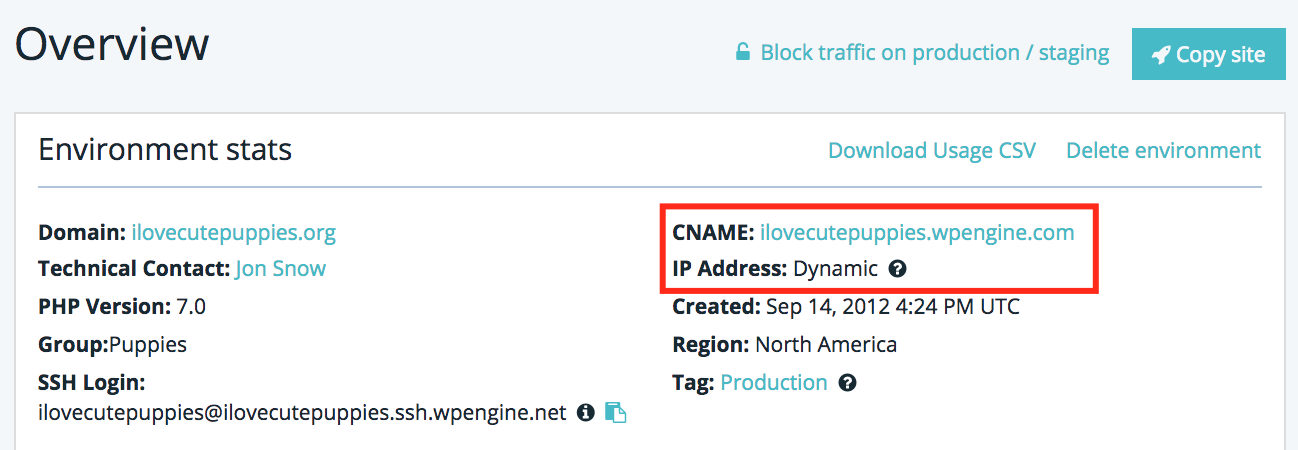
In order to configure your DNS records, first you will need to locate your WP Engine CNAME. This can be found in your User Portal, by navigating to your site’s Overview page. Here, you will see a CNAME entry, and your IP Address will show as “Dynamic” if your site is on a clustered solution. The CNAME value will be used when configuring your DNS records.
Most DNS providers do not offer the option to configure a CNAME record for your root domain (ilovecutepuppies.org), only for your “www” domain (www.ilovecutepuppies.org). However, there are some services which allow you to use CNAME flattening or CNAME-like records for your root domain in spite of this. One of the most popular CNAME flattening services is Cloudflare, and there are a couple DNS providers which provide other methods to point to a domain rather than an IP address:
- Option A (easiest): Point nameservers to Cloudflare. With this method you will be offloading the DNS record management to Cloudflare, and setting a CNAME in the Cloudflare dashboard.
- Option B (also ok!): Use ANAME record if hosting with DNSMadeEasy. This method is only an option if you use DNSMadeEasy as your DNS host. DNSMadeEasy allows for an ANAME record which behaves like a CNAME, to allow you to point to a domain instead of an IP address.
- Option C (also ok!): Use Alias record if hosting with DNSimple. This method is only an option if you use DNSimple as your DNS host. DNSimple allows for an Alias record which behaves like a CNAME, to allow you to point to a domain instead of an IP address.
- Option D (advanced): Use Alias record to point to ELB with Route53 DNS. If you use Amazon Route53 for DNS, you may optionally set an Alias record to point directly to the ELB name for your cluster.
Option A: Point nameservers to Cloudflare.
Cloudflare is a service that offers services like DNS management, CDN, Web Application Firewall (WAF), and even DDoS mitigation services. Before continuing, at this point you should open a new tab and navigate to www.cloudflare.com. Here you can sign up for a free account to get started. Enter your domain name when prompted.
When you continue, Cloudflare will automatically lookup your DNS records. As it performs this lookup, click Next to select your Cloudflare plan. For the purposes of this article, we have chosen the free Cloudflare plan.
From here, Cloudflare will import your existing DNS settings from your DNS host. In this stage, remove the A record next to your root domain (ilovecutepuppies.org in this example), and add a CNAME record in its place. Enter the CNAME record from your WP Engine Overview page for your site and click Add Record to save.
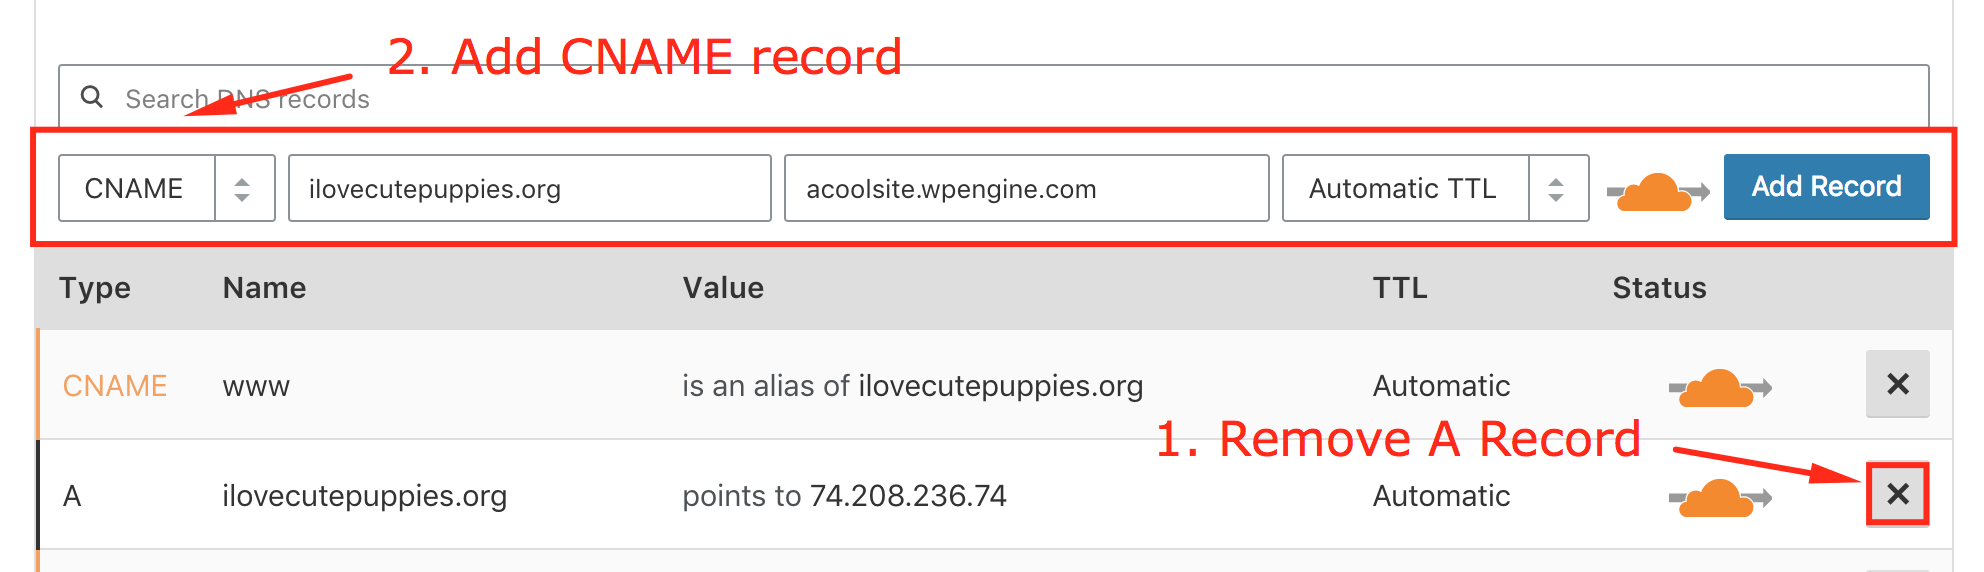
Now, look to your “www” record. If it is already a CNAME record pointing to your root domain (ilovecutepuppies.org in this example), no further action is needed. If it is an A record pointing to an IP address, perform the same steps to remove the A Record and replace it with the WP Engine CNAME record instead. Once these steps are complete, click Continue.
In the next screen you will be prompted to change your nameservers to point to Cloudflare. This step is performed in your DNS provider’s dashboard (we are using 1&1 in this example). Navigate to your nameserver settings in your DNS provider’s dashboard, and choose to use custom nameservers.
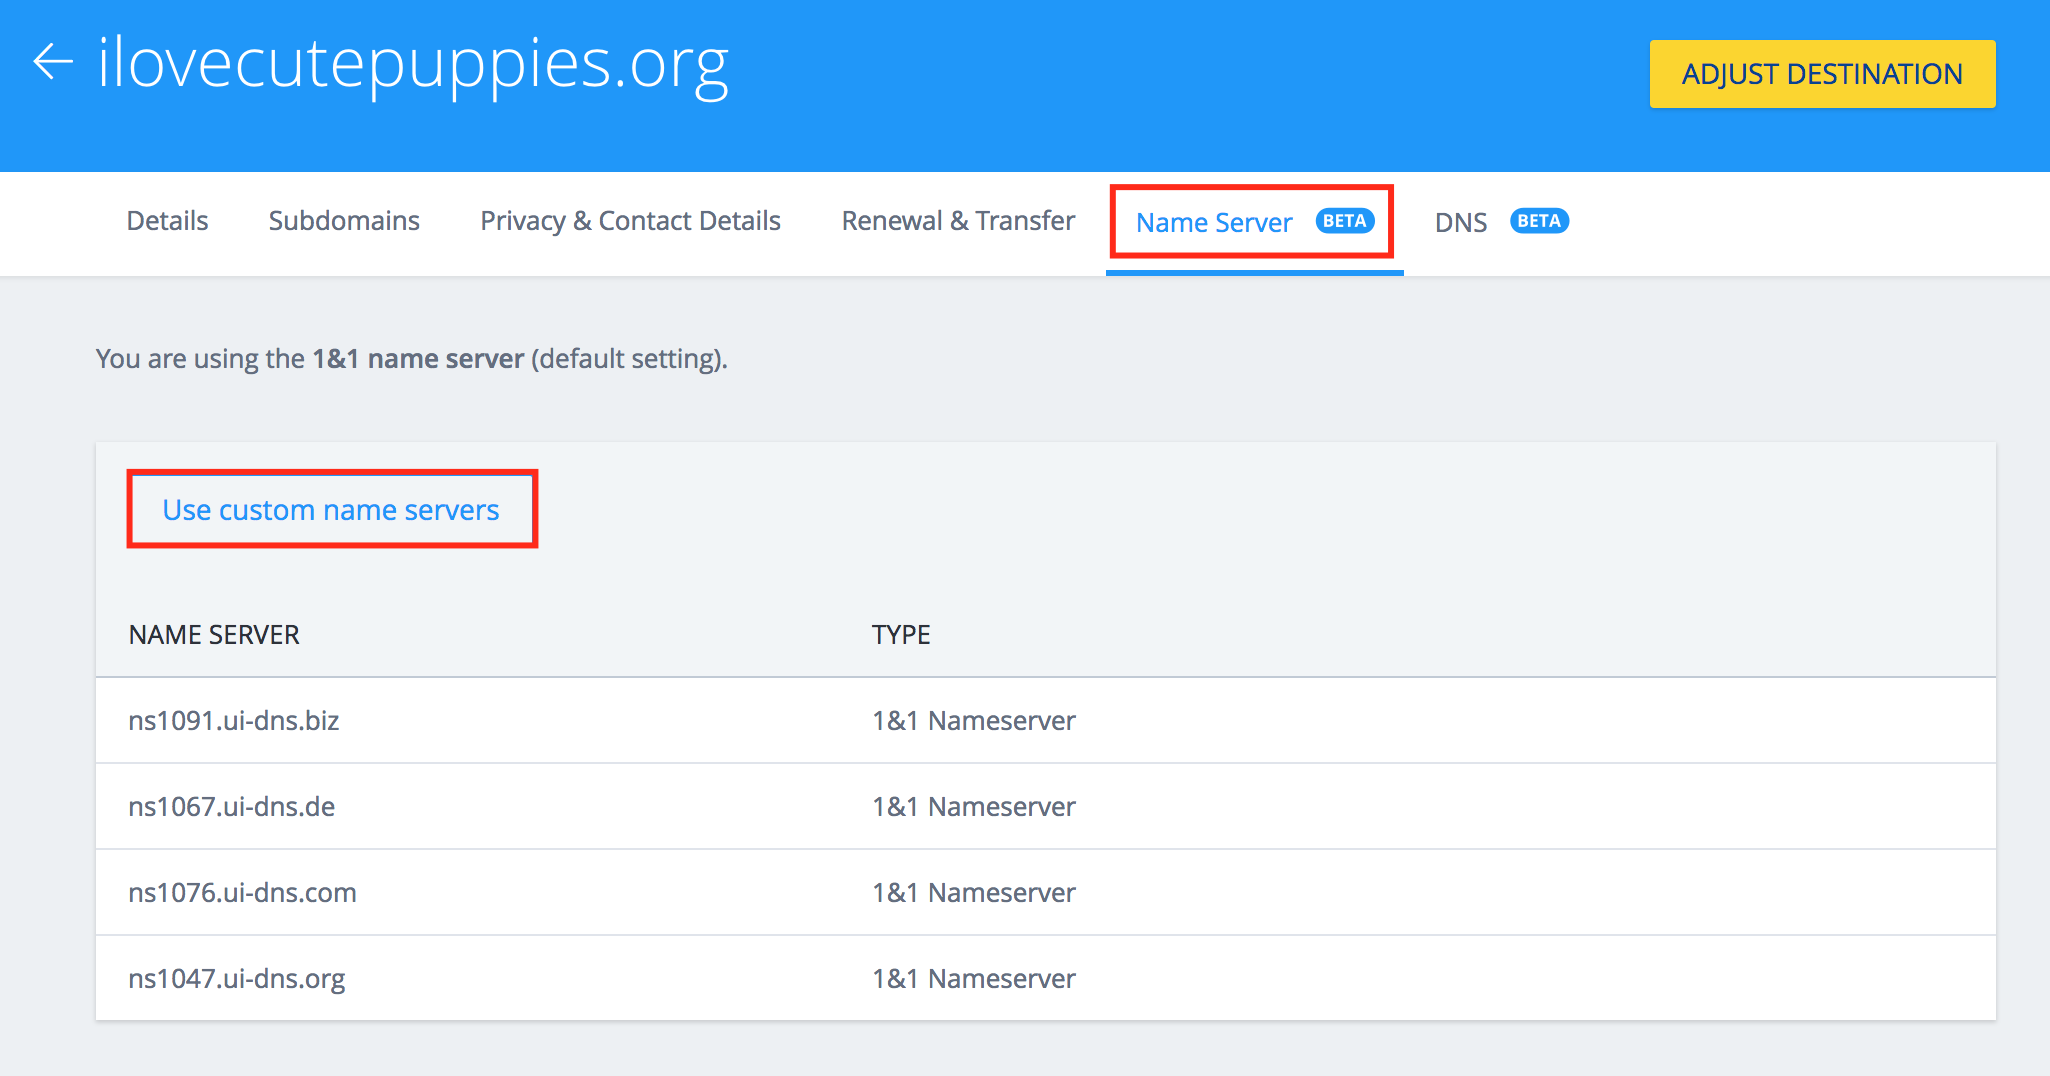
When prompted, enter the settings from Cloudflare in the nameserver fields, and save.

Once the name server changes have propagated, your DNS will be pointed to WP Engine successfully! In the meantime, be sure to read our Going Live guide to ensure you haven’t missed any important steps.
Option B: Point ANAME record with DNSMadeEasy
DNSMadeEasy is a DNS management service to which you would also point your nameservers with similar steps to Cloudflare, above. However, instead of setting a CNAME record with DNSMadeEasy, you will add an ANAME record.
To do this, navigate to Managed DNS in your DNSMadeEasy dashboard and select your domain. Under ANAME Records, click the + sign to add a new ANAME record.
To configure an ANAME record for your root domain (ilovecutepuppies.org), leave the Name field blank. Enter your WP Engine CNAME in the Resolves from box, and select your TTL (time in seconds for the change to take effect around the web). Click Submit to save the changes. Perform the same steps to change your “www” record, only entering “www” in the Name field.
View full instructions from DNSMadeEasy.
Option C: Point Alias record with DNSimple
If you use DNSimple as your DNS host, you may set an Alias record, which behaves similarly to CNAME but works on root domains (like ilovecutepuppies.org).
In your DNSimple dashboard, click Domains from the top navigation, select your domain, and click DNS from the left-hand navigation menu. Click the Add record menu and select Alias from the menu. Leave the Name field blank to configure the Alias record for your root domain (ilovecutepuppies.org in our example). Set the value for the Alias field to your WP Engine CNAME, and choose your TTL (time for the change to take effect around the web). Last, click Add Record to save your changes. For your www domain (www.ilovecutepuppies.org in our example), you can set a CNAME record to point to your root domain, or to your WP Engine CNAME (either will resolve properly in this case).
View full DNS configuration instructions from DNSimple.
Option D: Use Alias Record to point to ELB with Route53
If your DNS provider is AWS Route53, you may use an Alias record in your dashboard to point directly to the Elastic Load Balancer (ELB) for your cluster. To do this, you must perform a lookup of your [environment].wpengine.com CNAME.
In a Terminal window, type the following, replacing “environment” with your WP Engine CNAME:
dig +short environment.wpengine.com
You should see two domains and two IP addresses appear. One domain will be lbmaster-123456.wpengine.com, and the other will be a long string ending in .elb.amazonaws.com. The latter is the ELB domain to which you will need to point your Alias record with Route53.
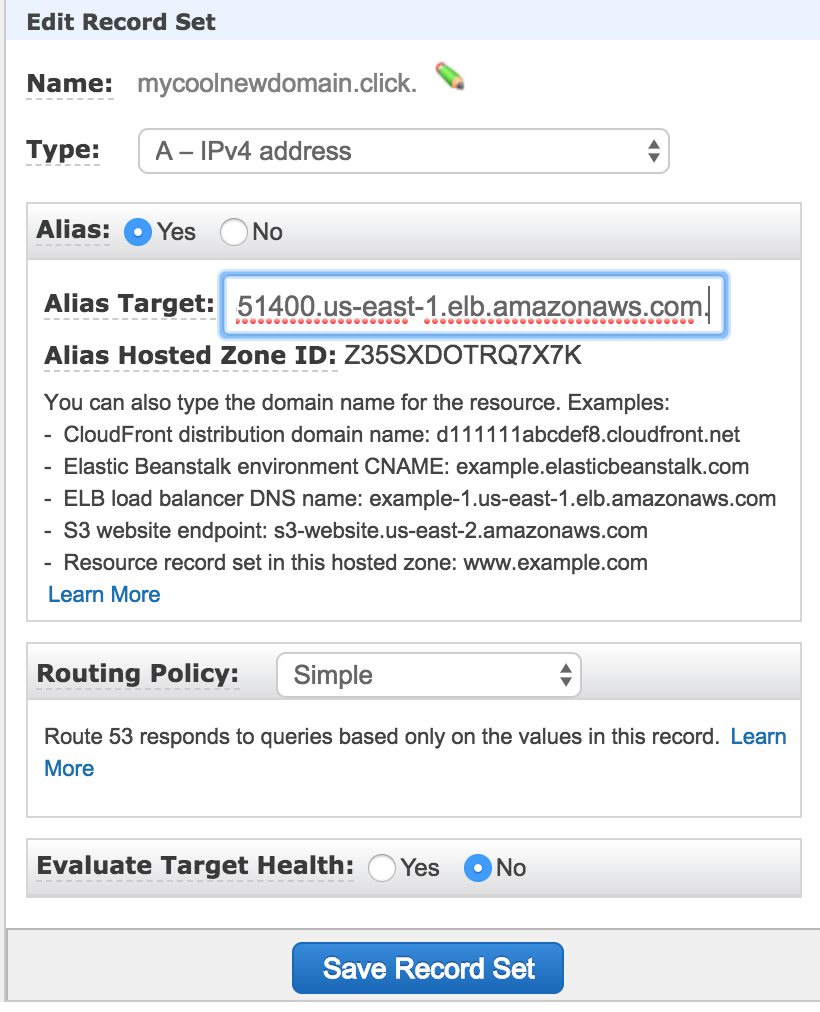
In your web browser, navigate to the Route53 console and select Hosted zones from the left-hand navigation. Select your root domain (mycoolnewdomain.click in this example) and look to the right side to make edits. Just under the “Type” of record, select the “Yes” radio button next to Alias, and enter the .elb.amazonaws.com domain in the Alias Target box. Click Save Record Set to finish editing the record.
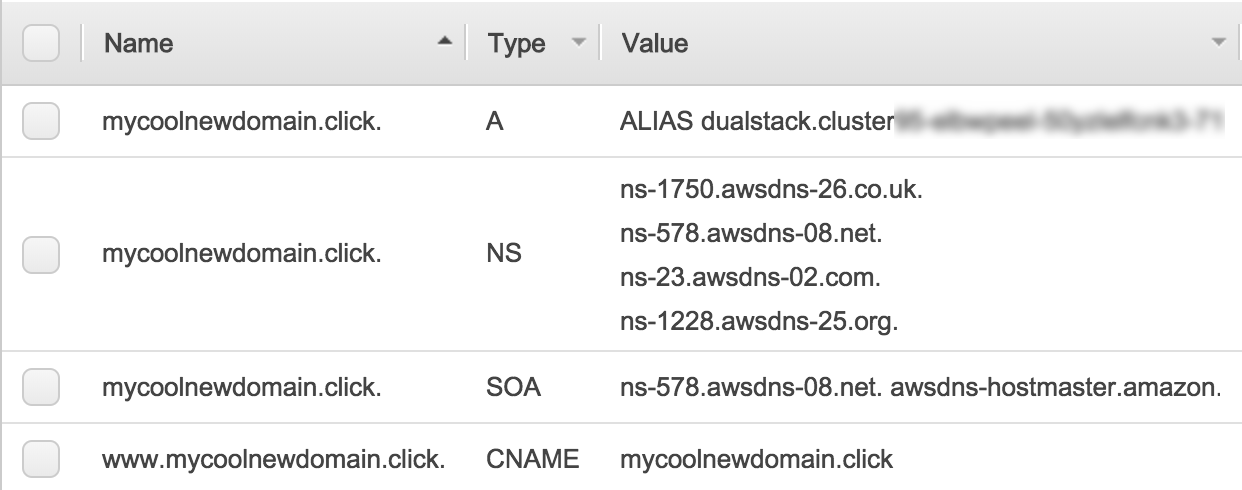
Now locate the “www” version of your domain in the list (www.mycoolnewdomain.click in our example) and ensure it is either set as a CNAME to your root domain, or that it is also aliased to the ELB domain.
Once your record changes propagate across the web, your DNS will be properly configured for your WP Engine domain.
NEXT STEP: Review our Going Live guide to ensure you haven’t missed any important steps